
There’s a moment every garlic grower knows — you’re standing over a row of fading stalks, fork in hand, wondering: is today the day?
Pull too soon and you’re left with marble-sized disappointment. Wait too long and the cloves burst from their wrappers like popcorn escaping the bag.
After years of growing garlic in my own backyard beds, I can tell you that nailing the harvest window is equal parts science and intuition — and it’s more forgiving than you think.
If you planted garlic last fall (or even this spring), this guide covers everything from reading your plants for harvest cues to curing bulbs that last deep into winter.
By the end, you’ll know exactly how to dig, dry, and store garlic so you rarely need to buy it from the grocery store again.
The Two Harvests: Scapes First, Bulbs Second
If you’re growing hardneck garlic, you actually get two harvests from a single planting.
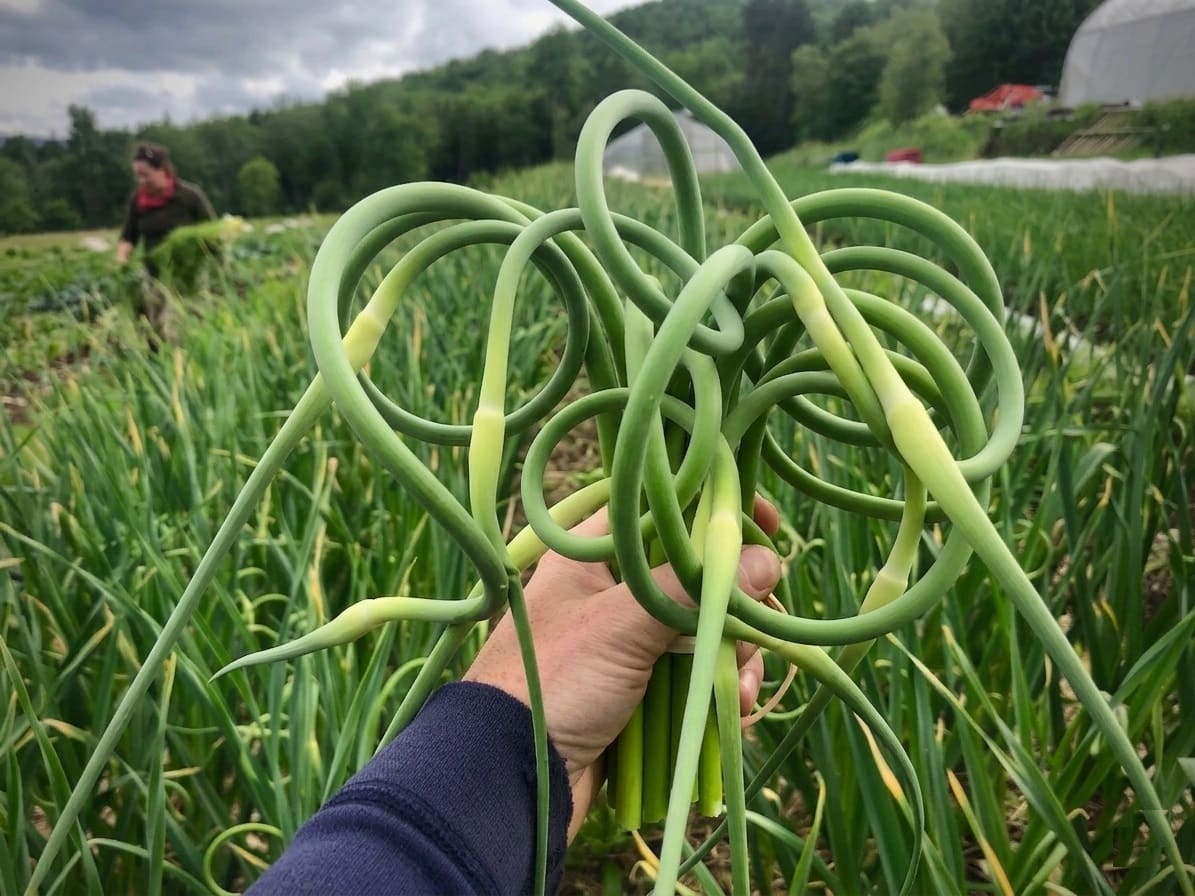
Before the bulbs are anywhere near ready, the plant sends up a curly stalk from its center called a garlic scape — a flower stem the plant produces to reproduce.
When and How to Harvest Scapes
Scapes typically appear in early to mid-June in most Northern Hemisphere gardens, though timing varies by zone.
You’ll recognize them easily: a slender, pale-green shoot that spirals upward from the middle of the plant, topped with a pointed capsule (sometimes called a “bulbil” or “elf hat”).
Snip them when the scape has formed a full loop or curl but before it straightens out. Once straight, scapes turn tough and bitter.
Cut at the base where they emerge from the stalk using clean scissors or garden shears.
Removing scapes redirects the plant’s energy into bulb development — some growers report up to 30% larger bulbs after scape removal.
But don’t toss them: scapes carry a mild, sweet garlic flavor that works beautifully in pesto, stir-fries, compound butter, or simply sautéed with olive oil.
Softneck varieties don’t produce scapes, so if you’re growing softneck garlic, skip ahead to the bulb harvest section.
👉 Related post: Should You Let Garlic Flower? Pros & Cons Explained
When to Harvest Garlic Bulbs: Reading the Signs
Unlike tomatoes ripening red on the vine, garlic hides underground. You can’t peek at the bulb without disturbing the plant. But the leaves tell you everything you need to know — if you understand their language.
Why Leaves Matter More Than Dates
Here’s the connection most new growers miss: every leaf above ground corresponds to a papery wrapper around the bulb below.
As a leaf dies, the wrapper it represents breaks down in the soil. Those wrappers are your garlic’s armor in storage — each one you lose means less protection against moisture and decay.
This is why garlic and onions require completely different harvest strategies. Onions can be left until all their tops die back naturally, and you can even knock the foliage over to speed things along.
👉 Find out Why Your Onions Are Flowering: Complete Guide to Preventing & Managing Bolting
Garlic is far less forgiving. Wait until all the leaves brown and your bulbs will be over-mature: cloves separating, wrappers deteriorating, and storage life cut dramatically short.
The sweet spot: Harvest when the bottom three to four leaves have turned brown and dry, but four to six green leaves remain up top — roughly 40–50% dieback, starting from the bottom.

For hardneck varieties, many experienced growers use a combined signal: about three to four weeks after cutting scapes, check the leaves. If the lower ones are browning while the top half stays green, you’re in the zone.
Softneck varieties follow the same leaf-reading principle, but since they don’t produce scapes, the dying-back foliage is your primary indicator.
A Critical Warning: Don’t Misread the Upper Leaves
If you notice yellowing tips or browning on the upper leaves while the lower leaves are still green, that’s not a harvest signal.
This pattern typically indicates nitrogen deficiency in the soil — a feeding problem, not a maturity cue.
Address it with a side-dressing of compost or a nitrogen-rich organic fertilizer for your next crop, but don’t let it trick you into pulling bulbs early.
👉 Learn How to Add Nitrogen to Soil: 18 Quick Fixes + Long-Term Solutions
Not All Varieties Ripen Together
If you’re growing multiple garlic varieties — and many gardeners do — don’t expect them all to be ready on the same day.
Artichoke-type softnecks tend to mature first, followed by Rocamboles, then Purple Stripes and Porcelains, with Silverskins often bringing up the rear.
A single garden can have a harvest window that spans four to six weeks across varieties. Check each type independently.
The Test Dig
No matter how carefully you read the leaves, the surest method is to dig up a single test bulb. Choose a healthy-looking plant from the middle of your row. Gently loosen the soil with a fork and pull it up.
Here’s what to look for:
- Cloves should be plump and well-defined, filling the skin snugly.
- The bulb wrappers should be intact — papery but not yet falling apart.
- If you slice the bulb in half crosswise, individual cloves should be clearly separated by thin skins (white or purple, depending on variety).

If the cloves still look like a solid mass without clear separation, give the crop another week.
Garlic experiences a rapid growth surge in its final three to four weeks before maturity — a few extra days can make a surprising difference in bulb size.
If the wrappers are already disintegrating and cloves are pulling apart, harvest immediately — you’re a touch late, but the garlic is still perfectly fine to eat.
Timing by Region
While leaf signals matter more than calendar dates, here’s a rough geographic guide for fall-planted garlic:
- Southern U.S. and warm climates: Late May through June
- Mid-Atlantic and Midwest (Zones 6–7): Late June through mid-July
- Northern U.S. and Canada (Zones 3–5): Mid-July through early August
- Australia and Southern Hemisphere: October through December, depending on variety and planting date
Unusually warm springs can push harvest earlier by a week or two. Cool, wet seasons may delay it. Let the plant — not the calendar — be your guide.
How to Harvest Garlic Without Damaging Your Crop
Garlic bulbs look tough but bruise surprisingly easily when freshly dug. Think of them the way you’d handle ripe peaches — any nick or gouge opens the door to decay and means that bulb goes straight to the kitchen rather than into storage.
Step 1: Stop Watering and Wait for Dry Conditions
Five to seven days before you plan to harvest, cut off irrigation. This jumpstarts the curing process while the bulbs are still in the ground and makes digging far easier.
Equally important: choose a dry day to dig. Harvesting from wet soil means muddy bulbs that are harder to cure and more prone to fungal problems.
If rain arrives during your pre-harvest dry-down period, wait for the soil to dry out before reaching for the fork.

Step 2: Loosen, Don’t Pull
Never yank garlic out by the stalk. The stem will snap off in your hand, leaving the bulb buried and now harder to find.
Instead, use a garden fork — not a shovel, which is more likely to slice through bulbs — inserted about four to six inches away from the base of the plant. Lever the soil upward gently.

Once loosened, grasp the plant near its base and lift the whole thing — roots, bulb, and leaves — out of the ground in one piece.

Shake off loose soil by hand, but don’t knock bulbs together or bang them against hard surfaces.
And don’t rinse them — introducing moisture now works against everything you’re about to do in the curing process.
Step 3: Get Them Out of the Sun
Lay harvested bulbs in a shaded area — a tray, a wheelbarrow, or on the ground under a tree — while you finish digging.
Unlike onions, which tolerate sun-drying in the field, garlic can sunburn, which deteriorates flavor and shortens shelf life. Move them to your curing setup promptly, ideally within a few hours.
If you accidentally damage any bulbs during harvest, set them aside. They’re not a loss — just dinner.
Freshly dug garlic is perfectly edible and many growers consider it a seasonal treat, with bright flavor and juicy cloves. Curing is only necessary for storage.
Curing Garlic: The Step That Makes Storage Possible
Curing is the slow drying process that transforms a moist, freshly dug bulb into the papery, shelf-stable head you see in stores.
As the garlic dries, the skin shrinks and tightens into a protective barrier against moisture and mold. Done well, curing can extend your garlic’s life from weeks to many months.
Setting Up Your Curing Space
Find a spot that’s dry, shaded, and well-ventilated. A covered porch, garage, carport, garden shed, or indoor room with a small fan all work well. Avoid damp basements, and steer clear of direct sunlight entirely.
You have two main options for arranging the garlic:
- Hanging method:
Bundle eight to ten plants together with twine, tied by the stalks, and hang them bulb-side down from rafters, hooks, or a clothesline.

- Rack method:
Lay plants in a single layer on a wire rack, old window screen propped on sawhorses, or any elevated surface that allows air to circulate underneath. Don’t pile bulbs — each one needs breathing room.

Leave the leaves, stems, and roots attached. The bulb continues drawing residual moisture and nutrients from the foliage as everything dries together.
If you’re in a humid climate, keep a fan running on low to maintain airflow, and watch the leaves — if they show any sign of mold, trim them off immediately before it can spread to the bulb.
👉 Learn How to Dehydrate Apples at Home: Easy Steps for Perfect Results
How Long Does Curing Take?
In warm, dry conditions, garlic can be fully cured in two weeks. In cool or humid climates, it may take six to eight weeks. A typical middle-ground: three to four weeks for most home gardeners.
Curing is complete when:
- The outer wrappers feel completely papery and dry
- The roots are shriveled and brittle
- The neck feels firm and dry with no moisture when squeezed
- A cut stem reveals little to no green inside

Cleaning and Trimming
Once cured, brush off remaining dirt with your fingers or a soft brush. Trim roots to about a quarter-inch.
Cut stems to one to two inches above the bulb — or leave them long for braiding if you’ve grown softneck varieties (braid while stems are still somewhat pliable).

Peel away only the dirtiest outer wrapper layers, keeping as many intact as possible. Every wrapper is another layer of shelf life.
Storing Garlic for the Long Haul
Ideal Conditions
Garlic stores best in a cool, dry, dark place with good air circulation. For most home gardeners, a pantry, unheated spare room, dry basement corner, or closet works well at typical room temperatures of 60–65°F (15–18°C).
For maximum longevity, aim cooler: 35–50°F (2–10°C) is the sweet spot where garlic stays dormant longest without sprouting.
The key is to avoid the refrigerator — its combination of cold and high humidity mimics autumn planting conditions that trigger garlic to sprout.
Peeled cloves can go in the fridge for short-term use (up to a week), but whole bulbs should stay out.
- Storage Containers
Choose breathable options: mesh bags, wicker baskets, brown paper bags, open crates, or even old nylon stockings. Avoid sealed plastic bags or airtight containers — trapped moisture is garlic’s worst enemy.

How Long Will It Last?
Storage life depends heavily on variety:
- Softneck varieties (Silverskins, Artichokes) are the storage champions, often lasting eight to twelve months under good conditions. Popular choices include California White, Inchelium Red, and Silver White.
- Hardneck varieties (Porcelains, Rocamboles, Purple Stripes) typically store for four to eight months. Porcelains tend to go the longest. Well-loved varieties include Music, German Extra Hardy, Chesnok Red, and Spanish Roja.
- Asiatic and Turban types have the shortest shelf life, often three to five months.
Check stored garlic every few weeks. Remove any bulbs showing soft spots, mold, or sprouting to prevent issues from spreading.
A note on elephant garlic: Despite the name, it’s actually a type of leek, not true garlic. It produces massive, mild-flavored cloves and stores similarly to hardneck varieties.
When Storage Isn’t Enough: Preservation Options
If you’ve grown a generous crop, you have options beyond curing:
1. Freezing works well. Freeze whole peeled cloves, minced garlic spread flat in a freezer bag (break off chunks as needed), or blended garlic pesto in ice cube trays. Texture softens after thawing, but flavor stays strong.
2. Dehydrating lets you make your own garlic powder or flakes — far more aromatic than store-bought.
3. A safety note on garlic-in-oil: Raw garlic stored in oil at room temperature creates conditions ideal for botulism. If you infuse oil with garlic, keep it refrigerated and use within a week.
Related posts:
- How to Make Lavender-Infused Oil at Home (Step-by-Step Guide)
- How to Make Comfrey Oil Safely (Cold & Fast Infusion Methods)
Save Your Best for Next Season
Select the largest, healthiest heads with the biggest cloves and set them aside as seed garlic for fall planting. Store them separately from your eating supply so they don’t get used by mistake.
Don’t bother saving small bulbs — small cloves produce small bulbs. This self-sustaining cycle means you may never need to buy seed garlic again.
Common Mistakes to Watch For
- Confusing leaf symptoms.
Not all yellowing means harvest time. Browning that starts from the top down, or yellow tips on otherwise healthy upper leaves, usually signals a nutrient problem — not maturity.
True harvest signals always begin at the bottom and progress upward.
- Losing patience — or losing track of time.
Garlic’s biggest growth spurt happens in the final three to four weeks. Pulling bulbs that still look like fat scallions means leaving significant size on the table.
On the flip side, garlic left too long can go from perfect to over-mature within a single week in warm weather. Once lower leaves start browning, check frequently.
- Curing in the wrong conditions.
The two most common curing failures: direct sunlight (which cooks bulbs and ruins flavor) and poor ventilation in humid environments (which invites mold). A small fan makes all the difference.
Frequently Asked Questions
- Can you eat garlic straight out of the ground?
Yes — it’s perfectly edible and many growers consider it a seasonal treat. The cloves will be moister and harder to peel, but the flavor is bright. Curing is only necessary for long-term storage.
- What happens if I forgot to cut the scapes?
The bulbs may be somewhat smaller, but they’re still fine. The uncut scape will eventually flower and produce tiny bulbils.
Some growers intentionally leave a few to collect bulbils for planting — though it takes two to three years to grow a full bulb from one.
- My garlic bulbs came out small. What went wrong?
The most common culprits: harvesting too early, insufficient soil fertility, overcrowding, inadequate watering during growth, or planting small cloves.
Ironically, high-nitrogen fertilizers like pelleted chicken manure can make things worse by promoting leaf growth at the expense of bulbs — opt for compost and bone meal instead.
- Can I plant garlic from the grocery store?
It’s possible but not recommended. Supermarket garlic is often treated with sprout inhibitors and may carry diseases unsuited to your region.
Source seed garlic from a local nursery, farmers’ market, or reputable online supplier — or save cloves from your own harvest.
- How do I know if stored garlic has gone bad?
Discard garlic that’s turned soft, mushy, or brown inside, or shows visible mold. Sprouted garlic is still safe if the flesh is firm — though the green shoot may taste slightly bitter.
When garlic starts sprouting in late winter, that’s your cue to use it up quickly or freeze the remainder.
- Is there a difference in curing hardneck vs. softneck?
The process is identical. The practical difference comes afterward: softneck stems stay flexible, making them ideal for braiding into decorative storage strands.
Hardneck stems dry stiff and brittle, so they’re trimmed and bulbs stored in bags or baskets.
Key Takeaways
- Read the leaves from the bottom up. Harvest when the lower third to half has browned, with several green leaves still standing.
- Always dig, never pull. Use a garden fork inserted several inches from the plant.
- Choose a dry day and stop watering five to seven days beforehand.
- Cure for three to four weeks in a dry, shaded, ventilated spot with leaves attached.
- Store in a cool, dry, dark place with good airflow — never the fridge for whole bulbs.
- Save your biggest bulbs for replanting in fall.
Growing your own garlic is one of the most satisfying things you can do in a garden.
From the first green shoots pushing through spring mulch, to the treasure-hunt thrill of unearthing plump bulbs in midsummer, to the quiet pride of reaching for your own garlic in January — it’s a cycle worth repeating every year.
So grab your fork, trust the leaves, and enjoy the harvest.
Got a garlic harvesting tip or question? Share it in the comments below — and if this guide helped you, pass it along to a fellow gardener who’s about to dig their first crop!
I sell lots of hardneck garlic (200 bulbs) at the Farmers’ Market and save cloves for next year. I have, recently, interplanted corn — one kernel every foot — with garlic and can harvest garlic when corn is a month old. I am concerned that forking garlic will injure the corn. Do you have any advice or knowledge that will inform this interplanting, space saving practice. I grow garlic and corn at 6500 feet above sea level in Gallup, NM.
Great question — and what a smart use of space! 200 bulbs at the Farmers’ Market is no small operation, especially at 6,500 feet in Gallup. Love that you’re pushing the boundaries with interplanting.
Your concern about the fork damaging corn roots is totally valid. Here’s what I’d try: instead of forking directly next to the corn, come at the garlic from the side away from the nearest corn stalk. Angle the fork so you’re loosening soil toward the open space rather than toward the corn’s root zone. At one-foot spacing, you’ve got a tight window, but garlic roots don’t run that deep — a shallow, gentle lever from the far side should do the trick.
A few other thoughts that might help:
– If your soil stays loose (sounds like it might at your elevation with that dry climate), you may be able to skip the fork entirely for some bulbs and just ease them out by hand after wiggling the stalk gently. I’ve had luck with this in sandier, well-amended beds.
– You could also try a slim hand trowel or a hori-hori knife instead of a full garden fork — less soil disruption, more precision. Think surgeon’s scalpel vs. sledgehammer.
– Timing-wise, the fact that your corn is only a month old actually works in your favor. At that stage the root system is still relatively shallow and compact. You’d have a much bigger problem if the corn were knee-high or taller.
I’d be curious to hear how this season goes for you — it’s the kind of real-world experiment that other growers can learn from. Keep us posted!