
That moment when you finally work up the courage to take scissors to your beloved plant—and discover the magic of creating new life from a simple cutting.
I still remember staring at my overgrown pothos for what felt like hours, scissors in hand, absolutely terrified to make that first cut. What if I killed it? What if I chose the wrong spot? The plant had been trailing beautifully across my bookshelf for months, but those bare stems at the base were crying out for some fresh, bushy growth.
Three weeks later, watching those first tiny white roots emerge from the cutting in my kitchen windowsill was nothing short of magical.
That single moment of courage had given me not just one new plant, but an entirely new obsession—and the confidence to turn my modest plant collection into what my friends now lovingly call “the greenhouse that used to be Sarah’s living room.”
If you’ve been hovering on the edge of the propagation world, wondering if you can really grow new plants from water and a few cuttings, I’m here to tell you: you absolutely can. Water propagation is not only one of the most rewarding gardening techniques you’ll ever learn, but it’s also surprisingly forgiving and incredibly fun to watch unfold.
The Science Behind the Magic: Why Water Propagation Works
Water propagation succeeds because of plants’ remarkable survival instincts. When you cut a stem from the parent plant, you’re essentially creating a crisis situation. The cutting realizes it’s been separated from its root system and kicks into survival mode, redirecting energy toward growing new roots as quickly as possible.
The key lies in plant hormones called auxins, which naturally concentrate at cut sites and stimulate root cell division. In water, these hormones remain active and accessible, while the constant moisture provides the ideal environment for delicate new root tissues to develop without the stress of seeking water in soil.
Here’s How to Make Willow Water: The Best Natural Rooting Hormone
Water propagation is essentially plant cloning—you’re creating a genetically identical copy of your parent plant. Unlike growing from seeds (which can be unpredictable with hybrid plants), cuttings give you exactly what you expect: the same beautiful variegation, the same growth pattern, the same personality as the original.
The advantages that make water propagation irresistible:
Water propagation offers several compelling benefits over other methods. First, you can actually see what’s happening—no more anxiously wondering if anything is developing beneath the soil surface. The clear containers let you monitor progress and catch problems early.
It’s also incredibly low-maintenance compared to soil propagation; there’s no worry about the right moisture balance or fungal issues that commonly plague soil-based methods.
Learn about Optimal Soil Temperatures for Seed Germination: A Gardener’s Guide
The controlled environment eliminates many variables that can derail propagation attempts. You won’t deal with soil-borne pathogens, pest issues, or moisture inconsistencies.
Perhaps most importantly for beginners, water propagation is remarkably forgiving—if something goes wrong, you can usually see it happening and take corrective action before losing your cutting entirely.
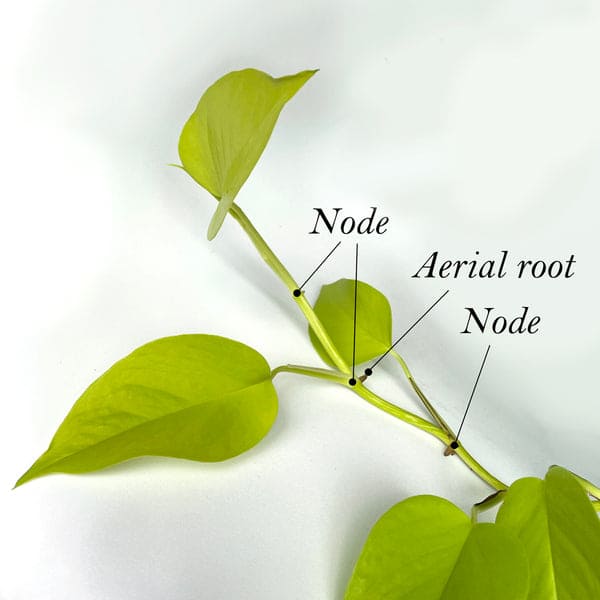
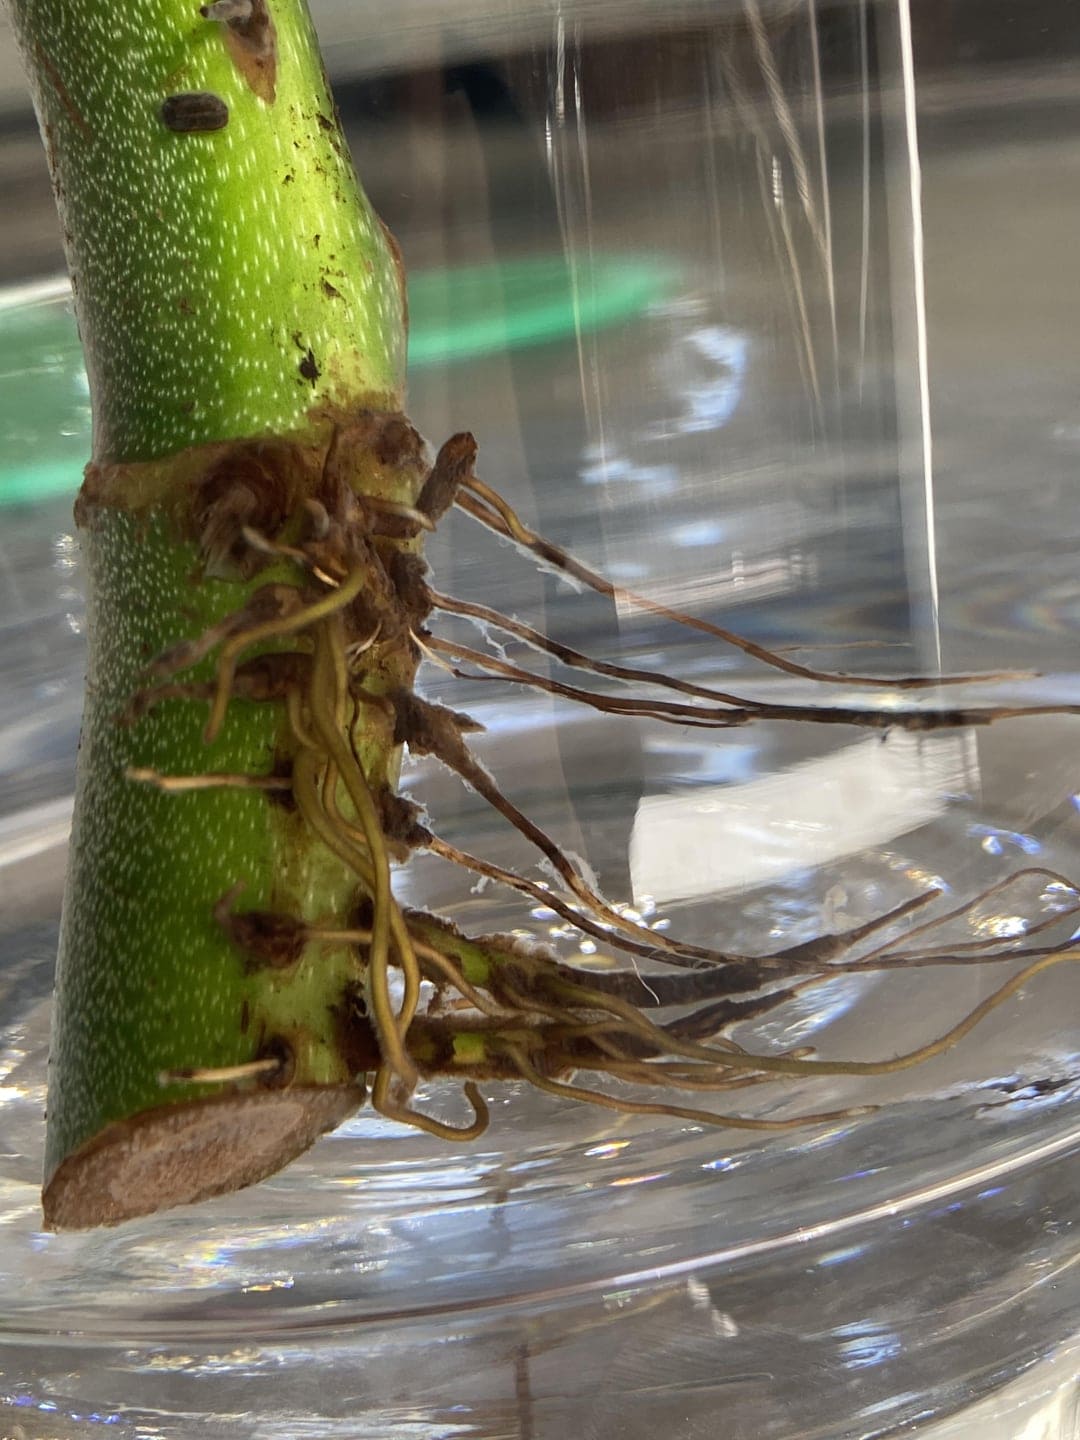
Getting to Know Your Plant’s Anatomy: The Node Detective Guide
Before you can become a propagation pro, you need to understand the star of the show: the node. Think of nodes as tiny factories where all the plant’s growth happens—roots, leaves, and new stems all originate from these small but mighty points.
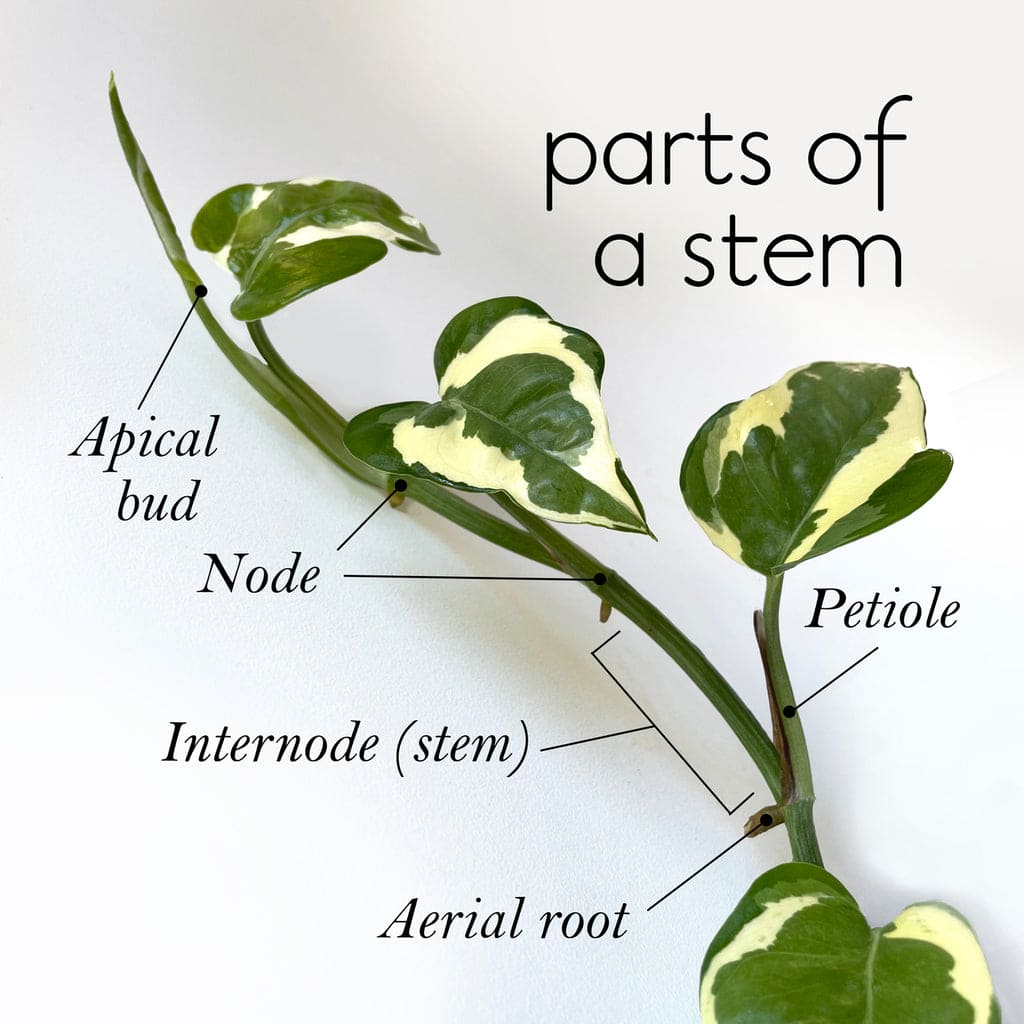
Finding the nodes on different plant types:
On trailing plants like pothos and philodendrons, nodes appear as small bumps or raised rings around the stem, usually located just below where each leaf attaches. Sometimes you’ll even see little aerial roots already starting to emerge—these are propagation gold mines that give your cutting a head start.
Read the Philodendron Imperial Red Care Guide: Growing Tips & Care Instructions
For upright plants like monsteras, nodes are slightly swollen areas of the stem where the leaf petiole (leaf stem) connects. They might not be as obvious as on trailing plants, but they’re always there at the junction points.
Here’s a little trick I learned after months of uncertain cutting: if you’re ever unsure whether you’ve found a node, look for the growth pattern. Nodes are always positioned where the plant could potentially send out new growth—at leaf junctions, stem intersections, or anywhere the plant naturally segments.
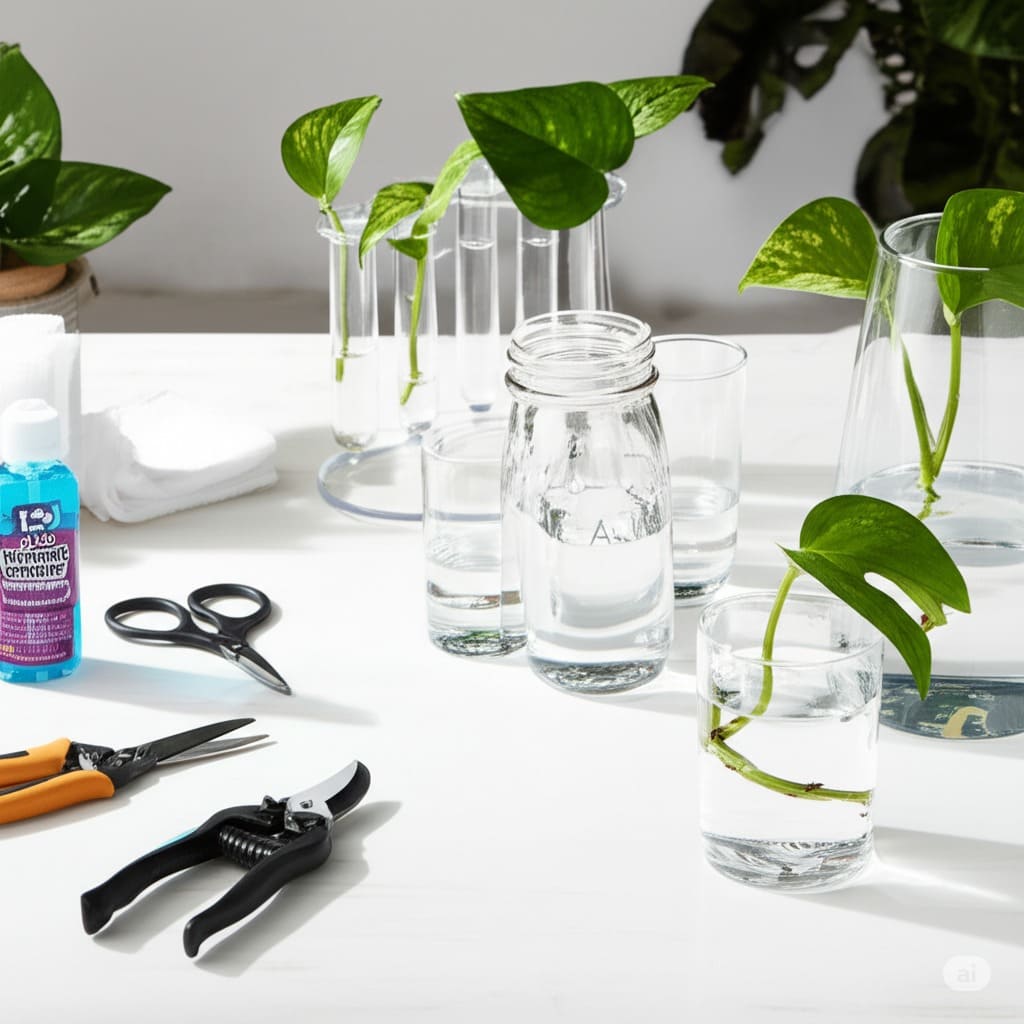
The Essential Water Propagation Toolkit
One of the beauties of water propagation is how little equipment you actually need. I’ve successfully rooted cuttings in everything from fancy propagation stations to repurposed pasta sauce jars—the plants really aren’t picky about luxury accommodations.
Your complete toolkit:
Sharp, clean cutting tools are non-negotiable. I prefer small pruning shears for woody stems and sharp scissors for softer growth. The key is keeping them sterile—I always wipe mine down with 70% rubbing alcohol before each cutting session to prevent spreading any potential diseases between plants.
For containers, clear glass works best so you can monitor root development, but the size and shape matter more than you might think.
Choose containers that are proportional to your cutting—you want the nodes submerged but the container shouldn’t be so large that the cutting drowns in excessive water. A good rule of thumb is that the container should be 2-3 times the width of your cutting.
Container recommendations by cutting type:
- Small herbs and trailing plants: Regular drinking glasses or mason jars
- Single large cuttings: Small vases or wide-mouth bottles
- Multiple cuttings: Propagation stations with individual tubes
- Long vine sections: Shallow bowls or wide containers
Room temperature water (65-75°F) is perfect for most plants. While some people swear by filtered water, I’ve had excellent success with regular tap water left out overnight to let chlorine evaporate and reach room temperature.
Optional rooting hormone can significantly speed up the process and improve success rates. Both powder and gel forms work well—gel adheres better to wet stems, while powder is easier to apply to multiple cuttings.
Here’s How to Use Honey as a Natural Rooting Hormone for Cuttings
The Step-by-Step Water Propagation Process
Step 1: Choose Your Cutting Strategically
Select a healthy stem that includes at least one node—preferably two or three for better success rates. The cutting should be 4-6 inches long for most plants, with several healthy leaves attached. Look for stems that are neither too young (weak and prone to rot) nor too mature (slow to root).
Avoid any stems that look stressed, diseased, have yellowing leaves, or have been recently damaged. The best cuttings come from plants that are actively growing and in good health.
I always take multiple cuttings when propagating, partly because not every attempt succeeds (even experienced propagators have failures), and partly because there’s something wonderfully abundant about creating several new plants at once.
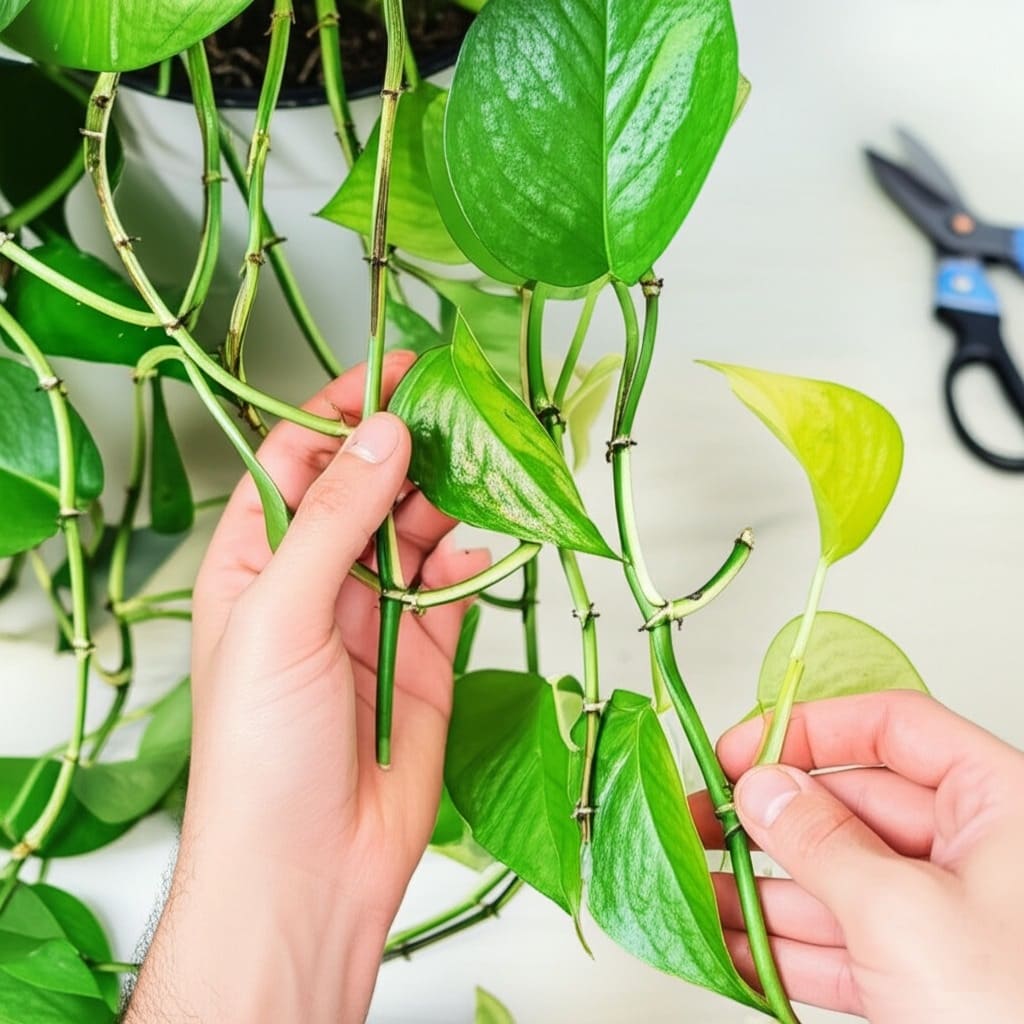
Step 2: Make the Perfect Cut
Using your clean, sharp tools, cut at a 45-degree angle about a quarter-inch below a node. This angled cut increases the surface area available for water absorption and root development while preventing the cut end from sitting flat against the container bottom, which can impede root growth.
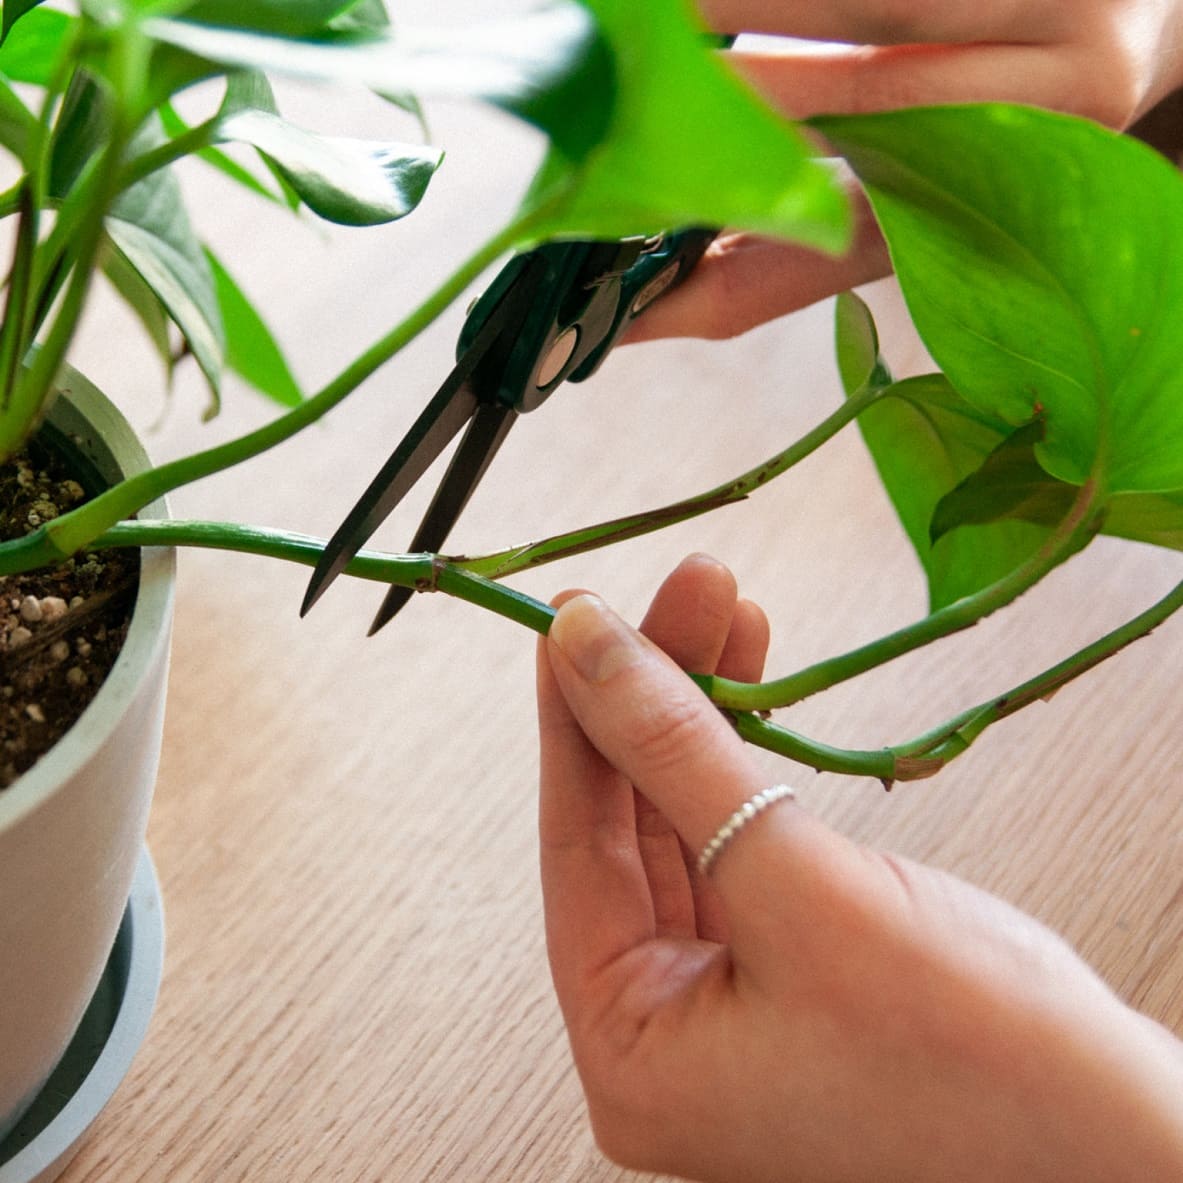
If you’re working with a long vine, you can create multiple cuttings by cutting below each node along the stem. Each section should include at least one node and preferably 2-4 leaves.
Step 3: Prepare Your Cutting
Remove any leaves that would sit below the waterline—submerged leaves will rot within days and create bacterial problems that can kill your entire cutting. Leave the top 2-4 healthy leaves to continue photosynthesis and fuel root development.
If your cutting has flowers or flower buds, remove these too. While it might feel harsh, flowers drain tremendous energy that your cutting needs to focus on growing roots instead of supporting blooms.
For cuttings with very large leaves, you can trim the leaves in half to reduce water loss while maintaining enough leaf surface for photosynthesis.
Step 4: Optional Rooting Hormone Application
While not essential for easy-to-root plants like pothos or tradescantia, rooting hormone can dramatically speed up the process and improve success rates for more challenging species.

Application technique: Dip the bottom inch of your cutting into the hormone, ensuring the cut surface and any exposed nodes are covered. Gently tap off excess powder or allow excess gel to drip off. Too much hormone can actually inhibit root development.
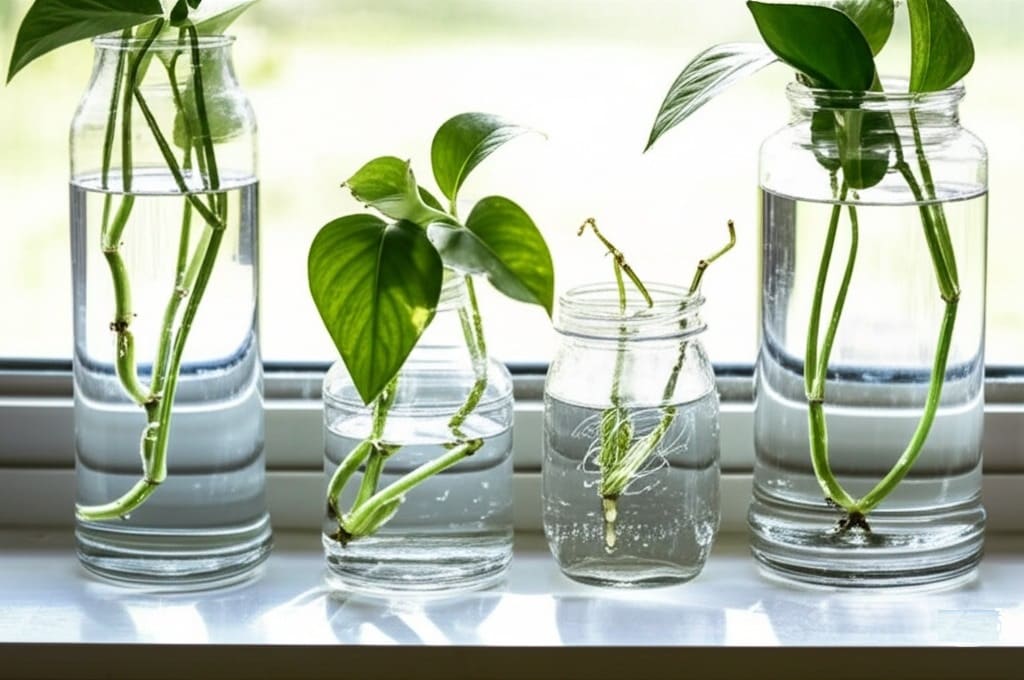
Step 5: The Water Setup
Place your prepared cutting in your chosen container and add enough room-temperature water to submerge the nodes while keeping all leaves above the waterline. The water level should cover the bottom 1-2 inches of the stem, depending on where your nodes are located.
If you’re propagating multiple cuttings in one container, ensure they have enough space and aren’t crowding each other. Overcrowding leads to poor air circulation and increased disease risk.
Position your propagation station in bright, indirect light. A spot that gets morning sun but afternoon shade is ideal—think of the dappled light under a tree canopy. Avoid direct sunlight, which can overheat the water and stress the cutting, and deep shade, which slows root development.
Environmental considerations:
- Temperature: 65-75°F is optimal
- Humidity: Normal household humidity is fine
- Air circulation: Gentle air movement helps prevent stagnation
The Waiting Game: What to Expect During Propagation
- Week 1-2: The Calm Before the Growth
Don’t panic if nothing visible seems to be happening during the first couple of weeks. Your cutting is busy developing the internal processes needed for root production. The plant is redirecting energy, producing hormones, and preparing cells for transformation into root tissue.
Keep the water level consistent and watch for any signs of rot (brown or black stem sections) or decline (yellowing leaves beyond normal adjustment stress).
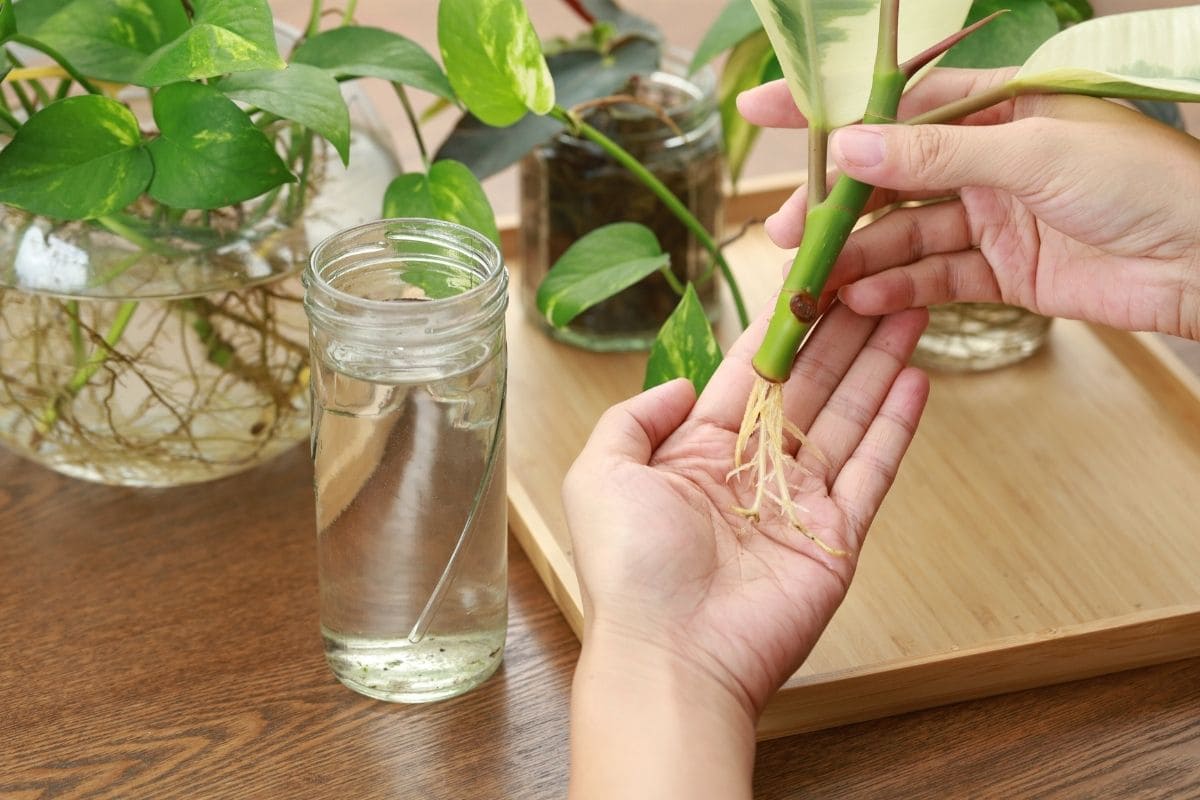
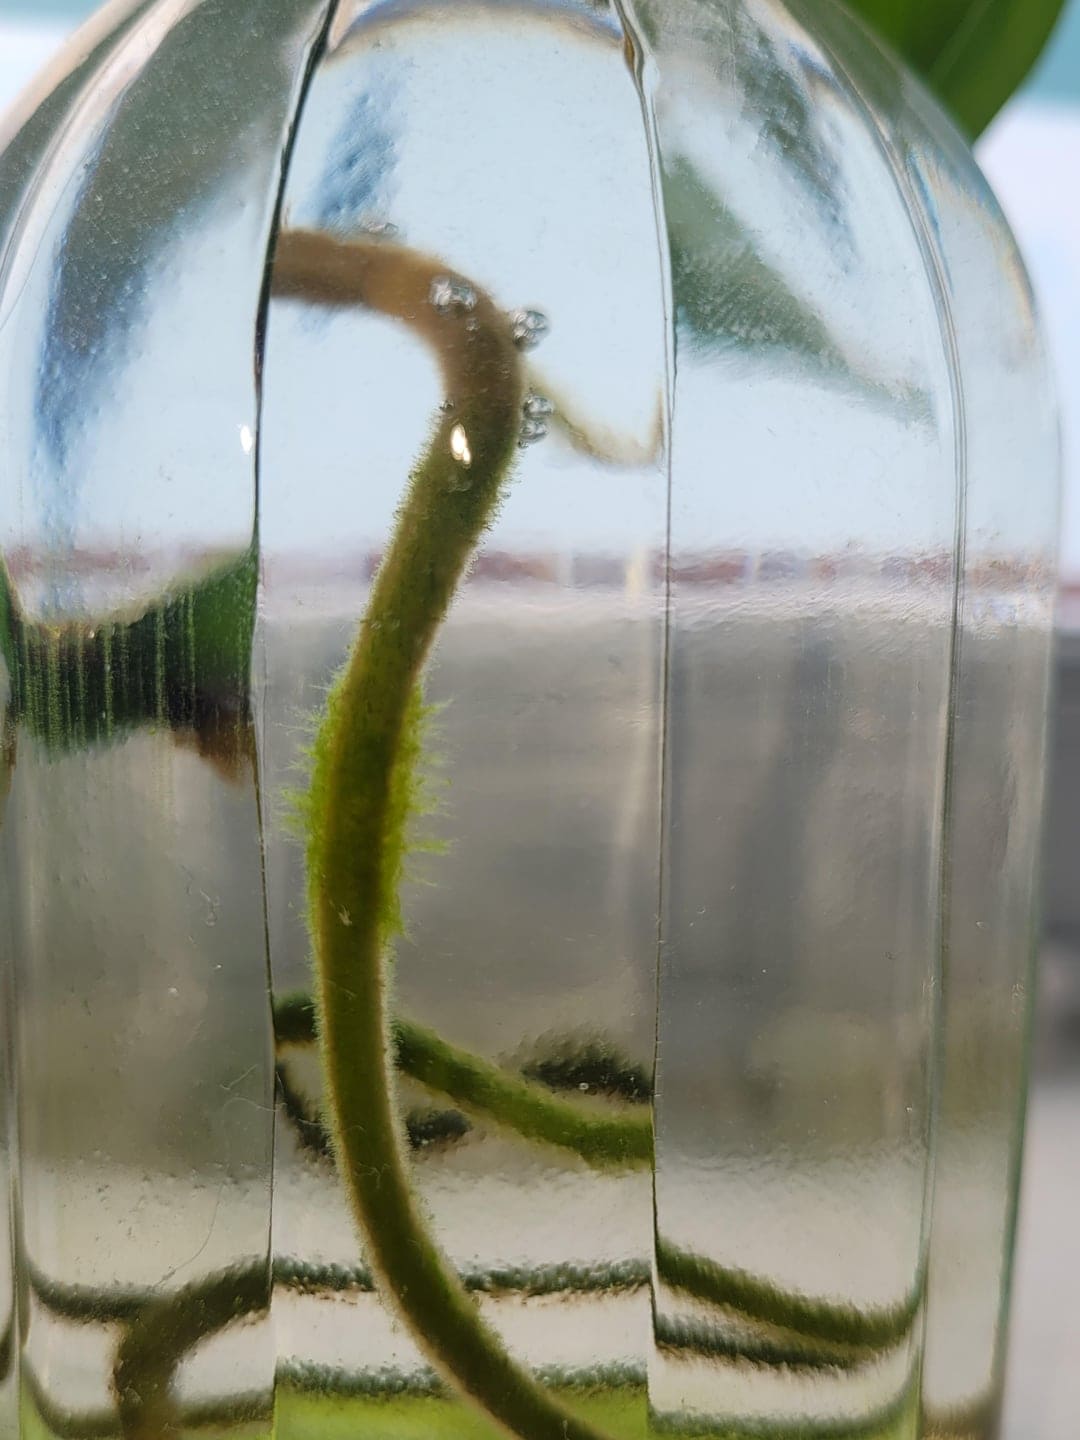
- Week 3-4: Root Emergence
This is when the magic starts! You’ll begin to see tiny white root nubs emerging from the nodes. These first roots are incredibly delicate, so avoid disturbing the cutting unnecessarily. Even gently moving the container can damage fragile new root tips.
- Week 5-8: Root Development
Root systems will become more substantial and may begin branching into secondary roots. This is also when you might notice new leaf growth starting, which is an excellent sign that your propagation is thriving and ready to support new growth.
Timeline expectations by plant type:
- Fast rooters (pothos, tradescantia, coleus): 5-14 days
- Medium rooters (philodendron, begonia, mint): 2-4 weeks
- Slow rooters (fiddle leaf fig, rosemary, woody herbs): 6-12 weeks
Patience is truly a virtue in the propagation world. I’ve had some plants surprise me by rooting in just days, while others took months to show their first roots.
Water Maintenance: Keeping Your Cuttings Happy
The biggest key to successful water propagation is maintaining clean, oxygenated water. I change the water completely once a week as a standard practice, though you can get away with just topping off if the water still looks crystal clear and fresh.
Weekly water change procedure:
- Gently remove cuttings from container
- Rinse roots under lukewarm water to remove any film or debris
- Clean container with soap and water, rinse thoroughly
- Refill with fresh room-temperature water
- Replace cuttings, ensuring proper water levels
This simple routine prevents bacterial buildup that could lead to root rot and ensures your cuttings have access to fresh oxygen dissolved in the water.
Signs your water needs immediate attention:
- Cloudiness or discoloration
- Unpleasant smell (should be odorless)
- Slimy film on roots or container walls
- Algae growth (green tinge or fuzzy growth)
- Foam or bubbles on the surface

If you notice any of these issues, change the water immediately and consider whether your propagation station might be getting too much direct light, heat, or is in a location with poor air circulation.
Plant Personalities: Which Species Excel in Water
The Water Propagation All-Stars:
Aroids (the Araceae family) are the undisputed champions of water propagation. This includes pothos, philodendrons, monsteras, and syngoniums—all of which evolved from swamp-dwelling ancestors and naturally adapted to thrive in wet conditions.
You may like:
- Monstera Standleyana Care Guide: Tips for a Thriving Philodendron Cobra Plant
- How to Care for Manjula Pothos: Tips for Beginners & Pros
- How to Care for Philodendron Selloum: Complete Growing Guide For Beginners
These plants have specialized aerial roots and can transition between water and soil environments with remarkable ease.
Tradescantia (inch plant) propagates so easily in water that you can almost watch the roots grow. I’ve successfully rooted pieces that broke off accidentally just by tossing them in a glass of water.
Many culinary herbs are excellent water propagation candidates. Basil, mint, oregano, and rosemary all root readily, though woody herbs like rosemary take significantly longer than soft-stemmed varieties.
Medium difficulty plants (require more patience):
- Begonias: Root well but slowly
- Ficus varieties: Possible but prefer warm conditions
- Geraniums: Work better with semi-woody cuttings
- Lavender: Very slow but eventually successful
Plants That Prefer Soil Propagation:
Succulents and cacti are generally poor candidates for water propagation. Their water-storing tissues are extremely prone to rot in constantly moist conditions, and they’ve evolved to thrive in well-draining environments.
Most woody plants like ficus or rubber trees can be propagated in water, but they often perform better with soil methods, air layering techniques, or specialized propagation mediums.
Advanced Tips and Troubleshooting
The Pothos Propagation Hack:
Here’s a secret weapon I discovered by accident when I ran out of individual containers: adding a small pothos cutting to any propagation container helps other, more difficult plants root faster. Pothos naturally releases auxins (rooting hormones) into the water, creating a beneficial environment for neighboring cuttings.
This technique works particularly well for slower-rooting plants like begonias or woody herbs. Just make sure the pothos cutting is healthy and change the water regularly to prevent overcrowding effects.
Discover the Rugged Charm of Begonia ‘Ferox’: A Beginner’s Guide to Growing the Troll Begonia
Dealing with Root Rot:
If you notice brown, mushy, or translucent stems, act quickly. Remove the cutting from water immediately and assess the damage. Using sterile scissors, trim away all rotted portions, cutting back to healthy, firm tissue.
You can dip the freshly cut end in diluted hydrogen peroxide (equal parts 3% hydrogen peroxide and water) for 10 seconds to kill bacteria, then place in fresh, clean water. Success isn’t guaranteed, but many cuttings can recover from early-stage rot.
Encouraging Faster Root Development:
Warmth significantly speeds up root development. During cooler months, I place my propagation containers on top of the refrigerator or near other warm (but not hot) appliances. The ideal temperature range is 70-75°F.
You can also purchase heating mats designed specifically for plant propagation, which maintain consistent gentle warmth from below. Avoid placing containers near heating vents or radiators, which create hot, dry conditions that stress cuttings.
Dealing with Algae Growth:
Green algae in propagation containers is common, especially in bright light conditions. While not immediately harmful to your cuttings, algae competes for nutrients and can eventually overwhelm young root systems.
Prevention is better than treatment: use opaque containers or position clear containers where they receive bright light but no direct sun. If algae develops, rinse everything thoroughly and consider moving to a slightly shadier location.
Making the Transition: From Water to Soil
Timing the Move:
The sweet spot for transplanting is when roots are 1-3 inches long and beginning to show secondary branching. This typically occurs 4-8 weeks after initial root emergence, depending on the plant species and environmental conditions.
If you wait too long, water roots become increasingly specialized for aquatic conditions and have a more difficult time adapting to soil environments. However, don’t rush the process—inadequate root development leads to transplant failure.
The Transplant Process:
Choose a pot only slightly larger than the root system—oversized containers hold too much moisture and can lead to root rot. Fill with high-quality, well-draining potting mix (never garden soil, which is too heavy and poorly draining for container growing).
Create a planting hole slightly larger than the root ball, gently place the rooted cutting, and backfill with soil. Water thoroughly until water drains from the bottom, then allow the top inch of soil to dry before watering again.
Post-transplant care:
- Keep in the same lighting conditions for 1-2 weeks
- Monitor soil moisture closely—newly transplanted cuttings are sensitive to both drought and overwatering
- Watch for signs of transplant shock (wilting, yellowing leaves) and adjust care accordingly
- Gradually introduce to final growing conditions over 2-3 weeks
Long-Term Water Growing: The Hydroponic Option
Not every cutting needs to graduate to soil. Many plants can live happily in water indefinitely with proper care and nutrition. I have a magnificent pothos that’s been thriving in water for over a year, adding a living sculpture element to my kitchen while producing cascading growth that would make any soil-grown plant jealous.
Keys to successful long-term water growing:
- Change water weekly without fail
- Add diluted liquid fertilizer every 2-4 weeks during growing season (March-September)
- Use a balanced, water-soluble fertilizer at 1/4 strength
- Monitor for algae and bacterial growth more vigilantly
- Ensure adequate light and air circulation
- Trim back excessive growth to maintain plant health
Best candidates for permanent water growing:
- Pothos (all varieties)
- Heartleaf philodendron
- Tradescantia
- Chinese evergreen
- Lucky bamboo
- Spider plant babies
Seasonal Considerations and Timing
Spring and early summer (March through July) are prime propagation seasons when plants are actively growing and root development happens fastest. Longer daylight hours, warmer temperatures, and increased plant hormonal activity all contribute to higher success rates.
Seasonal adjustments:
- Spring/Summer: Expect faster rooting, more vigorous growth, and higher success rates. This is the ideal time to attempt challenging propagations or try new species.
- Fall: Still excellent for propagation, especially for overwintering tender plants like coleus or geraniums. Take cuttings before first frost threatens outdoor plants.
- Winter: Slower root development due to lower light levels and cooler temperatures. Consider using grow lights or heating mats. Allow extra time for root development—what takes 3 weeks in summer might take 6-8 weeks in winter.
- Summer propagation for winter houseplants: Many gardeners take cuttings of outdoor annuals in late summer to grow as houseplants through winter. Geraniums, coleus, and begonias all transition well to indoor water propagation.
Common Mistakes That Can Sabotage Your Success
- Using Contaminated Tools: Always clean your cutting tools between plants. I learned this lesson the hard way when a fungal infection spread through an entire batch of fifteen cuttings from one contaminated pair of scissors. Now I keep a small container of rubbing alcohol specifically for tool sterilization.
- Overcrowding Containers: While it’s tempting to root multiple cuttings together to save space, overcrowding leads to poor air circulation, increased disease risk, and competition for resources. Give each cutting adequate space to develop—generally 2-3 inches between stems.
- Ignoring Environmental Conditions: Temperature extremes, excessive direct light, or stagnant air can all derail propagation efforts. Consistent, moderate conditions yield the best results. I keep a min/max thermometer near my propagation station to monitor temperature fluctuations.
- Impatience with Slow Rooters: Some plants simply take longer than others, and there’s no rushing the process. I’ve had lavender cuttings take three months to show significant root development, but the wait was absolutely worth it. Disturbing slow-developing cuttings often sets them back further.
- Forgetting About Lighting Needs: Too little light slows root development and weakens cuttings, while too much direct light can overheat water and stress plants. The goldilocks zone is bright, indirect light—enough to drive photosynthesis but not so intense as to cause heat stress.
Explore 36 Shade-Loving Herbs and Vegetables That Grow With Less Sunlight
Frequently Asked Questions
- Q: How long can I keep cuttings in water before they need to be planted?
A: Most cuttings should be transplanted within 6-8 weeks of developing substantial roots for optimal soil adaptation. However, many plants can survive much longer with proper care and feeding. Some, like pothos and philodendron, can live indefinitely in water with regular fertilizing.
- Q: Why are my cuttings rotting instead of rooting?
A: Root rot usually results from bacterial contamination, stagnant water, submerged leaves, or poor environmental conditions. Ensure you’re using clean tools and containers, changing water weekly, keeping all foliage above the waterline, and providing appropriate light and temperature conditions.
- Q: Can I propagate any plant in water?
A: While many plants can be water propagated, some (particularly succulents, cacti, and very woody plants) respond better to other methods. Soft-stemmed plants with visible nodes tend to be the most successful candidates. Research your specific plant species for best results.
- Q: Should I fertilize my water propagations?
A: Generally, fertilizer isn’t necessary during the initial rooting phase, as the cutting has stored energy for root development. However, if you plan to keep plants in water long-term or notice yellowing leaves after several weeks, diluted liquid fertilizer (1/4 strength) can be beneficial.
- Q: What’s the ideal water temperature for propagation?
A: Room temperature (65-75°F) is perfect for most plants. Avoid hot or cold water, which can shock the cuttings and inhibit root development. If your home is cool, gentle bottom heat from a propagation mat can accelerate rooting.
- Q: My water keeps getting cloudy. What am I doing wrong?
A: Cloudy water typically indicates bacterial growth, often caused by submerged leaves, infrequent water changes, or contaminated containers. Remove any plant material below the waterline, increase water change frequency to every 3-4 days, and ensure your containers are thoroughly cleaned between uses.
Your Propagation Journey Starts Now
Looking back at that first nervous cutting session with my pothos, I realize that moment changed not just my plant collection but my entire relationship with gardening.
There’s something profoundly satisfying about creating life from what initially appears to be destruction—watching a simple cutting transform into a thriving plant through nothing more than water, light, and patience.
Water propagation taught me observation skills I never knew I had, patience I didn’t think I possessed, and confidence to experiment with increasingly challenging projects.
It showed me that with just a little knowledge and care, I could multiply my favorite plants endlessly—creating gifts for friends, expanding my own collection, and developing the intuition that comes from truly understanding how plants grow.
Every expert propagator started exactly where you are now: holding scissors, taking a deep breath, and making that first tentative cut. Your plants are more resilient than you think, more forgiving than you fear, and more eager to grow than you imagine. Success builds on success, and your confidence will grow with each new root that emerges.
The best time to start propagating was last month. The second-best time is right now. Choose a trailing plant with visible nodes, grab a clean glass jar, fill it with room-temperature water, and take that first exciting step into the wonderful world of plant propagation.
Your future self—surrounded by dozens of thriving plants you grew yourself, sharing cuttings with friends, and confidently tackling propagation challenges that seem daunting today—will thank you for starting this journey now.
Ready to dive deeper into the propagation world? Consider experimenting with different rooting mediums like perlite or coconut coir, trying air layering techniques for woody plants, or exploring the fascinating realm of tissue culture.
The journey from nervous beginner to propagation master is one of the most rewarding paths in gardening, filled with surprises, successes, and the occasional learning experience that makes the victories even sweeter.