
There’s something undeniably special about the vibrant burst of chrysanthemums brightening our homes and gardens during the autumn months. These colorful blooms, affectionately known as “pot mums,” have become synonymous with fall decorating and bring a welcome splash of color just as many other garden flowers begin to fade.
Whether you’re a seasoned gardener or someone who simply appreciates beautiful blooms, pot mums offer an accessible way to enjoy stunning flowers with relatively minimal effort.
As someone who has grown pot mums for years, I’ve watched these remarkable plants transform my fall garden and home with their cheerful presence. I still remember my first experience with chrysanthemums – a gift from my grandmother who insisted they were the most reliable fall flowers.
She was right! That first autumn, I placed a single yellow mum on my apartment balcony, and the way it thrived despite my novice gardening skills sparked a lasting appreciation for these resilient plants.
In this comprehensive guide, I’ll share everything you need to know about selecting, growing, and caring for pot mums, drawing from both horticultural expertise and personal experience to help you enjoy these beautiful plants to their fullest potential.
What Are Pot Mums?
Pot mums, or potted chrysanthemums, are specially cultivated versions of garden chrysanthemums (Chrysanthemum morifolium) that have been treated and bred to remain compact and flower abundantly in containers.
While garden chrysanthemums can reach heights of 3 feet or more in landscape settings, pot mums are kept smaller, typically reaching only 12-18 inches in height and spread.
A Brief History
Chrysanthemums have an impressive lineage dating back over 2,500 years. Originally cultivated in China as early as the 15th century BCE, chrysanthemums hold significant cultural importance in many Asian countries.
In Japan, the chrysanthemum (kiku) is so revered that it appears on the Imperial Seal, while in China, it symbolizes autumn and longevity.
These flowers made their way to Europe in the 17th century and eventually to North America, where they’ve become one of the most popular flowering plants. The modern pot mum varieties we enjoy today are the result of extensive breeding programs designed to create compact plants with extended blooming periods and diverse flower forms.
Garden Mums vs. Florist Mums
It’s important to understand the distinction between two main types of chrysanthemums:
- Garden Mums (Hardy Mums):
These perennial varieties are bred for garden planting and can survive winters in USDA hardiness zones 5-9. They typically bloom in late summer through fall and can return year after year when planted in the ground.

- Florist/Pot Mums:
These varieties are primarily grown as temporary decorative plants. They’ve been treated with growth regulators and special lighting to control their size and flowering time.
While technically perennials, pot mums are often treated as seasonal decorations and discarded after blooming. However, with proper care, some varieties can be kept as perennials in milder climates.
Selecting the Perfect Pot Mum
When shopping for pot mums, timing and selection make all the difference in how long you’ll enjoy their beautiful blooms.
When to Buy
The ideal time to purchase pot mums is when they’re showing color but still have plenty of unopened buds. This ensures you’ll get the maximum bloom time from your plant.
For fall displays, look for mums at garden centers and nurseries starting in late August through September. If you’re shopping earlier in the summer, you may find spring-blooming varieties that can be planted in your garden for years of enjoyment.
What to Look For
I’ve learned through experience that the most beautiful mum display often comes from the most unassuming plants at the garden center. Here’s what to look for when selecting your pot mums:
- More buds than open flowers: Choose plants with only about 20-30% of their flowers open and the rest still in bud stage. This ensures a longer bloom period once you get the plant home.
- Compact, bushy growth: Avoid leggy or sparse plants. Look for full, dense foliage with multiple stems.
- Healthy foliage: Leaves should be deep green without yellowing, browning, or signs of pests.
- Moist soil: The plant should not be wilted or extremely dry, as this stresses the plant and shortens bloom time.
- Root condition: If possible, gently slip the plant from its pot to check for healthy white roots. Avoid plants with heavily circling or brown roots.
A few years ago, I made the mistake of choosing the mum with the most open flowers at the garden center, thinking I was getting more bloom for my buck. Within a week, those flowers had faded, and I was left with a much less impressive display than my neighbor’s plant that started with mostly buds. Lesson learned!
Explore Top 44 Perennial Flowers & Plants for Year-Round Garden Color
Essential Care Guide for Pot Mums
Light Requirements
Pot mums thrive in bright conditions and require at least 6 hours of direct sunlight daily to perform their best. When grown indoors, place them near a south-facing window where they can receive plenty of light.
In very hot climates, some afternoon shade can be beneficial as it helps prolong the flowering period by keeping the plant cooler. Remember that even in fall, a plant in direct sun will dry out more quickly, so adjust your watering accordingly.
Explore the Best Air-Purifying Indoor Plants That Thrive Without Direct Sunlight
Watering Needs
Consistent moisture is crucial for pot mums, as they have relatively shallow root systems that dry out quickly. Here’s how to get watering right:
- Check soil moisture daily by pressing your finger about an inch into the soil. If it feels dry, it’s time to water.
- Water thoroughly until moisture runs from the drainage holes, ensuring the entire root ball is saturated.
- Try to water the soil directly, avoiding wetting the foliage and flowers which can lead to fungal issues.
- In hot weather, potted mums may need watering daily; in cooler conditions, every 2-3 days is usually sufficient.
- Never allow pot mums to completely dry out or wilt, as this will significantly shorten the blooming period and may cause permanent damage.

One technique I’ve found helpful is placing the pot in a shallow dish of water for a few hours when the soil seems particularly dry. This allows the root ball to soak up moisture from the bottom, especially beneficial for plants that have become root-bound. Just remember to remove the pot from the water after a few hours to prevent root rot.
Learn How to Use Ollas for Water-Efficient Gardening: A Step-by-Step Guide
Temperature Preferences
Pot mums prefer moderate temperatures and actually bloom longer in cooler conditions:
- Daytime temperatures of 65-70°F (18-21°C) are ideal
- Nighttime temperatures of 55-60°F (13-16°C) help prolong flowering
- Protect plants from frost, which can damage buds and flowers
- In very hot weather (above 80°F/27°C), blooms may fade more quickly
Soil Requirements
The right soil can make a significant difference in how well your pot mums perform:
- Use a high-quality, well-draining potting mix designed for containers
- The ideal soil pH is slightly acidic to neutral (5.8-6.8)
- Adding compost or organic matter improves soil structure and fertility
- Ensure containers have adequate drainage holes to prevent waterlogging
Fertilization Schedule
Pot mums are moderate feeders, but proper nutrition helps support abundant blooming:
- For temporary seasonal display: Use a balanced liquid fertilizer at half-strength every two weeks while the plant is blooming
- For long-term care: Fertilize with a balanced fertilizer (like 10-10-10) monthly during the growing season (spring through summer)
- Reduce or eliminate fertilization about 3-4 weeks before expected bloom time
- Stop fertilizing once the plant is in full bloom to extend flowering time
Container Considerations
The right container makes a significant difference in the health of your pot mums:
- Choose containers at least 1-2 inches larger than the nursery pot
- Ensure adequate drainage holes in the bottom
- Terra cotta pots provide good drainage but dry out more quickly
- Plastic or glazed ceramic containers retain moisture longer
- Consider double-potting (placing the plastic nursery pot inside a decorative container) for flexibility
Encouraging Beautiful Blooms
Pinching and Pruning
To create bushier plants with more flowers, pinching is essential:
- In spring and early summer, pinch back the tips of new growth when stems reach 6 inches in height
- Remove about 1 inch from each stem using your fingertips or pruning shears
- Continue pinching every 2-3 weeks until mid-July (for fall-blooming varieties)
- Stop pinching approximately 100 days before you want the plant to bloom

I remember being hesitant to pinch back my mums the first time I grew them for more than one season. It seemed counterintuitive to remove perfectly healthy growth!
But the difference was remarkable – my unpinched plants grew tall and leggy with fewer flowers, while the pinched plants developed multiple branches and a much more impressive floral display.
Learn How to Prune Roses: A Simple Guide for Stunning Results
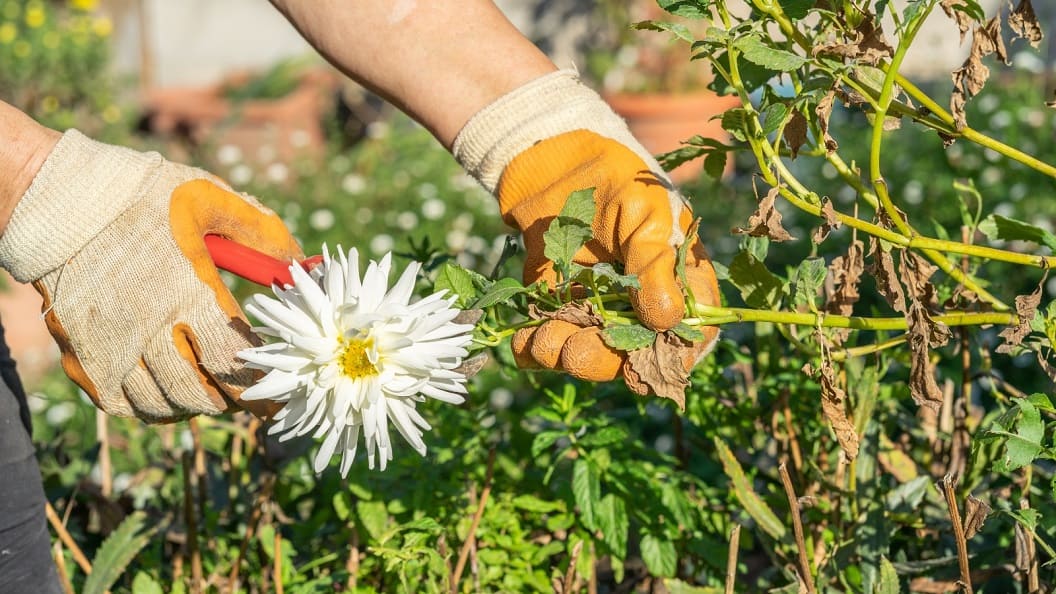
Deadheading Practices
Removing spent flowers keeps your plant looking fresh and may encourage additional buds to open:
- Pinch or snip off faded flowers just below the bloom
- Remove the entire flower stem once all buds on that stem have bloomed and faded
- Continue deadheading throughout the blooming period
- Clean up fallen petals and leaves to prevent disease
Find out When and How to Deadhead Cosmos for Continuous Blooms
Bud Removal Options
Different bud removal techniques can create various flowering effects:
- Disbudding (DB): Removing all lateral buds to allow the terminal (top) bud to develop into one large flower. This technique is common for exhibition chrysanthemums.
- Center Bud Removal (CBR): Removing only the terminal bud to create a more uniform spray of smaller flowers. This creates a fuller look with many blooms.
- Zero Bud Removal (ZBR): No buds are removed, resulting in a natural flowering pattern. This is the simplest approach and works well for most home gardeners.
Find out Should You Let Garlic Flower? Pros & Cons Explained
Post-Bloom Options
Once your pot mum has finished blooming, you have several options:
Keeping as a Houseplant
With proper care, pot mums can continue as houseplants after their initial bloom:
- Move the plant to a bright location that receives at least 6 hours of sunlight
- Reduce watering slightly, keeping soil just barely moist
- Cut back spent flower stems to about 3-4 inches above the soil
- Do not fertilize during winter months
- Maintain temperatures between 50-65°F (10-18°C) if possible
Explore 25 Stunning Round-Leaf Houseplants Perfect for Beginners
Transplanting to the Garden
In warmer climates (USDA zones 5-9), pot mums can be transplanted to the garden:
- Choose a sunny location with well-draining soil
- Plant at the same depth as the pot, spacing plants 18-24 inches apart
- Water well after planting and apply 2-3 inches of mulch
- In colder regions, plant in spring rather than fall to give roots time to establish
- Protect newly planted mums with a layer of mulch before winter arrives
A gardening friend once shared with me that she never purchases new mums – instead, she plants her gift and decorative pot mums in a dedicated “mum nursery” bed in her garden after they finish blooming. By summer, she divides these plants and moves them to various garden locations, creating a magnificent fall display at virtually no cost!
Overwintering Techniques
If you want to keep your pot mums for another season, proper overwintering is crucial:
In Zones 7-9 (Milder Climates):
- Leave the plant in its container or transplant to the garden
- Cut back stems to about 3-4 inches once they’ve died back
- Apply 3-4 inches of mulch around the plant
- Continue minimal watering during dry spells
In Zones 5-6 (Colder Climates):
- Move potted plants to a protected area like an unheated garage or shed
- Reduce watering to monthly, just enough to prevent complete drying
- Alternatively, sink the entire pot into the ground and cover with mulch
- Cut back dead foliage in spring when new growth appears
In Zones 4 and Below (Very Cold Climates):
- Overwinter indoors in a cool area (35-45°F) like a basement or garage
- Provide minimal water and no fertilizer
- Or treat as an annual and purchase new plants each year
Learn How to Overwinter Dahlia Tubers: A Complete Guide for Beginners
Composting or Discarding
If you choose not to keep your pot mums after flowering:
- Remove the plant from its pot
- Add to your compost pile if it’s disease-free
- Reuse the pot for other plants
- If composting isn’t an option, dispose of the plant with yard waste
Read more about Chop and Drop Gardening: Build Healthy Soil the Easy Way
Troubleshooting Common Problems
Pests and Diseases
Pot mums can occasionally face pest and disease challenges:
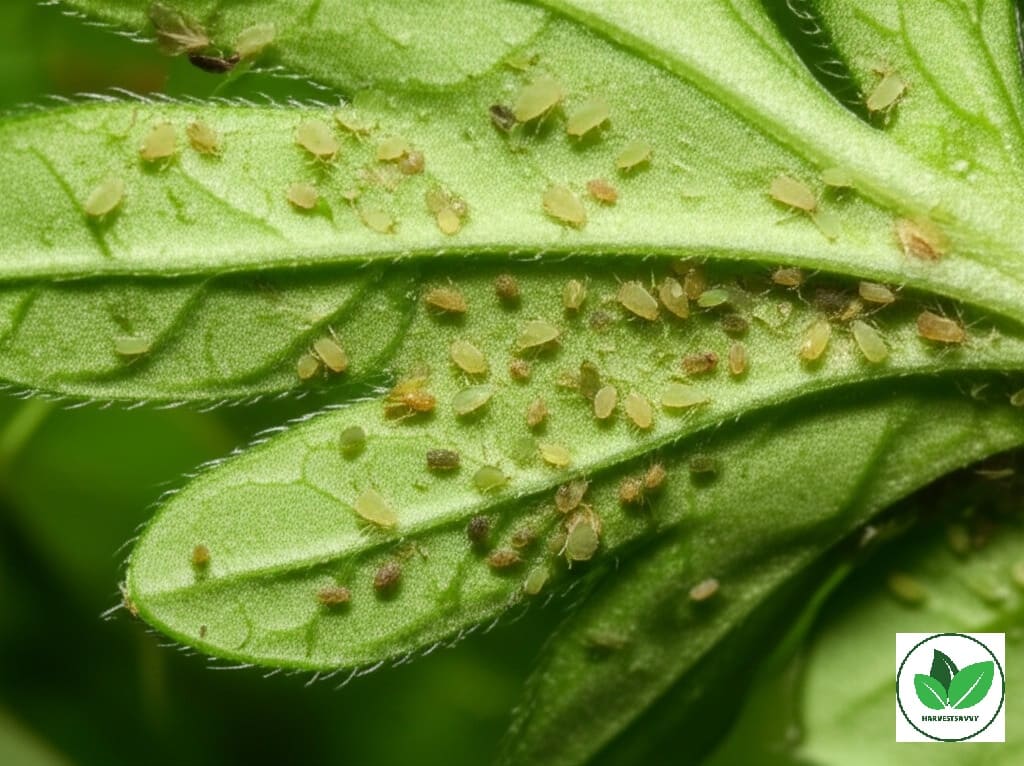
Aphids: These small insects cluster on stems and undersides of leaves, causing distorted growth.
- Solution: Spray with insecticidal soap or a strong stream of water
Spider Mites: Tiny pests that cause stippled, yellowing leaves and fine webbing.
- Solution: Increase humidity and treat with insecticidal soap or neem oil
Powdery Mildew: White powdery coating on leaves, typically in humid conditions.
- Solution: Improve air circulation, avoid wetting foliage, and treat with fungicide if necessary
Botrytis (Gray Mold): Gray fuzzy growth on flowers and stems, common in cool, damp conditions.
- Solution: Remove affected parts, reduce humidity, and ensure good air circulation
Root Rot: Caused by overwatering or poor drainage, leading to wilting despite moist soil.
- Solution: Reduce watering, ensure good drainage, and repot in fresh soil if necessary
Learn to Master Natural Pest Control: Top Organic Solutions for Your Garden
Yellowing Leaves
Several factors can cause yellowing foliage:
- Overwatering: The most common cause – yellowing leaves and soggy soil
- Solution: Allow soil to dry slightly between waterings
- Underwatering: Wilting followed by yellowing, dry soil
- Solution: Increase watering frequency, especially in hot weather
- Nutrient Deficiency: Overall yellowing, often starting with older leaves
- Solution: Apply a balanced fertilizer according to package directions
- Temperature Stress: Rapid yellowing after exposure to very hot or cold conditions
- Solution: Move plant to a more moderate environment
Find out Why Are My Cucumber Leaves Turning Yellow? Top Causes & Solutions
Leggy Growth
Stretched, sparse growth often indicates insufficient light:
- Move the plant to a sunnier location
- Pinch back leggy growth to encourage branching
- For overwintered plants, begin pinching in spring when new growth reaches 6 inches
Failure to Bloom
If your pot mum isn’t producing flowers:
- Incorrect Light Exposure: Mums need short days (long nights) to initiate blooms
- Solution: Ensure the plant receives 14+ hours of uninterrupted darkness daily for 6 weeks
- Late Pinching: Pinching too late in the season removes flower buds
- Solution: Stop all pinching by mid-July for fall-blooming varieties
- Excessive Fertilizer: Too much nitrogen promotes leaf growth at the expense of flowers
- Solution: Switch to a fertilizer with higher phosphorus content (the middle number)
- Heat Stress: High temperatures can delay or prevent flowering
- Solution: Provide afternoon shade during hot weather
Learn How to Make Orchids Rebloom: Complete Care Guide & Tips
Seasonal Decorating with Pot Mums
The versatility of pot mums makes them perfect for countless decorative applications:
Indoor Display Ideas
- Group mums of complementary colors on a sideboard or dining table
- Create a centerpiece by placing smaller pots in a basket or decorative container
- Line a mantel or windowsill with a row of matching or gradient-colored mums
- Place single specimens on coffee tables, nightstands, or bathroom counters
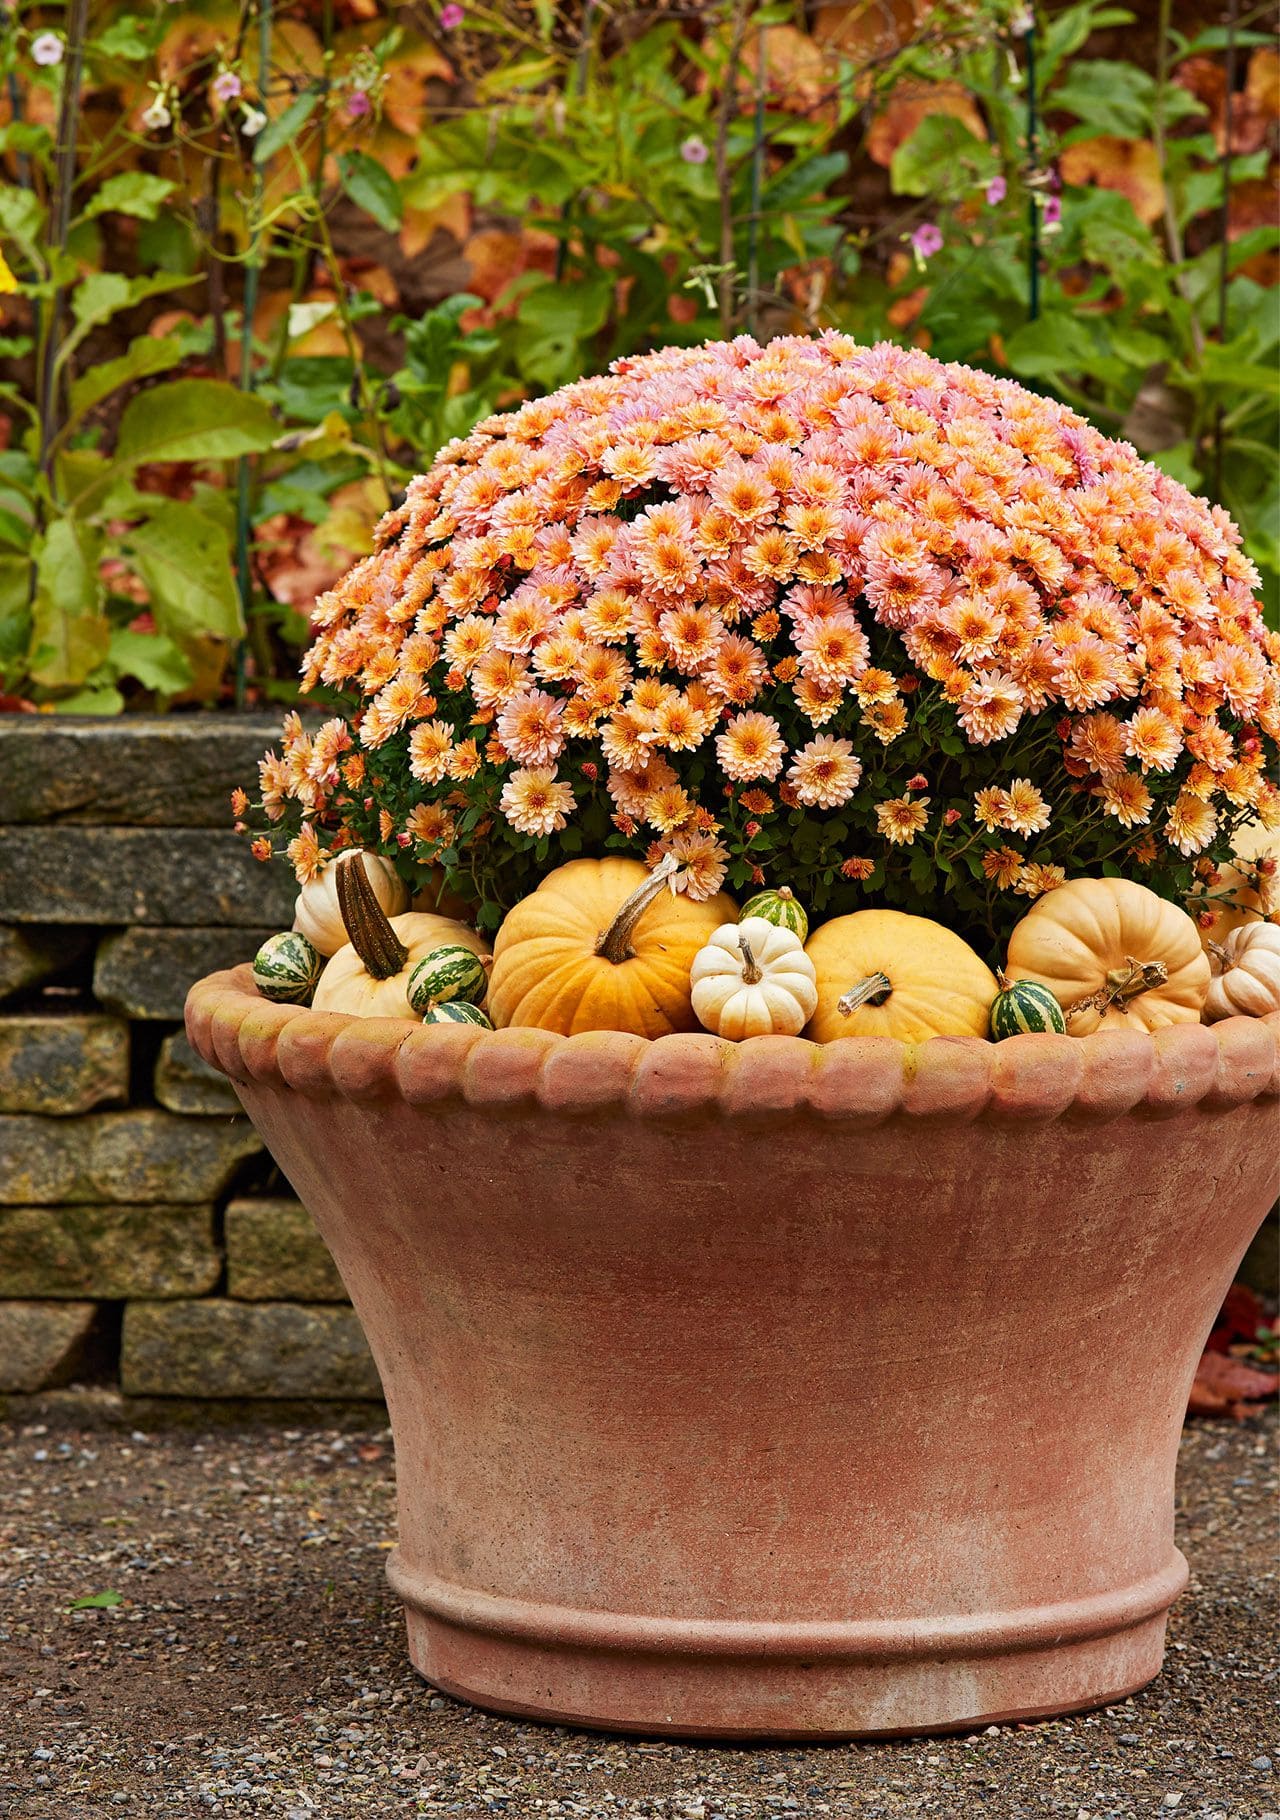
In my home, I love creating a “welcome table” in the entryway each fall with a large pot mum flanked by smaller plants, gourds, and perhaps a lantern. The bright flowers immediately set a festive tone for anyone who visits.
Outdoor Arrangements
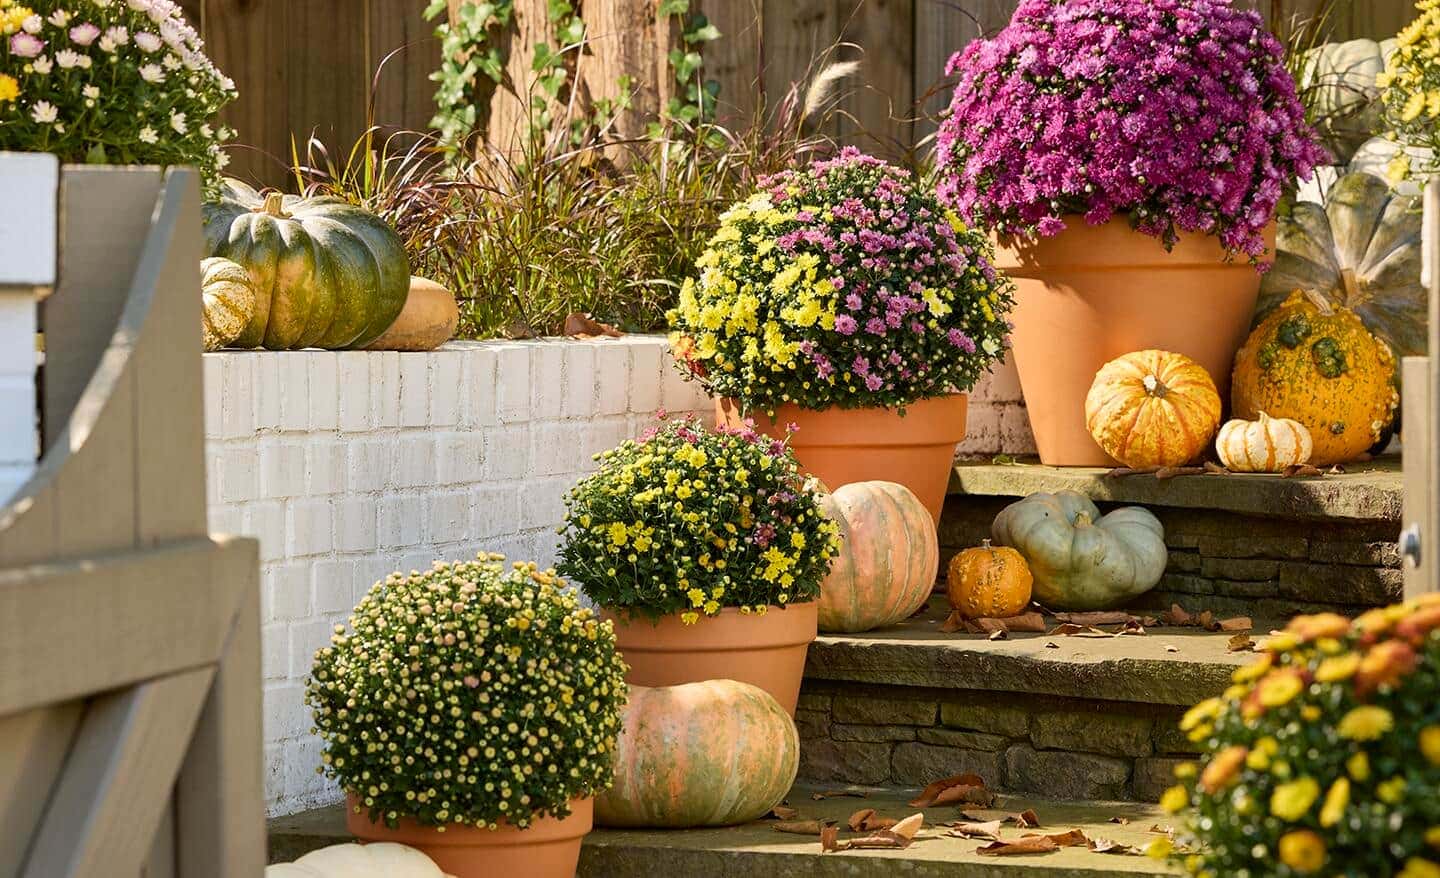
- Line walkways or steps with evenly spaced pot mums
- Create a colorful display on porches and patios by grouping various sizes
- Place mums in window boxes or hanging baskets for eye-level color
- Use large container mums as focal points in the landscape
Pairing with Other Fall Plants and Decorations
Pot mums complement other autumn elements beautifully:
- Combine with ornamental kale and cabbage for textural contrast
- Surround with ornamental grasses for a prairie-inspired look
- Pair with pumpkins, gourds, and ornamental corn for a harvest display
- Integrate with evergreen shrubs for winter interest after the mums finish blooming
Learn about Eco-Friendly Pumpkin Disposal & Sustainable Ways to Reuse Your Halloween Pumpkins
Using Mums for Special Occasions
- Create table centerpieces for Thanksgiving gatherings
- Welcome guests to autumn weddings with potted mums marking ceremony seating
- Gift potted mums for housewarmings, birthdays, and hostess gifts
- Use mums in autumn-themed party decorations
Sustainable Practices with Pot Mums
As gardeners become more environmentally conscious, considering the sustainability of our plant choices becomes important:
Environmental Considerations
- Choose locally grown plants when possible to reduce transportation impacts
- Look for growers who use minimal chemical inputs
- Select biodegradable or recyclable containers, or reuse plastic pots
- Consider perennial varieties that don’t need replacing annually
Alternatives to Single-Season Use
- Select hardy garden mum varieties that can be planted in the landscape
- Divide established mums every 2-3 years to create new plants
- Share divisions with friends and neighbors to reduce overall consumption
- Consider starting mums from cuttings rather than purchasing new plants
Last fall, instead of buying new mums, I took cuttings from my neighbor’s established garden chrysanthemums in early summer. By September, I had six beautiful plants in bloom that cost me nothing but a little potting soil and time. The experience not only saved money but connected me more deeply to the growing process.
Find out How to Care for Poinsettias And Keep Your Holiday Plant Healthy Year-Round
FAQ Section: Common Questions About Pot Mums
- Q: Are chrysanthemums annual or perennial plants?
A: Chrysanthemums are technically perennials in USDA hardiness zones 5-9. However, many pot mums sold as seasonal decorations are treated as annuals and discarded after blooming. With proper care, many varieties can survive for multiple years.
Discover What’s the Difference Between Annuals, Perennials, and Biennials?
- Q: Are pot mums toxic to pets?
A: Yes, chrysanthemums contain compounds that can be toxic to cats, dogs, and horses if ingested. Symptoms may include digestive upset, skin irritation, and in severe cases, coordination problems. Keep these plants out of reach of pets or choose pet-safe alternatives if you have animals that tend to chew on plants.
- Q: Can I plant my pot mum in the garden after it finishes blooming?
A: Yes, in zones 5-9, pot mums can be planted in the garden. For best success in colder regions, plant in spring rather than fall to give roots time to establish before winter. In very cold climates (zones 3-4), the plants may not survive winter regardless of when they’re planted.
- Q: How do I know when to water my pot mum?
A: Check the soil by inserting your finger about an inch deep. If it feels dry at that depth, it’s time to water. In warm weather, potted mums may need daily watering; in cooler conditions, every 2-3 days is usually sufficient. Never allow the soil to become completely dry.
- Q: Why are the leaves on my pot mum turning yellow?
A: Yellowing leaves most commonly indicate watering problems—either too much or too little water. Other causes include nutrient deficiencies, temperature stress, or natural aging of lower leaves. Check soil moisture first, then consider other factors if the watering is appropriate.
- Q: How long will pot mums stay in bloom?
A: With proper care, pot mums typically bloom for 4-8 weeks. Choosing plants with plenty of unopened buds extends the display period. Cooler temperatures (below 65°F/18°C) also help prolong flowering.
- Q: Can I make cut flowers from my pot mums?
A: Absolutely! Chrysanthemum flowers make excellent cut flowers that can last up to two weeks in a vase. Cut stems in the morning, remove lower leaves, and place in clean water with flower preservative for best results.
Conclusion
Pot mums offer an accessible way for anyone to enjoy vibrant fall color, whether you’re a dedicated gardener or simply someone who appreciates seasonal beauty. Their versatility, relatively easy care requirements, and spectacular blooms make them a worthy addition to any home or garden.
Whether you choose to enjoy your pot mums for a single glorious season or attempt to nurture them for years to come, these plants connect us to the changing rhythms of nature and add warmth to our living spaces just as the weather turns cooler.
I hope this guide has inspired you to try growing pot mums and provided the knowledge you need to enjoy them successfully. There’s something deeply satisfying about nurturing these colorful plants through their blooming cycle and incorporating them into your seasonal celebrations. Happy growing!
Have you had success growing pot mums for multiple seasons? Share your experiences and tips in the comments below!