
I still remember the electric moment when I spotted my first wild chanterelle peeking through fallen oak leaves—a flash of golden orange that seemed to glow in the dappled forest light.
My heart raced as I crouched down, double-checking every identification marker I’d studied. That single mushroom transformed an ordinary autumn hike into an adventure, and I’ve been hooked ever since.
Mushroom hunting combines the thrill of discovery with the satisfaction of harvesting your own gourmet ingredients. Whether you’re drawn by culinary curiosity, a love of nature, or the challenge of the hunt, this ancient practice offers rewards far beyond a basket of fungi.
By the end of this guide, you’ll understand the fundamentals of safe foraging, know where and when to search, and have the confidence to begin your own mycological adventures.
👉 Read The Complete Guide to Edible Flowers: 25+ Varieties to Grow & Cook
The Unbreakable Rules: Safety Before Everything
Rule #1: When in doubt, throw it out
This isn’t negotiable. Some mushrooms contain toxins that cause fatal organ failure even when thoroughly cooked. The Death Cap (Amanita phalloides) has killed experienced foragers who thought they were picking paddy straw mushrooms. One mistake can be your last.
But don’t let fear paralyze you. With proper education and strict adherence to safety protocols, mushroom hunting is perfectly safe. Thousands of people forage successfully every year by following these foundational principles:
Your Non-Negotiable Safety Protocol
Begin with “foolproof four” species only.
For your first full season, limit yourself to mushrooms with distinctive features and no deadly look-alikes:
- Morels (completely hollow)
- Chicken of the woods (bright orange shelves on wood)
- Oyster mushrooms (white gills on dead wood)
- And giant puffballs (softball-sized, pure white inside)
Master these before expanding your repertoire.
👉 Discover 25+ Types of Mushrooms You Should Try (And How to Cook Them)
Three-source identification rule.
Never eat a mushroom identified from just one field guide or app. Cross-reference with at least three sources:
- A regional field guide
- An online mycological society resource
- And ideally an experienced forager who’s examined your physical specimen.
AI identification apps can suggest possibilities but should never be your sole verification method.
The first-time protocol.
Even with 100% positive identification, eat only two cooked teaspoons of any new-to-you species, then wait 24 hours. Individual allergic reactions occur with edible mushrooms just as they do with strawberries or shellfish.
Keep one raw specimen refrigerated during this waiting period for potential identification if symptoms develop.
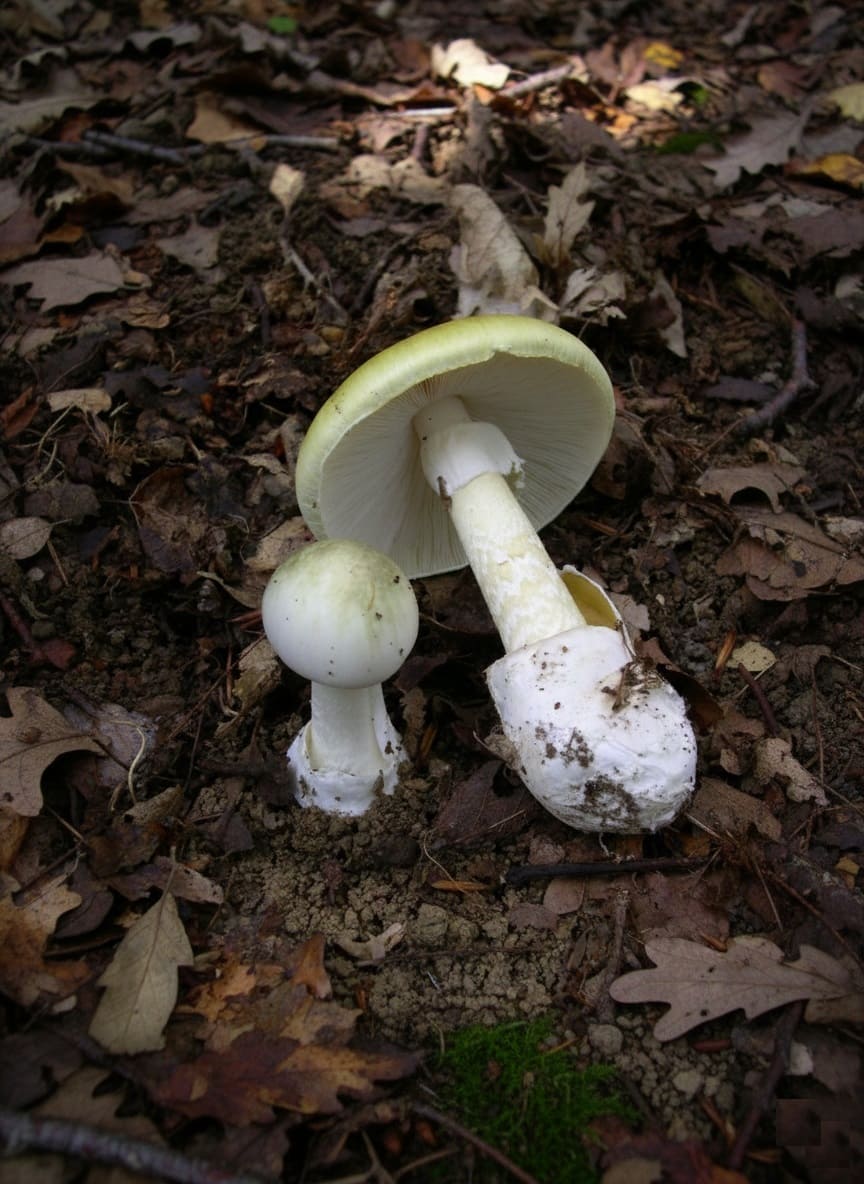
Know what poisonous looks like.
Memorize the features of deadly species in your area before hunting edibles. In North America, that means understanding Amanita characteristics: white gills, a ring on the stem, and often a cup (volva) at the stem base.
Learn to recognize Galerina species—small brown mushrooms that grow on wood and contain the same deadly toxins as Death Caps. If you see these features, photograph but never harvest.
Always cook wild mushrooms thoroughly.
Even edible species contain compounds that are toxic when raw. Morels cause severe gastric distress unless cooked. Some Boletes cause reactions in sensitive individuals when undercooked.
Heat breaks down these compounds and makes nutrients more accessible. There are no exceptions to this rule.
If Poisoning Occurs: Emergency Response
1. Symptoms can be delayed. The most dangerous mushroom toxins (amatoxins in Death Caps and Destroying Angels) may cause no symptoms for 6-24 hours, by which time liver damage is already occurring.
Any gastrointestinal symptoms within 6 hours of eating wild mushrooms warrant immediate medical attention.
2. Save everything. If anyone feels ill after eating wild mushrooms, save all remaining specimens (cooked and uncooked), photograph them, and bring them to the emergency room.
Contact the Poison Control Center at 1-800-222-1222 (US) immediately. Do not wait to see if symptoms worsen.
3. Regional poison centers maintain relationships with mycological experts who can identify species from photographs and guide treatment. Every hour matters with severe mushroom poisoning.
Know Before You Go: Legal Considerations
Regulations vary dramatically by location, and ignorance isn’t an acceptable excuse. Before your first forage:
- National Forests generally allow personal use collection of 1-2 gallons per day without permits, but commercial harvesting requires paid permits. Special rules apply to matsutake mushrooms in some Pacific Northwest forests.
- National Parks prohibit mushroom collection in most cases, though a few allow small quantities for personal consumption. Check specific park regulations before visiting.
- State and local lands have their own rules. Some state parks allow foraging, others prohibit it entirely. Research before you go.
- Private property requires landowner permission always, even if the forest looks “wild” or unused. Trespassing laws apply to mushroom hunters just as they do to anyone else.
Contact local mycological societies or ranger stations for current regulations. Fines for illegal harvesting can reach hundreds of dollars, and confiscation of harvest and equipment is common.
Why Mushroom Hunting Matters
Beyond the obvious culinary appeal, mushroom hunting offers three compelling benefits that enrich the practice beyond simple food gathering.
Ecological awareness emerges naturally.
Once you start hunting fungi, you begin noticing tree species, soil moisture patterns, microhabitats, and seasonal rhythms with heightened attention. This awareness connects you to forest health in ways that casual hiking never does.
Recent research shows mycorrhizal fungi store up to 36% of global fossil fuel emissions underground—the mushrooms you’re hunting are climate heroes in disguise.
Nutritional density surprises most newcomers.
Wild mushrooms pack impressive protein levels, B-vitamins, and vitamin D (especially when sun-exposed).
Many species contain immune-boosting beta-glucans and compounds showing promise in medical research. You’re not just gathering tasty food—you’re harvesting nutritional powerhouses unavailable in any store.
Mindful outdoor practice transforms the experience.
Unlike speed hiking, mushroom hunting demands slow movement and careful observation. This creates what researchers call “involuntary attention”—your mind engages naturally without force, reducing stress while sharpening awareness.
Families hunting together build observation skills, ecological literacy, and shared memories that screens can’t replicate.
Building Your Mushroom Hunter’s Toolkit
Essential Field Equipment
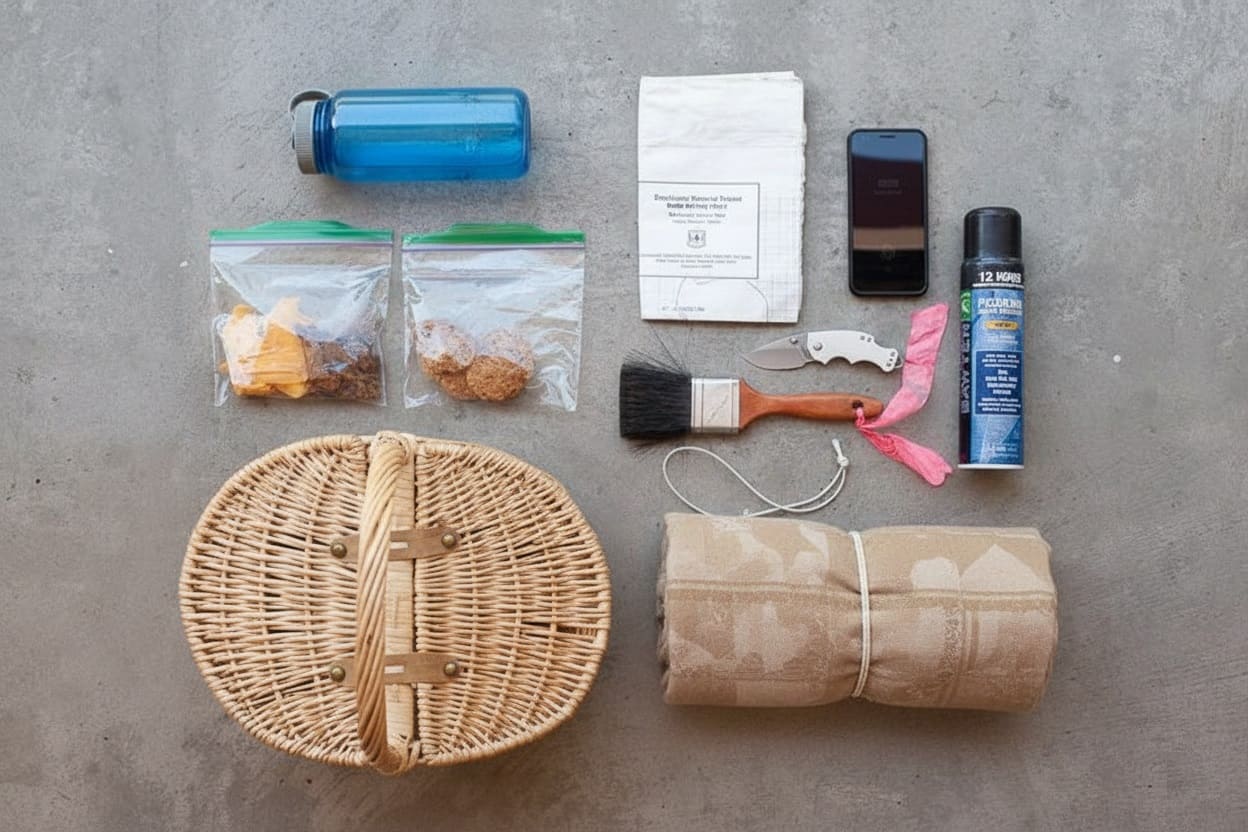
Start with these six items—you can forage successfully with nothing more:
1. Regional field guide for your specific area is non-negotiable. David Arora’s All That the Rain Promises and More covers the West Coast brilliantly but won’t help you in Michigan.
Carry a slim pocket guide in the field for quick reference, and keep a comprehensive guide at home for detailed study. The Audubon guides, regional mushroom club publications, and books by local mycologists often provide the most accurate information for your specific area.
2. Sharp folding knife for clean harvesting and field examination. Purpose-designed mushroom knives include curved blades for trimming and built-in brushes for cleaning, but any sharp pocket knife works.
Attach bright flagging tape to the handle—you’ll drop it in leaves eventually, and brown knives disappear instantly.
3. Wicker basket or mesh bag protects fragile specimens while allowing spores to scatter as you walk, potentially seeding future harvests. The firm structure prevents crushing.
Bring two bags: one for confirmed edibles, another for unknowns you want to identify later. Never mix these.
4. Soft brush (a paintbrush works perfectly) for field-cleaning caps and removing debris. This reduces indoor cleanup time significantly.
5. Camera or smartphone for documentation. Photograph every mushroom you’re learning from multiple angles:
- Top of cap
- Gills or pores underneath
- Stem including base
- And the surrounding habitat showing nearby trees.
These photos are invaluable when consulting experts or field guides later.
6. Small notebook for recording conditions. Note the date, location, tree species nearby, weather in past few days, and any observations. This data becomes increasingly valuable as you build experience and learn seasonal patterns in your favorite hunting grounds.
Safety and Comfort Additions
Add these for longer forays or unfamiliar terrain:
Waterproof hiking boots, long pants and sleeves (tick and poison ivy protection), bright clothing during hunting season, bug spray, whistle, first aid kit, water, snacks, extra layers, topographic map, and GPS-enabled phone with offline maps.
Mushroom hunters get lost more often than regular hikers because they’re staring at the ground instead of tracking landmarks—GPS compensates for this.
👉 Unveiling The Must-Have Gardening Tools: Essential Picks for Every Gardener
Where and When to Hunt: Reading the Forest
Timing Your Forays by Season
1.Spring (April-June) belongs to morels. These prized mushrooms emerge when soil temperatures hit 53°F consistently, often around dead or dying ash, elm, and apple trees. Scout south-facing slopes first, where sun exposure warms the ground earliest.
Watch for blooming dandelions—when you see yellow flower heads giving way to seed puffs, soil conditions are right for morels. Late spring brings prolific oyster mushroom flushes on dead aspens and other hardwoods.
2. Summer (June-August) shifts to chanterelles in hardwood forests, especially under oak and beech. They need both moisture and warmth, making summer ideal.
Early king boletes (porcini) begin appearing near pine, spruce, and fir. Chicken of the woods brightens oak trunks with dramatic orange shelves that are visible from considerable distances.
3. Autumn (September-November) is peak season for diversity and abundance. Hen of the woods forms massive clusters at oak bases. Fall chanterelles and boletes reach their prime.
Hedgehog mushrooms push through forest duff with their distinctive spined undersides. Honey mushrooms colonize dying trees in large clusters. The first hard frosts end the season, though oysters persist through mild winters.
4. Weather patterns trump calendar dates. Mushrooms need moisture to fruit, so plan forays 2-4 days after significant rain—enough time for fruiting bodies to develop. A good soaking rain can trigger massive flushes.
Conversely, drought conditions halt fruiting even during prime season. Many experienced hunters maintain logs tracking rainfall, temperatures, and when specific species appeared in past years, building a predictive database over time.
Habitat Hunting: Where to Look
Learn your trees first
Half the battle in mushroom hunting is tree identification. Mycorrhizal mushrooms form partnerships with specific tree species.
Chanterelles associate with oak, beech, and birch. King boletes appear near Douglas fir, hemlock, and pine. Morels fruit near dying elms and ash.
Can’t identify trees yet? Start learning—your mushroom success depends on it. Download a tree identification app or bring a tree field guide on early forays.
Seek microclimates within forests
Even in a single woodland, conditions vary dramatically. North-facing slopes stay cooler and moister. Creek bottoms and ravines collect moisture and humidity. Old-growth areas with thick, undisturbed duff layers support different species than younger forests.
These microclimates create abundance pockets that savvy hunters return to year after year.
Pay attention to these productive patterns: shady areas with filtered sunlight, slopes where water drains without pooling, zones with deep leaf litter or decaying wood, and mixed-age forests containing both young and mature trees.
Cover ground strategically.
Walk slowly, scanning in sections from near to far. Develop a systematic sweep pattern with your eyes rather than random scanning.
Experienced hunters develop what’s called a “search image”—once your brain locks onto the specific color, shape, and texture of chanterelles, you’ll suddenly start seeing them everywhere. Your first find is always the hardest; subsequent specimens pop out like magic.
Make mental notes of promising areas to revisit in different seasons. Many hunters keep private maps marking productive spots with GPS coordinates, creating a personal database of reliable hunting grounds that they guard more closely than gold miners protect claims.
Five Beginner-Friendly Species: Your Starting Point
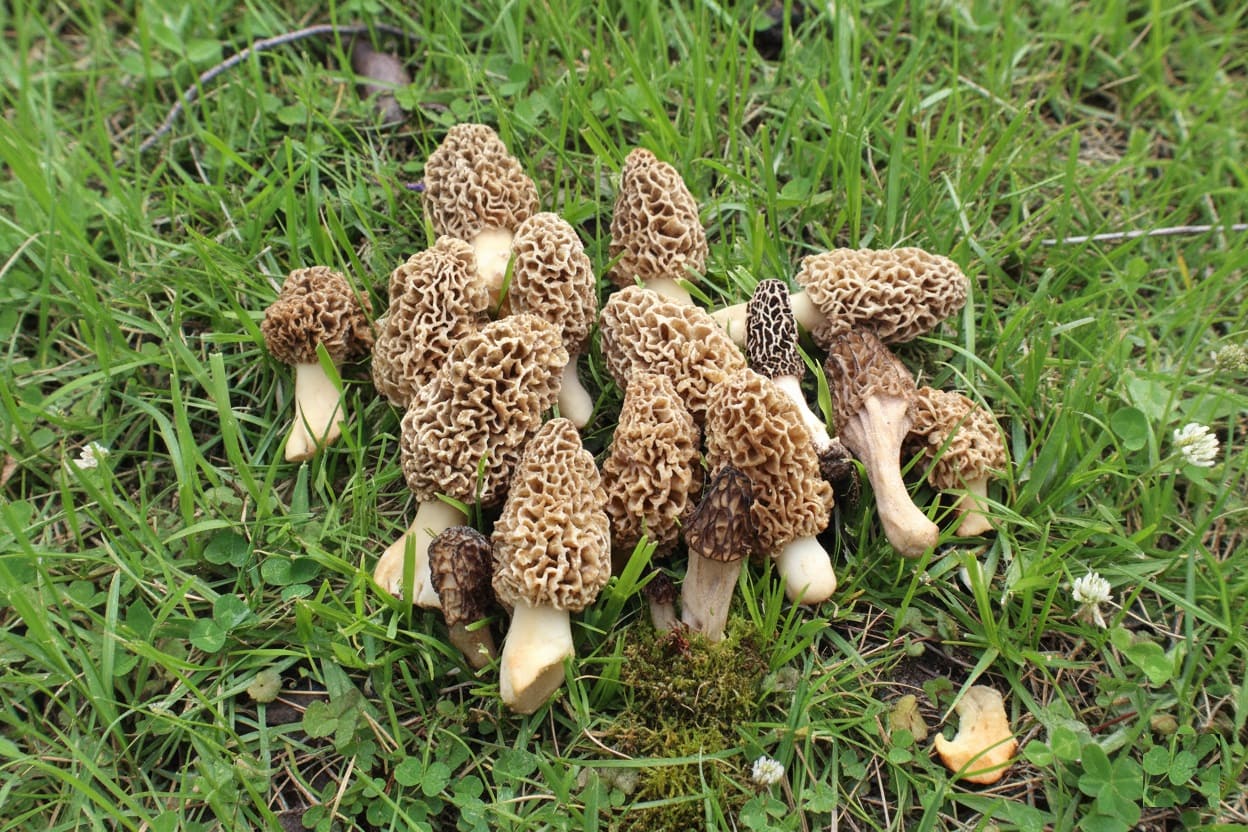
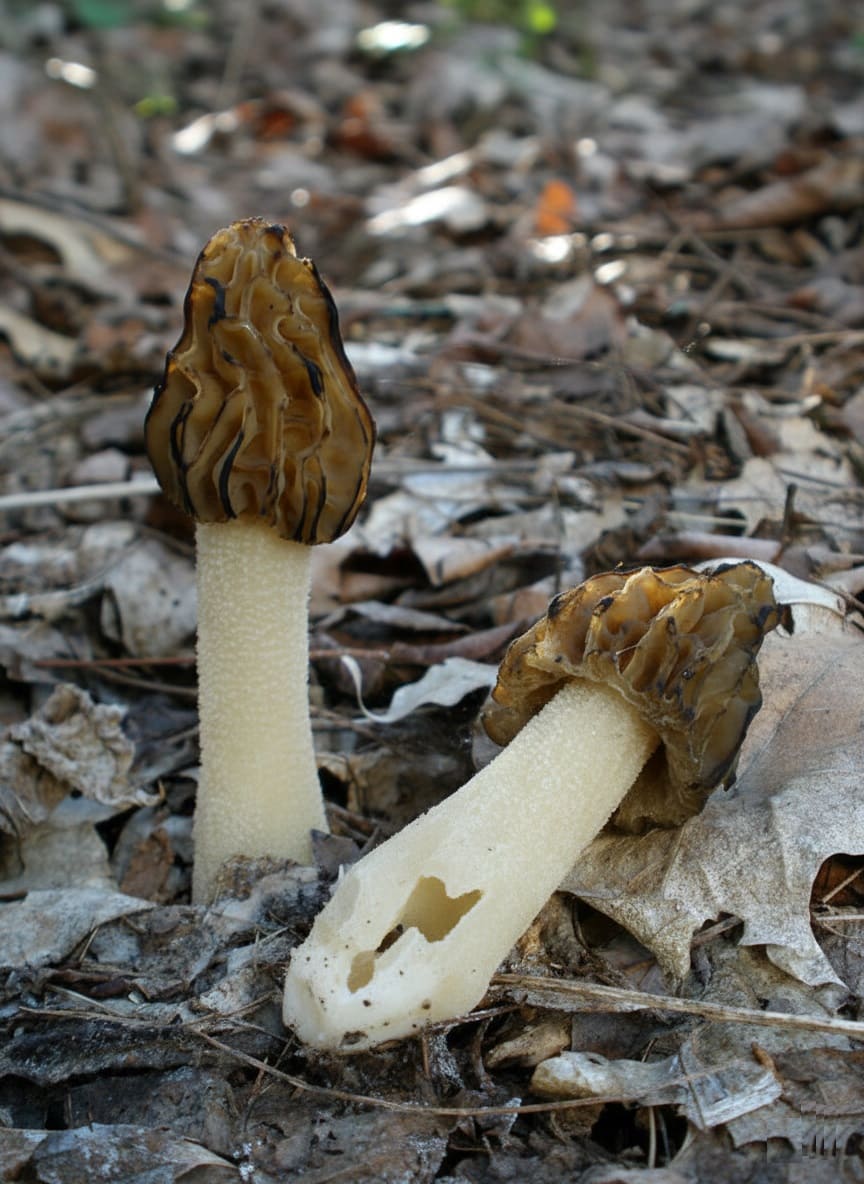
Morels (Morchella species)
Prized by chefs worldwide and commanding $30+ per pound commercially, morels create treasure-hunt excitement during their brief spring season.
Identifying features—all must be present:
- Honeycomb or deeply pitted cap resembling a brain or sponge
- Completely hollow from cap tip to stem base when cut lengthwise
- Cap attached directly to stem at the bottom, not hanging free
- Colors range from tan and yellow to gray and black
- Typically 2-8 inches tall
- Often found in clusters once you spot the first one
- Critical: Know the look-alikes.
False morels (Gyromitra species) have brain-like wrinkled caps but are NOT hollow throughout when cut lengthwise—they contain cotton-like material or irregular chambers.
These contain gyromitrin, which metabolizes into deadly monomethylhydrazine (rocket fuel). They can be fatal. Always cut your morel vertically before eating to verify it’s completely hollow.
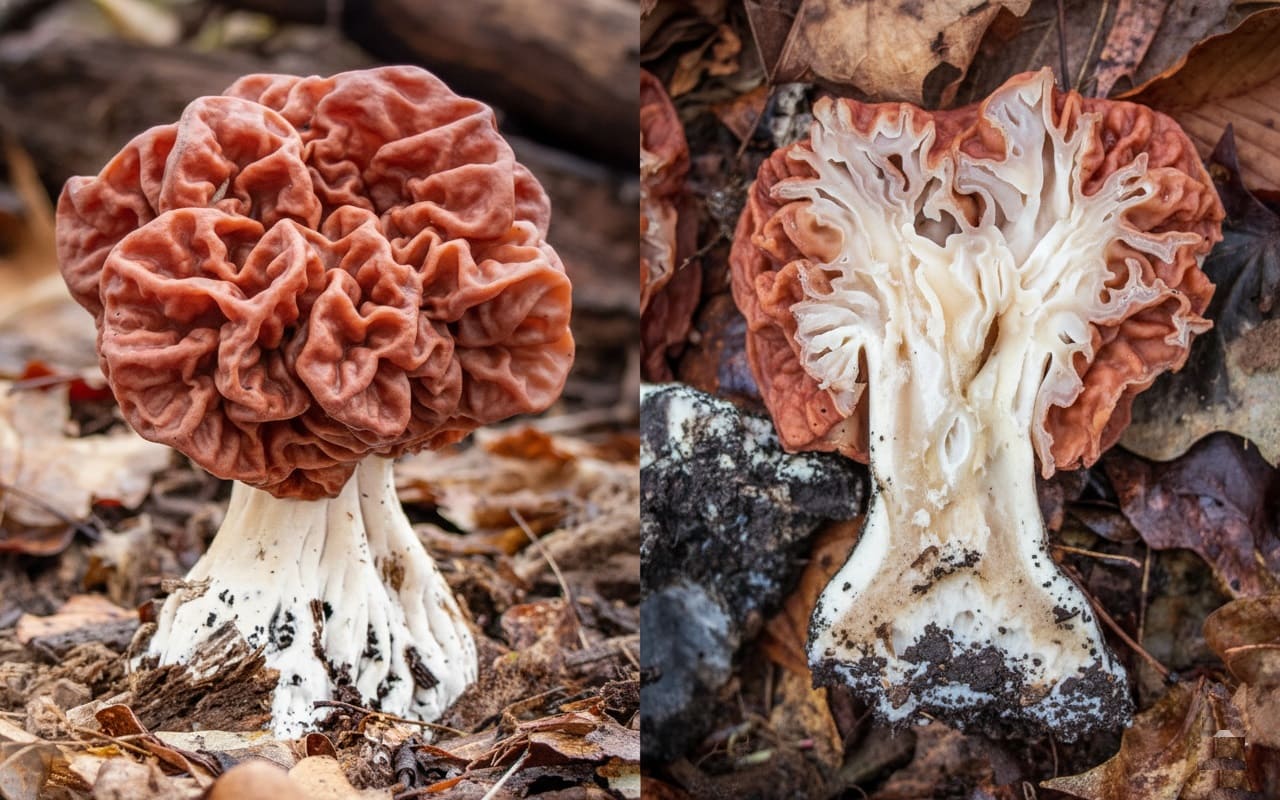
Half-free morels (Morchella punctipes) are edible cousins with caps that hang free from the stem about halfway down rather than attaching at the bottom. They’re safe to eat but less prized.
- Where and when:
Spring (late March through June depending on latitude and elevation). Search near dying or dead ash, elm, apple, and tulip poplar trees.
In western states, burn areas produce bonanza crops the spring following forest fires—some hunters plan entire vacations around accessing burn zones.
- Habitat tip:
Morels often fruit on south-facing slopes and along creeks first, where the soil warms earliest. They appear in waves, so if you find small specimens, return in 3-4 days when they’ve sized up.
Chicken of the Woods (Laetiporus sulphureus)
Virtually unmistakable when fresh and growing in the right location, making this ideal for beginners.
Identifying features:
- Large fan-shaped overlapping brackets growing in clusters
- Brilliant orange upper surface with yellow to sulphur-yellow pore surface underneath (no gills)
- Soft, almost suede-like texture when young and fresh
- Grows in shelf-like formations on dead or dying oak trees (occasionally other hardwoods)
- Fades to pale orange or white with age
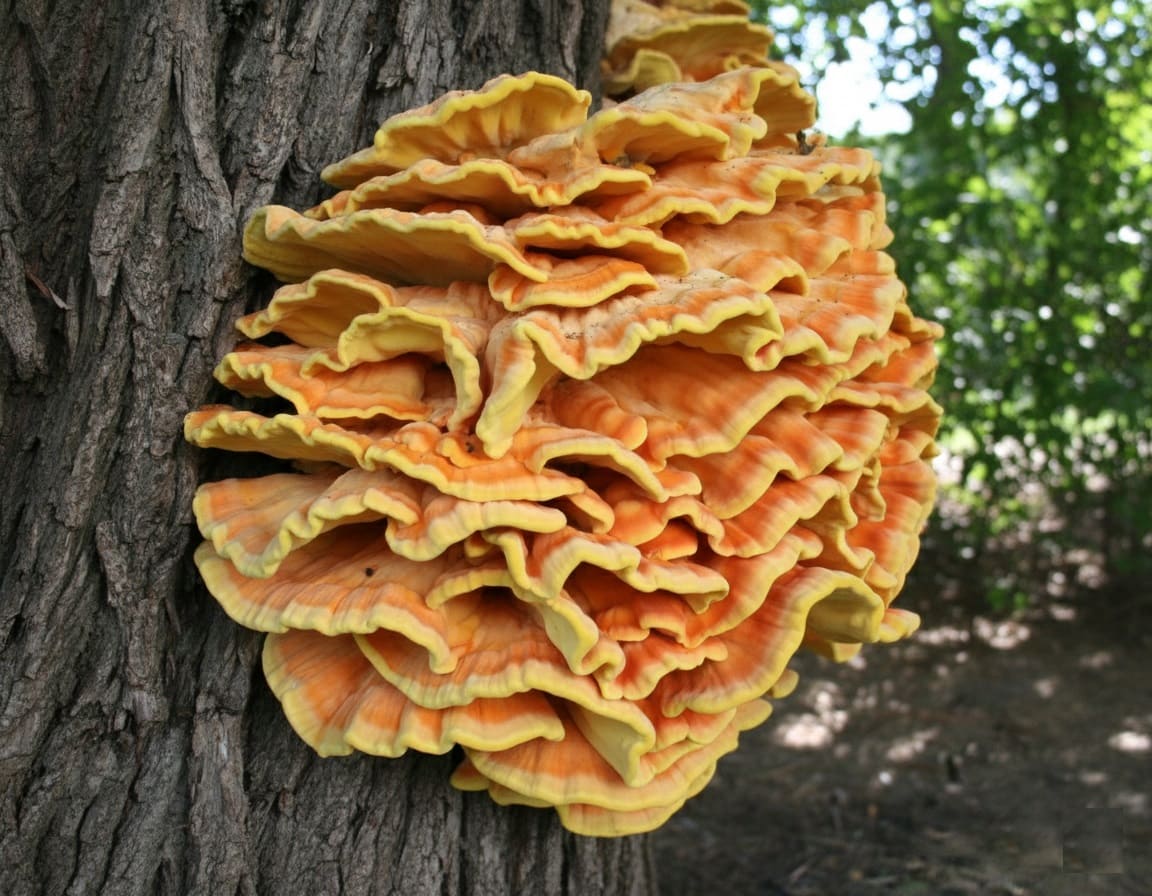
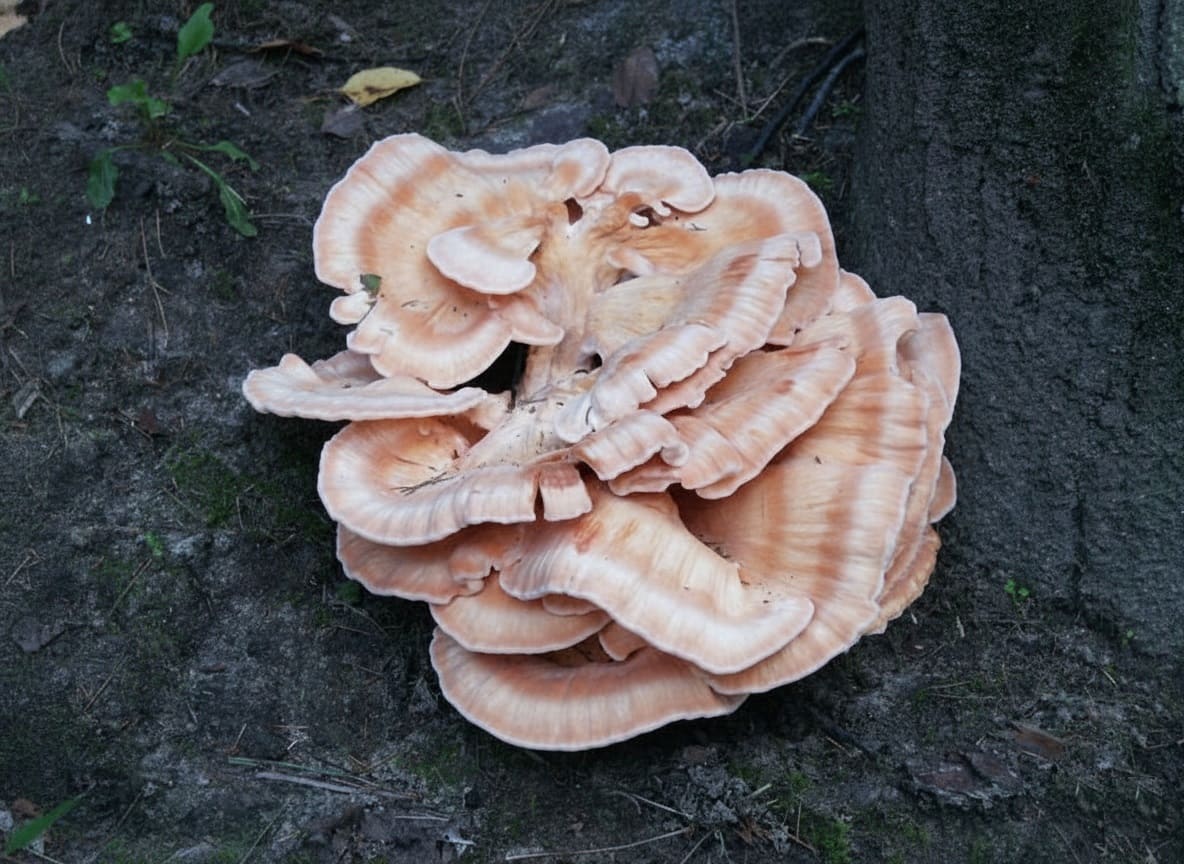
- Look-alike caution:
The white-pored chicken of the woods (Laetiporus cincinnatus) has a white pore surface and often grows from the base or roots of oaks.
It’s also edible and some prefer its milder flavor, but confirm you’re looking at Laetiporus species only—their bright colors and growth patterns are distinctive.
- Where and when:
Late spring through fall on standing or fallen oaks. Sometimes fruits repeatedly on the same tree for years—mark productive trees for future visits. Look mid-trunk to base, though specimens occasionally appear higher.
- Harvest note
Only collect young, fresh, tender growth from the outer edges. Mature specimens near the tree become tough and crumbly. Some people experience gastric upset from chicken of the woods regardless of proper identification—honor the two-teaspoon first-time rule.
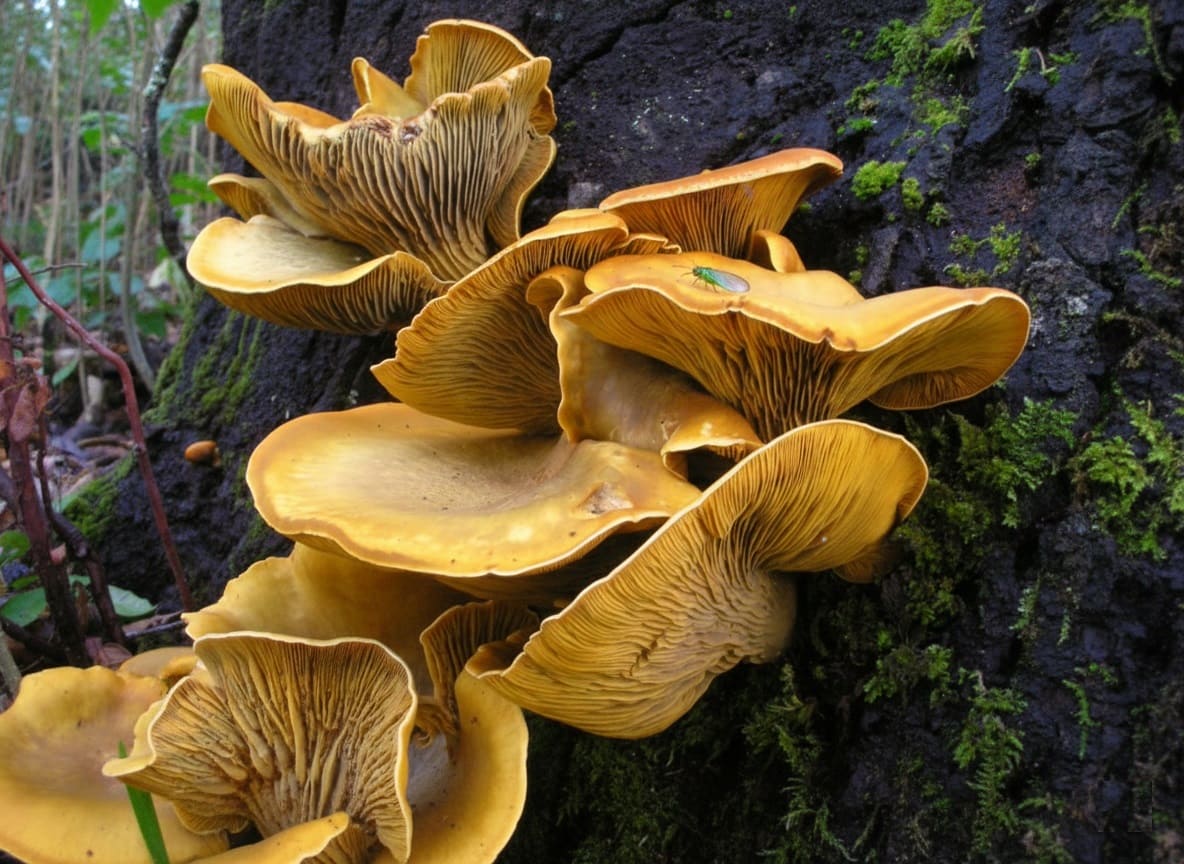
Chanterelles (Cantharellus species)
These golden treasures are common enough to fill baskets in good years yet choice enough for gourmet restaurants to pay premium prices.
Identifying features—verify all:
- Golden-yellow to deep orange color throughout
- Funnel or vase-shaped cap, often with wavy edges
- FALSE gills underneath—actually blunt, forked, vein-like ridges that run down the stem (not knife-thin sharp gills)
- Solid white flesh throughout when cut
- Pleasant fruity or apricot aroma
- Always grows from soil, never from wood
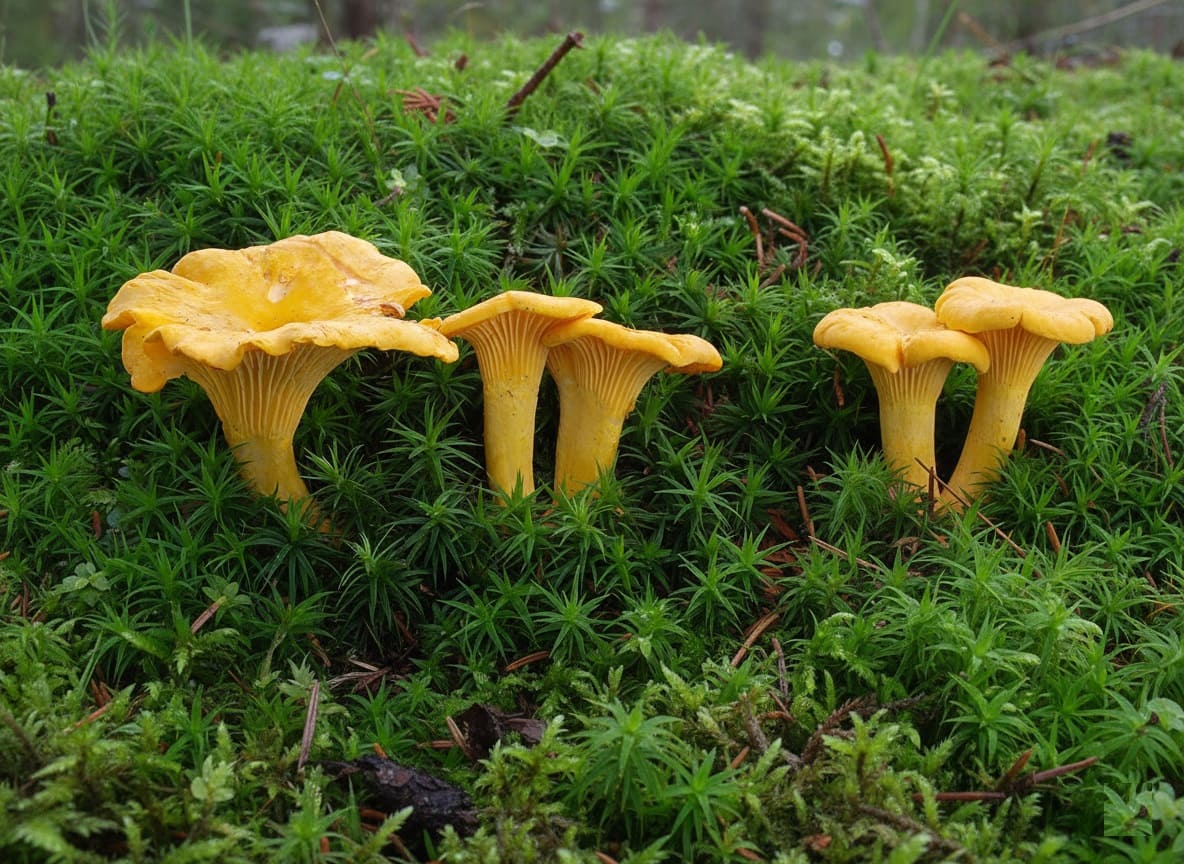
- Dangerous look-alike:
Jack-O’-Lantern mushrooms (Omphalotus species) are orange and grow in clusters, but they have true sharp-edged gills (not blunt ridges), grow on wood or from buried wood, and lack the fruity scent. They cause severe gastrointestinal distress lasting 6-12 hours.
Learn to distinguish ridges from true gills—run your finger along the underside of a chanterelle and you’ll feel the blunt, easily separated ridges. True gills are thin, papery, and break when you run a finger across them.
- Where and when
Summer through fall in oak, beech, fir, and pine forests. They’re mycorrhizal, appearing where appropriate trees dominate. Often fruit in the same spots yearly after good rains—successful hunters guard these locations zealously.
Hen of the Woods / Maitake (Grifola frondosa)
Large enough that a single specimen feeds multiple people, this mushroom grows so reliably in the same locations that some hunters mark their trees.
Identifying features:
- Large cluster (often 10+ pounds) of overlapping fan-shaped grayish-brown caps
- Multiple fronds with wavy edges emerging from branching white stems
- Grows at the base of oak trees, sometimes from roots a few feet away
- Dense, firm texture when fresh
- Earthy aroma
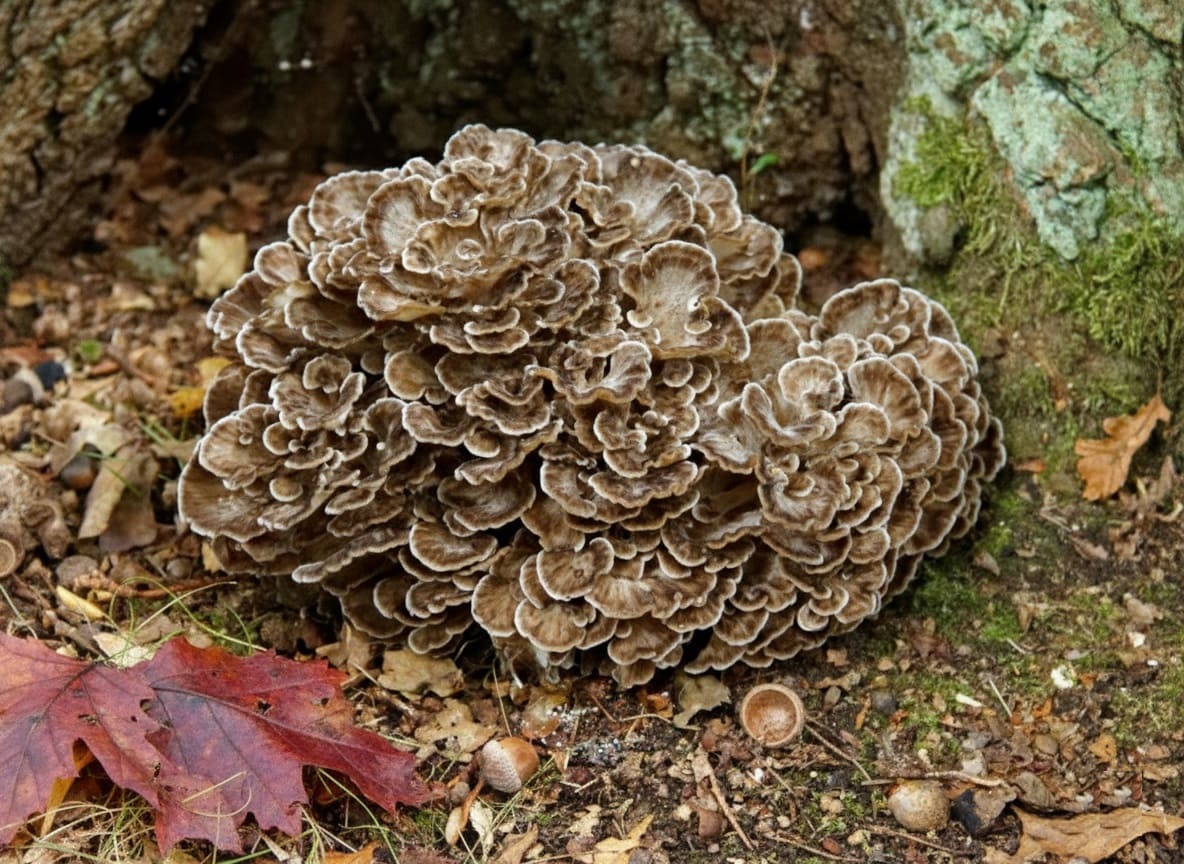
- Finding strategy
Circle the entire trunk slowly—these masters of camouflage often hide on the far side, perfectly matched to leaf litter. Some hunters discreetly mark productive trees (tape on the backside works) to relocate them next autumn.
- Where and when
Fall (late August through November) at the base of mature oaks, particularly where trees are declining or already dead. They fruit in the same locations for many years as the mycelium slowly consumes the root system.
Oyster Mushrooms (Pleurotus ostreatus)
Found year-round in temperate areas and growing in obvious shelf-like clusters, oysters offer reliable foraging with excellent culinary value.
Identifying features:
- Shell or fan-shaped caps growing in overlapping clusters
- White to gray to brownish coloration
- White gills that run down a short, off-center stem (or no stem)
- Grows exclusively on dead or dying hardwood trees
- Mild anise or almond aroma when young
- Soft, delicate texture
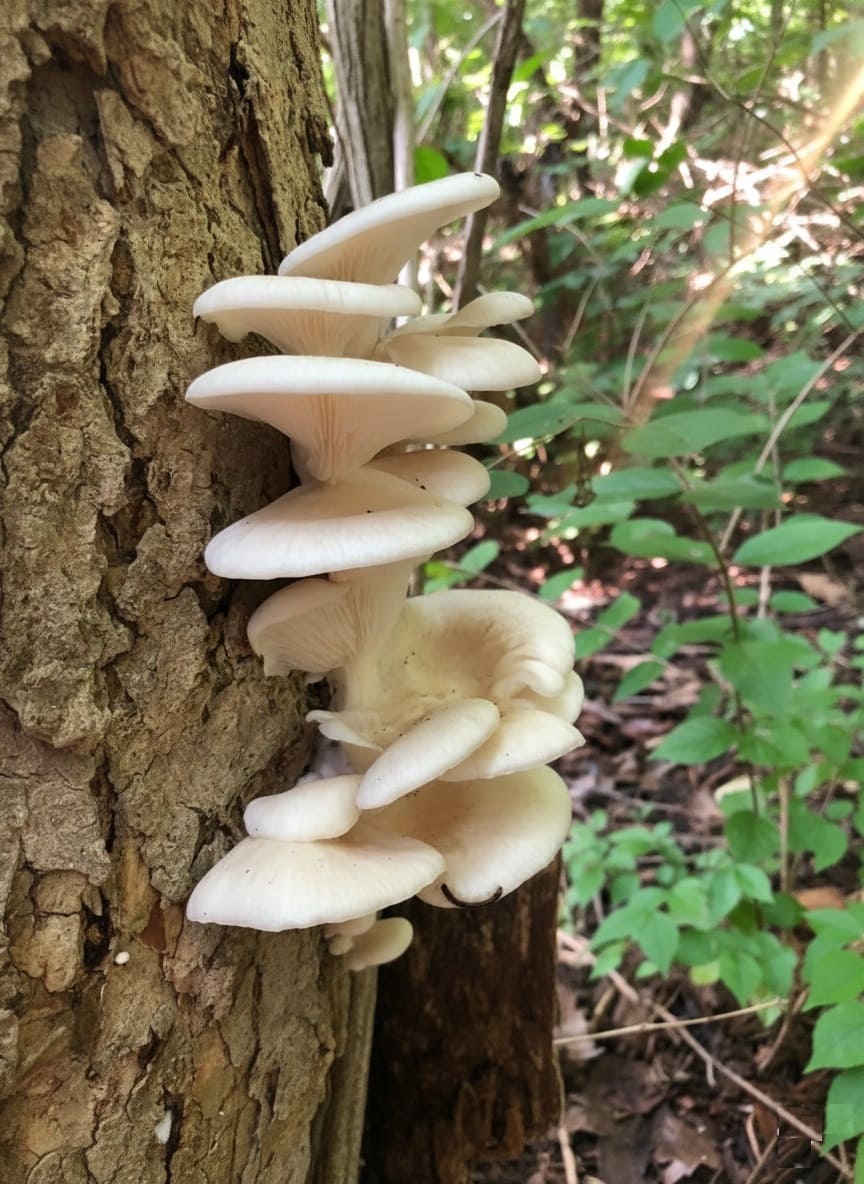
- Where and when:
Dead standing trees, fallen logs, and stumps, particularly beech, aspen, poplar, oak, and cottonwood. Peak productivity comes in spring and fall, but they can fruit year-round during mild weather—even pushing through snow after a warm spell.
- Harvest tip:
The tender outer edge of clusters has the best texture. Tough stems near the attachment point are usually discarded. Unlike many mushrooms, oysters fruit so prolifically that collecting generously from one spot rarely depletes the resource.
The Art of Identification: Beyond Pictures
One photo in a field guide will never provide sufficient information for safe identification. You need to examine multiple characteristics systematically.
The Complete Identification Process
- Cap examination:
Note the shape (convex, flat, funnel-shaped?), size, color (which changes with age), surface texture (smooth, scaly, sticky?), and edge characteristics (smooth, ragged, or ribbed?). Observe whether it changes color when bruised.
- Underside structures:
Does it have gills, pores, teeth, or ridges? If gills, how are they attached to the stem—free, attached, or running down? What’s their spacing and color? Spore color reveals crucial information.
- Stem characteristics:
Examine shape, texture, color, presence of rings (annulus) or cups (volva) at the base, and whether it’s hollow or solid when cut. Some edible boletes bruise blue when cut—this is normal and not a sign of toxicity.
- Flesh behavior:
Cut the mushroom and observe. Does the color change (bruise)? What’s the texture—firm, crumbly, or soft? Some species exude latex (milky liquid) when cut.
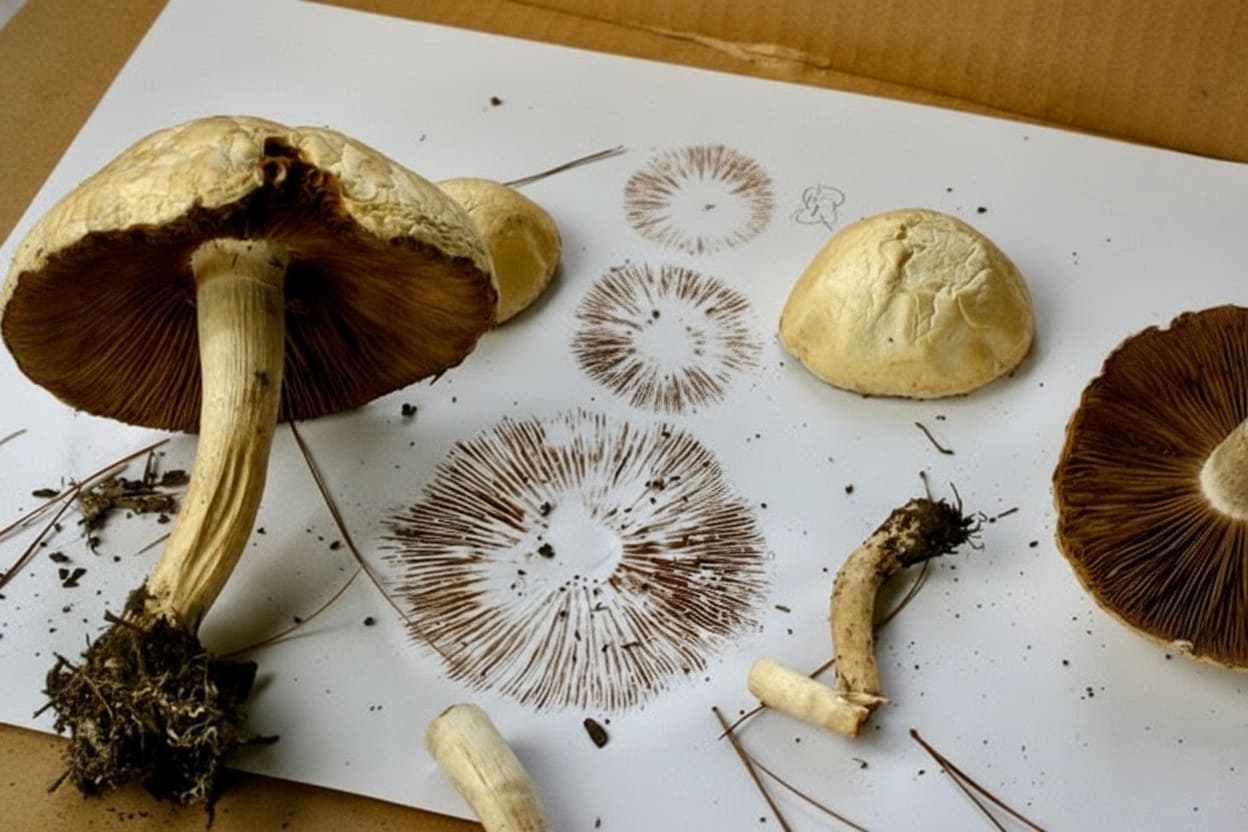
- The spore print technique:
Remove the stem from a mature specimen, place the cap gill-side down on white paper (or half white, half dark for visibility), cover with a bowl to prevent air currents, and wait 8-24 hours.
The resulting spore deposit color—white, cream, pink, brown, purple-brown, or black—eliminates many possibilities and confirms others. This single test differentiates many look-alikes.
- Smell matters:
Crush a small piece and smell it immediately. Mushrooms range from pleasant (almond, anise, apricot) to unpleasant (chlorine, fishy, chemical, or faecal). Some identification keys rely heavily on odor.
- Context clues:
What’s it growing on—soil, wood, or dung? Which trees are nearby? What time of year? Is it solitary, scattered, in clusters, or forming fairy rings? All these factors narrow identification.
Using Technology Wisely
1. Identification apps like iNaturalist, Picture Mushroom, and Shroomify provide starting points but should never be your sole verification for edibles. Use apps to generate possibilities, then confirm with field guides and experts.
The AI might suggest five similar species—you need to know which specific features distinguish them.
2. Online communities connect you with knowledgeable enthusiasts. Post clear photos to Facebook groups or Reddit’s r/mycology.
Photograph from multiple angles: top view, underside showing gills or pores, stem including base, habitat with surrounding trees, and a shot showing scale. Better documentation yields better identifications.
3. Local mycological societies offer the gold standard—hands-on learning with experts who examine physical specimens. Most host regular forays, identification workshops, and annual mushroom shows where hundreds of species are displayed with expert commentary.
Membership typically costs $25-50 annually and accelerates learning exponentially.
Sustainable and Ethical Foraging Practices
- Harvest moderately.
Even in a bonanza flush, take no more than half of what you find. Leave some for wildlife (many animals depend on mushrooms for nutrition), for spore dispersal, and for other foragers to enjoy the discovery.
The practice ensures future harvests and maintains ecological balance.
- The cut-versus-pull debate has raged for decades.
Current research suggests neither method significantly impacts underground mycelium. Cutting keeps mushrooms cleaner and feels less destructive.
Pulling (with a gentle twist to minimize disturbance) allows examination of the entire stem base, which aids identification. Choose whichever method suits your purpose.
- Use appropriate containers.
Wicker baskets and mesh bags allow spores to escape as you walk, potentially seeding future harvests. Some hunters believe this practice sustains populations, though scientific evidence remains limited.
Regardless, the open weave prevents condensation that accelerates decay.
- Harvest appropriate stages.
Collect young to mature specimens at their prime, not tiny buttons that haven’t released spores yet. Avoid ancient, rotted, or heavily bug-infested specimens—they’ve completed their reproductive cycle and make poor eating anyway.
- Tread lightly.
Forest floor ecology is delicate. Walk carefully, avoid creating new trails through sensitive areas, and never rake through leaf litter searching for hidden mushrooms. Your impact extends beyond the mushrooms you harvest.
Know the Legal Framework
Check regulations before every foraging trip, especially in unfamiliar areas:
- National Forests generally allow personal-use collection without permits, typically 1-3 gallons per day. Commercial harvesting requires paid permits. Some high-demand species (matsutake mushrooms in Oregon and Washington) have special restrictions.
- National Parks prohibit collection in most cases. A few allow small quantities for personal consumption—confirm specific park regulations before visiting.
- State and local lands have varied rules. Research beforehand or call ranger stations.
- Private property requires explicit permission from landowners. Never assume access.
- Protected species exist in some regions. Familiarize yourself with local conservation concerns.
Fines for illegal harvesting can reach hundreds of dollars, and game wardens may confiscate equipment and vehicles in serious cases.
From Forest to Fork: Processing Your Harvest
Immediate Post-Harvest Care
- Field cleaning reduces work later.
Brush off loose dirt, pine needles, and debris before bagging. Trim dirty stem bases in the field. This keeps your basket cleaner and reduces indoor cleanup time.
- Separate species carefully.
Keep different types in separate bags or sections of your basket, especially if any are unknowns pending identification. Cross-contamination between a poisonous mushroom and edibles is theoretically possible, though rare.
- Store properly in transit.
Keep mushrooms cool if possible. Don’t leave a basket in a hot car—they’ll deteriorate rapidly. Paper bags in a cooler (without ice contact) work well for longer trips.
Related posts:
- How to Grow Mushrooms Indoors and Outdoors: Easy Tips for Beginners
- Mastering the Market: Innovative Strategies for Mushroom Cultivation at Possum Bottom Farms
Home Cleaning Process
- Start with dry brushing.
Use a soft brush, pastry brush, or specialized mushroom brush to remove loose dirt and debris. This alone suffices for firm species like boletes and chanterelles.
- Trim strategically.
Cut away damaged portions, bug holes, and dirty stem bases. For soil-growing species like morels and chanterelles, remove significant stem length where dirt embeds in the tissue.
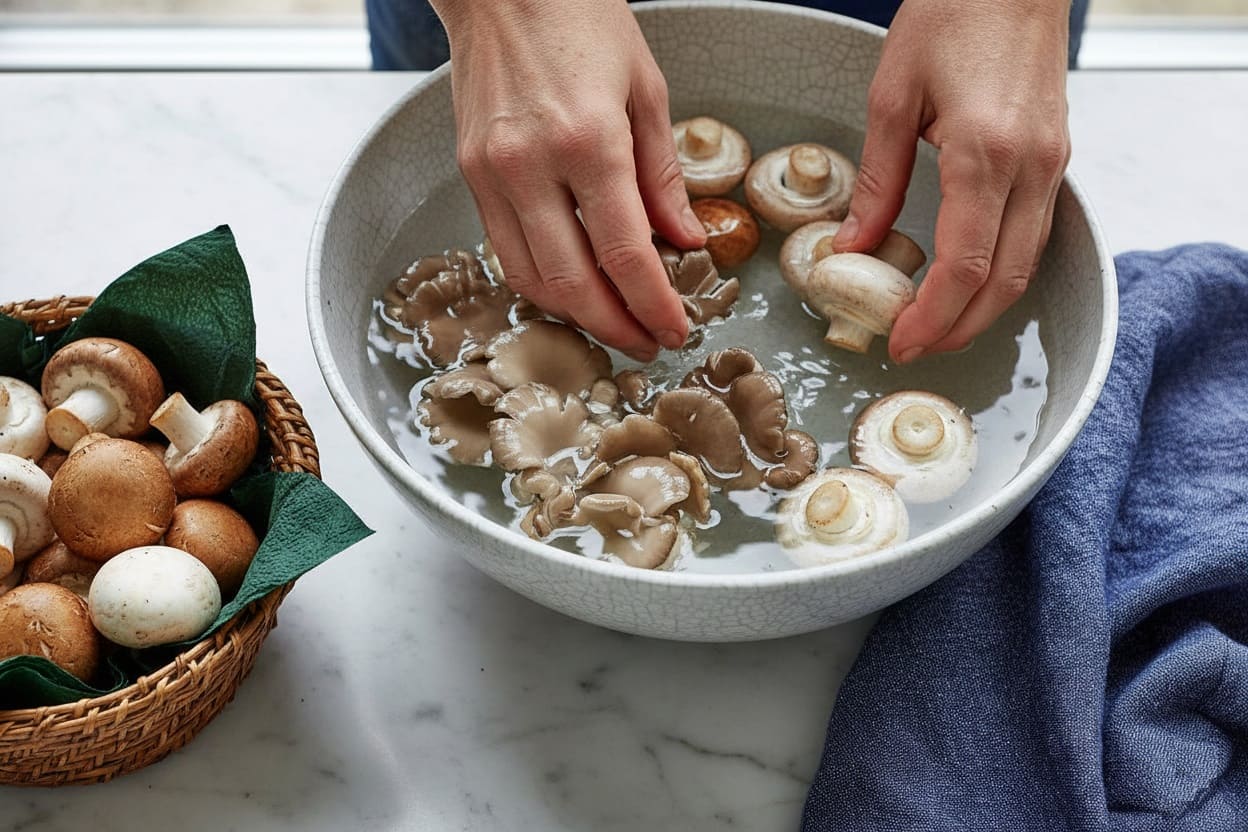
- Rinse sparingly, if at all.
Most experts recommend minimal water exposure—mushrooms absorb moisture like sponges, affecting texture and storage life. If rinsing is necessary (morels often require it due to hollow structure), work quickly with cold water and pat dry immediately with towels.
- Inspect for inhabitants.
Slice mushrooms in half lengthwise to check for worms or larvae. Small infestations can be trimmed away; heavy infestations mean composting that specimen.
- Never wash before storing.
Clean mushrooms only just before cooking. Storing wet mushrooms accelerates decomposition dramatically—they’ll be slimy within 24 hours.
Storage Guidelines
- Refrigerate immediately in paper bags or wrapped in paper towels inside partially open containers. Most wild mushrooms keep 5-7 days when properly stored. Hen of the woods lasts longer; shaggy manes deteriorate within hours of harvest.
- Use or preserve promptly. Don’t let prime specimens languish. Process excess into preserved forms within 1-2 days of harvest.
Cooking Fundamentals
Always cook wild mushrooms thoroughly.
Heat breaks down indigestible cell walls, neutralizes heat-labile toxins present even in edible species, and develops complex flavors through Maillard reactions. There are no exceptions—all wild mushrooms must be cooked.
Start with simple preparations that highlight natural flavors:
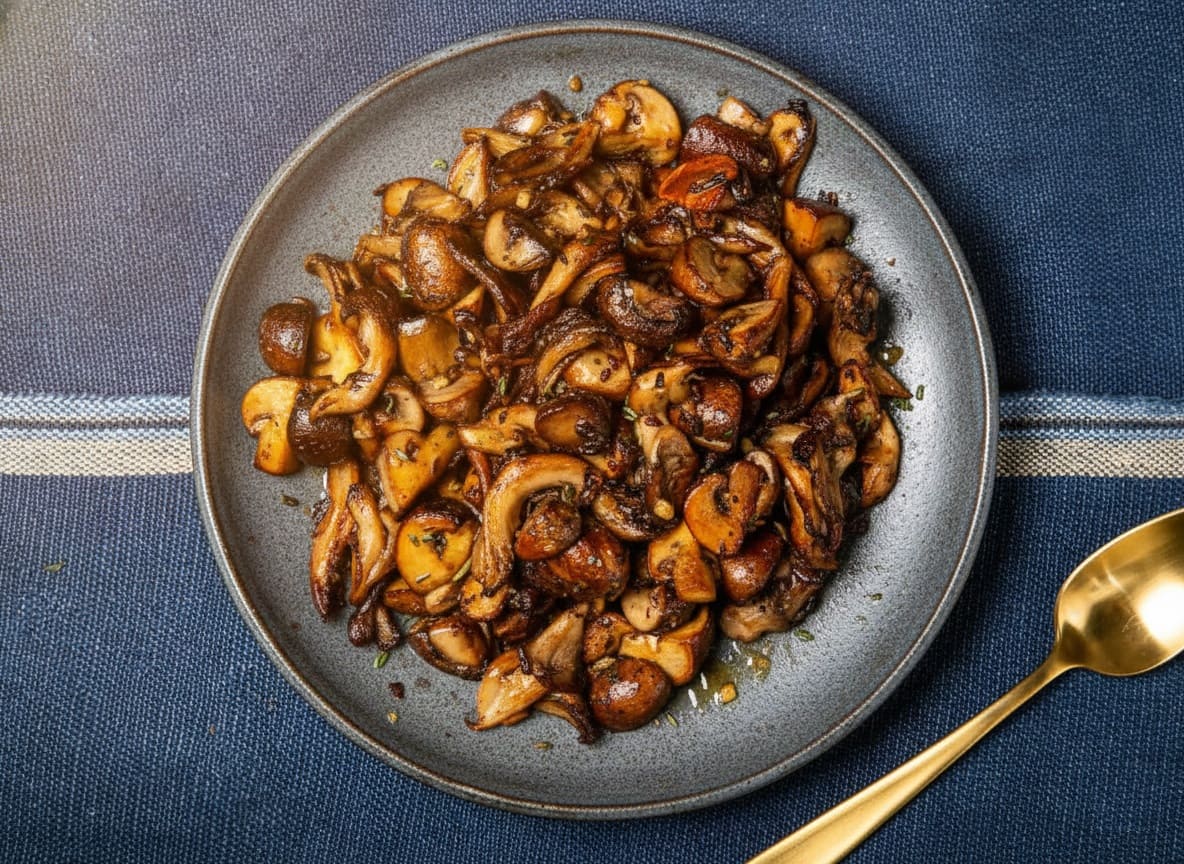
The classic sauté showcases any mushroom beautifully. Heat butter or olive oil over medium-high heat, add sliced mushrooms in a single layer without crowding, and resist the urge to stir for 2-3 minutes while they develop golden color.
Flip and cook until caramelized. Season with salt, pepper, and fresh thyme or parsley. Add minced garlic or shallots in the final minute. That’s it—pure mushroom essence.
Mushrooms also excel in soups and broths, cream sauces for pasta, risottos, and as side dishes complementing roasted meats.
Species-specific approaches:
Morels require thorough cleaning due to their hollow structure—slice lengthwise, rinse quickly if needed, and sauté with butter and shallots. Their earthy, nutty flavor needs little enhancement.
Chanterelles hold their texture well, making them perfect for cream sauces or egg dishes. Their fruity notes complement rich, fatty ingredients.
Chicken of the woods, when young and tender, can be breaded and fried like actual chicken cutlets, or used in tacos and sandwiches. Its meaty texture is remarkable.
Hen of the woods separates into individual fronds easily. Roast at high heat until crispy edges develop, or add to stir-fries where its firm texture shines.
Oyster mushrooms cook quickly—too much heat and they become rubbery. Quick sauté or addition to soups at the end works best.
Preservation Methods for Excess
1. Dehydrating works superbly for boletes, morels, chanterelles, and many others. Clean thoroughly, slice 1/4-inch thick, arrange on dehydrator trays without touching, and dry at 110-125°F until crispy (8-12 hours typically).
Store in airtight jars in a cool, dark place. Properly dried mushrooms last for years. Rehydrate in warm water 20-30 minutes before use—save the flavorful soaking liquid for soups and sauces.
👉 Here’s How to Dehydrate Apples at Home: Easy Steps for Perfect Results
2. Sautéing before freezing produces better results than freezing raw. Cook mushrooms completely (this removes excess moisture), cool to room temperature, then freeze in portion sizes. Chanterelles and boletes freeze reasonably well; delicate species like oysters don’t.
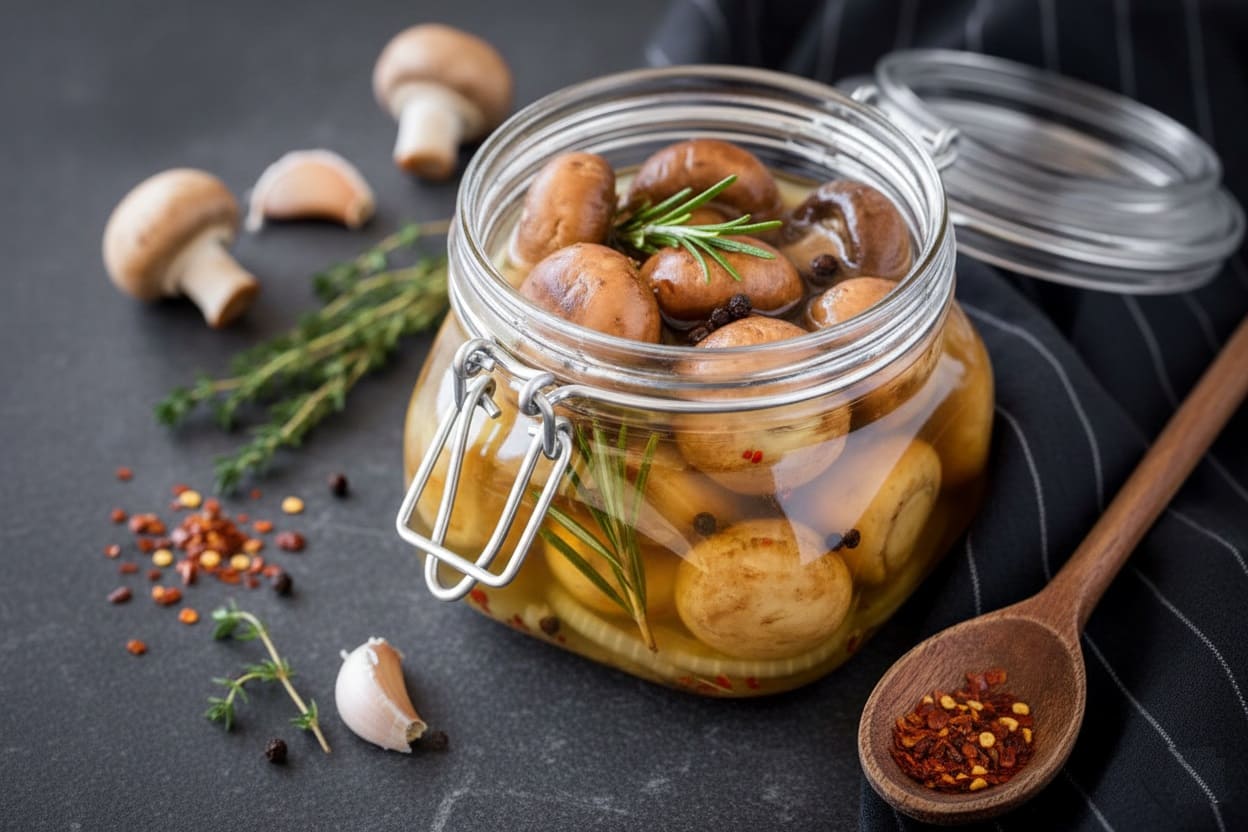
3. Pickling transforms mushrooms into tangy condiments. Young boletes, hedgehogs, and honey mushrooms pickle beautifully in vinegar-based brines with spices.
4. Mushroom powder intensifies umami in any dish. Dehydrate mushrooms until bone-dry, pulverize in a spice grinder or blender, and store in airtight containers. Add to soups, sauces, dry rubs, and compound butters for instant depth.
Building Skills Over Time
First Season Focus
Limit yourself to three truly foolproof species your first year. Learn them exhaustively—every development stage from button to decay, seasonal timing, habitat preferences, and normal variations.
Join local forays whenever possible. Photograph every find from multiple angles and keep detailed notes in a journal: dates, locations, weather patterns, tree associations, and nearby landmarks.
This database becomes invaluable. You’ll notice patterns: “Chanterelles appeared here three days after that September rain” or “Morels fruit on this slope a week before the valley floor.” These observations accumulate into reliable predictive knowledge.
Expanding Your Range
Add one or two new species each subsequent season. The more mushrooms you know, the more you’ll find—not because there are suddenly more mushrooms, but because your trained eyes detect previously invisible treasures.
You walked past those oyster mushrooms a hundred times before learning to spot them.
Study mushroom families (boletes, russulas, amanitas) to understand shared characteristics. This framework accelerates learning—once you recognize bolete features, identifying specific species becomes much easier.
- Learn toxic species actively.
Knowing what to avoid is as important as knowing what to seek. Studying Death Caps helps you distinguish them from edible Amanitas. Understanding deadly galerinas makes you more cautious around all little brown mushrooms.
The “Little Brown Mushroom” Reality
Mycologists use “LBM” to describe hundreds of small, dull-colored species that resist easy identification. Many require microscopic examination of spore characteristics for definitive identification.
As a beginner—and even as an experienced hunter—simply note these, photograph them if interested for learning purposes, but leave them undisturbed. The risk-to-reward ratio isn’t worth it.
Similarly, “BWM” (big white mushrooms) can confuse even experts. Many Amanita species start as white buttons that could be edible Caesar’s mushrooms or deadly Destroying Angels. Unless you’re absolutely certain, admire and photograph but don’t harvest.
Community Connection
1. Local mycological societies are treasure troves of expertise and enthusiasm. Members lead identification walks, teach workshops, organize mushroom festivals, and create welcoming spaces for beginners to learn without judgment.
Annual dues typically cost $25-50 and include access to forays, meetings, and identification services. This is the single best investment a beginning mushroom hunter can make.
2. Find a mentor. Nothing accelerates learning like walking behind an experienced hunter who shares their decision-making process.
They’ll point out mushrooms you walked past, explain habitat clues, and offer intuitive wisdom that only comes from decades of observation. Many hunters are generous with knowledge—just don’t expect them to reveal their best secret spots.
3. Give back as you learn. When you gain confidence, share knowledge with newcomers. The mushroom community thrives on generosity. That expert who helped you identify your first morels was once a beginner too.
Common Pitfalls to Avoid
The confirmation bias trap.
Your subconscious desperately wants that mushroom to be edible, which can make you overlook contradictory evidence. Combat this by creating written checklists for each species listing all required features.
Ask yourself “What else could this be?” before confirming identification. Get second opinions from experienced hunters. Remember that passing on uncertain specimens is always the correct choice.
The dangerous overgeneralization.
Finding one edible species doesn’t mean similar-looking mushrooms are safe. The deadly Amanita genus includes both edible species (Caesar’s mushroom in Europe) and killers (Death Cap, Destroying Angel).
Each mushroom is unique until you’ve confirmed every diagnostic feature matches your target species.
The contamination risk.
Avoid collecting near roads, industrial sites, treated lawns, or agricultural fields. Mushrooms bioaccumulate heavy metals, pesticides, and other chemicals from their environment.
After Chernobyl, European mushrooms tested radioactive for years. Choose pristine forests far from obvious pollution sources.
The quantity-over-quality mistake.
Beginners sometimes harvest marginal specimens—old, bug-eaten, waterlogged—simply because they found them. Resist this impulse. Only collect fresh, firm, healthy mushrooms in their prime that you’d pay for at a farmers market. Quality always beats quantity.
Frequently Asked Questions
- Q: Will picking mushrooms harm the organism or prevent future growth?
A: No. The mushroom is just the fruiting body—analogous to an apple on a tree. The actual organism (mycelium) lives underground and produces new mushrooms when conditions are right, regardless of whether you harvested previous fruiting bodies.
Sustainable harvesting doesn’t damage mycelium.
- Q: What’s the most dangerous mushroom in North America?
A: Death Cap (Amanita phalloides) and Destroying Angels (Amanita bisporigera, A. virosa, A. ocreata) cause over 90% of mushroom-related deaths.
They contain amatoxins that cause delayed symptoms (6-24 hours after eating), by which time severe liver damage has already occurred.
Treatment options are limited and outcomes depend on how much was consumed and how quickly treatment begins.
- Q: Can I sell mushrooms I forage?
A: Regulations vary widely by jurisdiction. Many areas require permits for commercial harvesting on public lands. Health departments regulate sales of wild foods. Some states restrict or prohibit wild mushroom sales entirely.
Research local laws thoroughly before selling anything you’ve foraged. Most mushroom hunters gift excess to friends rather than navigating commercial regulations.
- Q: Do I need to have mushrooms officially identified before eating?
A: While not legally required, it’s highly recommended for beginners. Many mycological societies offer free identification services at meetings or via online groups. Some areas have “mushroom advisors” (common in Europe; less so in North America).
In the US, bringing samples to experienced society members or attending identification events at mushroom festivals provides verification. The responsibility for correct identification ultimately rests with you.
- Q: How do I know if I’m allergic to a particular mushroom?
A: Even commonly eaten species can cause reactions in sensitive individuals. Follow the two-teaspoon rule: eat only two cooked teaspoons of any new-to-you species, then wait 24 hours before eating more.
This precaution allows you to identify problem species without wasting an entire harvest. Keep a raw sample refrigerated during this waiting period for potential identification if symptoms develop.
- Q: Can I forage mushrooms year-round?
A: Yes, though abundance varies seasonally. Spring brings morels and early oysters. Summer offers chanterelles and boletes. Fall peaks with dozens of species. Winter oysters appear during mild spells.
Year-round hunting requires encyclopedic knowledge of seasonal patterns, but dedicated hunters find mushrooms in every month.
Related posts:
- Can You Eat Acorns? Foraging, Processing, Cooking & Safety Guide
- Foraging Wild Cherries: Discovering The Nature’s Delights
- How to Find, Identify and Forage Wild Strawberries Like a Pro
Your starting action steps
- This week, purchase a field guide specific to your region and locate your nearest mycological society.
- This month, attend an identification workshop or foray to meet mentors and see specimens in person.
- This season, commit to learning one species thoroughly—every stage, every habitat preference, every identifying characteristic.
- This year, keep a foraging journal documenting finds, conditions, and locations.
The mushrooms are waiting in forests near you right now. All you need to do is look down, slow down, and begin.
Remember: start with foolproof species, never eat what you can’t identify with absolute certainty, and embrace the learning process. Your first find might be tomorrow, or it might be next season—but the search itself is half the reward. Happy hunting.