
I still remember staring at those three sad, shriveled potatoes I’d forgotten in the back of my kitchen cabinet. Most people would have tossed them straight into the compost bin, but something about their determined little sprouts made me pause. What if, instead of throwing them away, I gave them a chance to become something more?
That moment of curiosity led me down a rabbit hole that completely transformed how I think about potato growing. Within three months, those forgotten spuds had multiplied into pounds of fresh, golden potatoes—all from a simple plastic bucket on my patio.
If you’ve ever thought you needed acres of farmland to grow meaningful amounts of food, or if traditional gardening feels overwhelming, bucket potato growing might just be the game-changer you’ve been looking for.
Why Growing Potatoes in Buckets Is a Total Game-Changer
Let’s be honest—traditional potato growing can feel intimidating. The whole process of digging trenches, hilling soil, and hoping you don’t accidentally spear your harvest with a garden fork during harvest seems like something only “real” gardeners can master. But bucket growing? It’s like potato cultivation for the rest of us.
The space factor alone is revolutionary. I live in a suburban home with a modest yard, and dedicating large garden beds to potatoes always felt like a luxury I couldn’t afford.
But buckets? They fit anywhere—patios, balconies, even sunny spots indoors. You’re not competing with other plants for prime real estate; you’re creating your own little potato paradise wherever you have room.
Then there’s the control aspect. When you grow in buckets, you become the master of your potato’s universe. Poor soil in your yard? Not a problem—you’re bringing in exactly the growing medium your potatoes need. Drainage issues? Solved with a few strategic drill holes. Pest problems? Much easier to manage when everything’s contained and portable.
Container growing also provides excellent disease prevention. Since you’re starting with fresh, sterile potting mix rather than potentially contaminated garden soil, you’re immediately reducing the risk of common potato ailments like scab and blight that can devastate ground-grown crops.
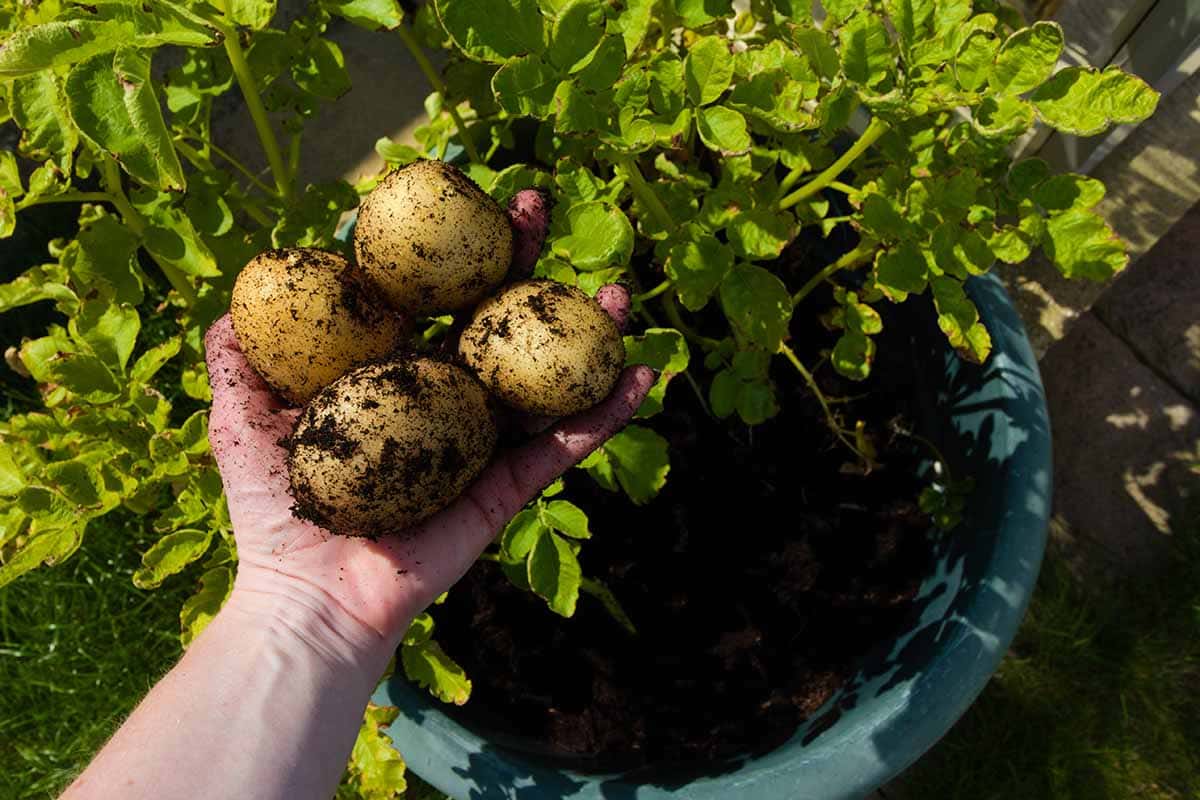
But perhaps my favorite benefit is the harvest experience. There’s something almost magical about tipping over a bucket and watching potatoes tumble out like buried treasure. No careful digging, no accidentally cutting tubers in half with your spade—just pure potato gold waiting to be discovered.
Setting Up Your Potato Bucket System
Choosing the Right Container
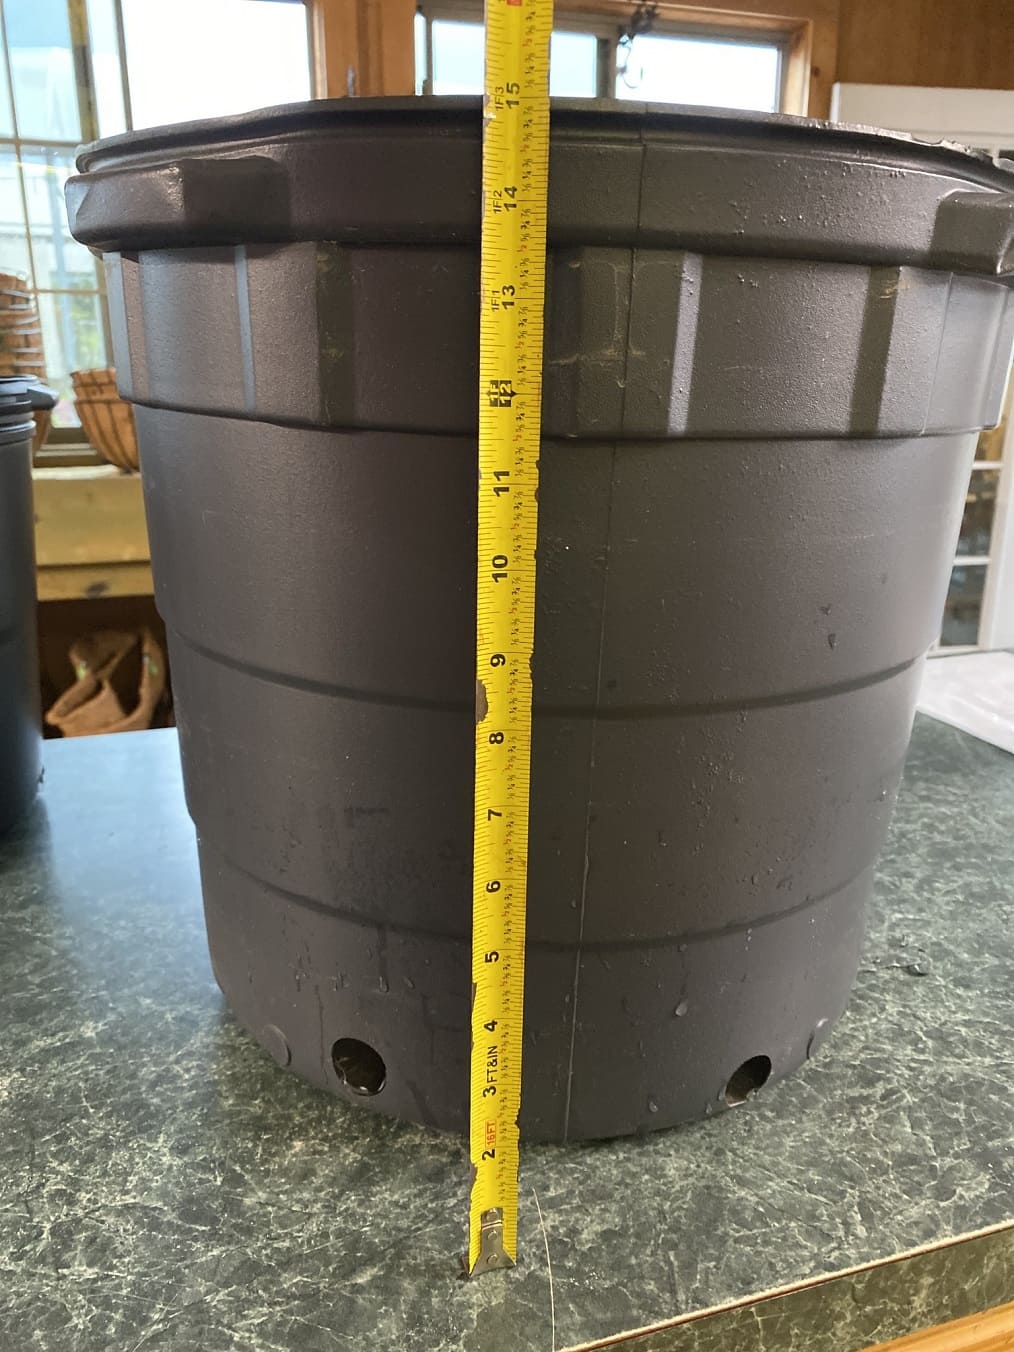
After experimenting with everything from small 2-gallon containers to massive 20-gallon tubs, I’ve learned that 5-gallon buckets hit the sweet spot for most home growers. They’re large enough to produce a meaningful harvest (typically 2-5 pounds of potatoes) while remaining manageable for moving around and harvesting.
That said, if you’re serious about maximizing your yield and have the space, 10-gallon containers can be impressive producers. I once harvested over 8 pounds from a single large container, though it required significantly more soil and became quite heavy once filled.
Food-grade buckets are worth the investment. While any plastic container can work, food-grade options eliminate concerns about harmful chemicals leaching into your soil. Many bakeries and restaurants are happy to give away empty frosting or pickle buckets—just ask! Home improvement stores also sell new food-grade options for around $5-8 each.
Don’t limit yourself to traditional buckets, though. Fabric grow bags work exceptionally well for potatoes and offer excellent drainage and root aeration. Large plastic storage totes, wooden boxes, or even old laundry baskets lined with landscape fabric can serve as potato containers. The key is ensuring adequate size, drainage, and food safety.
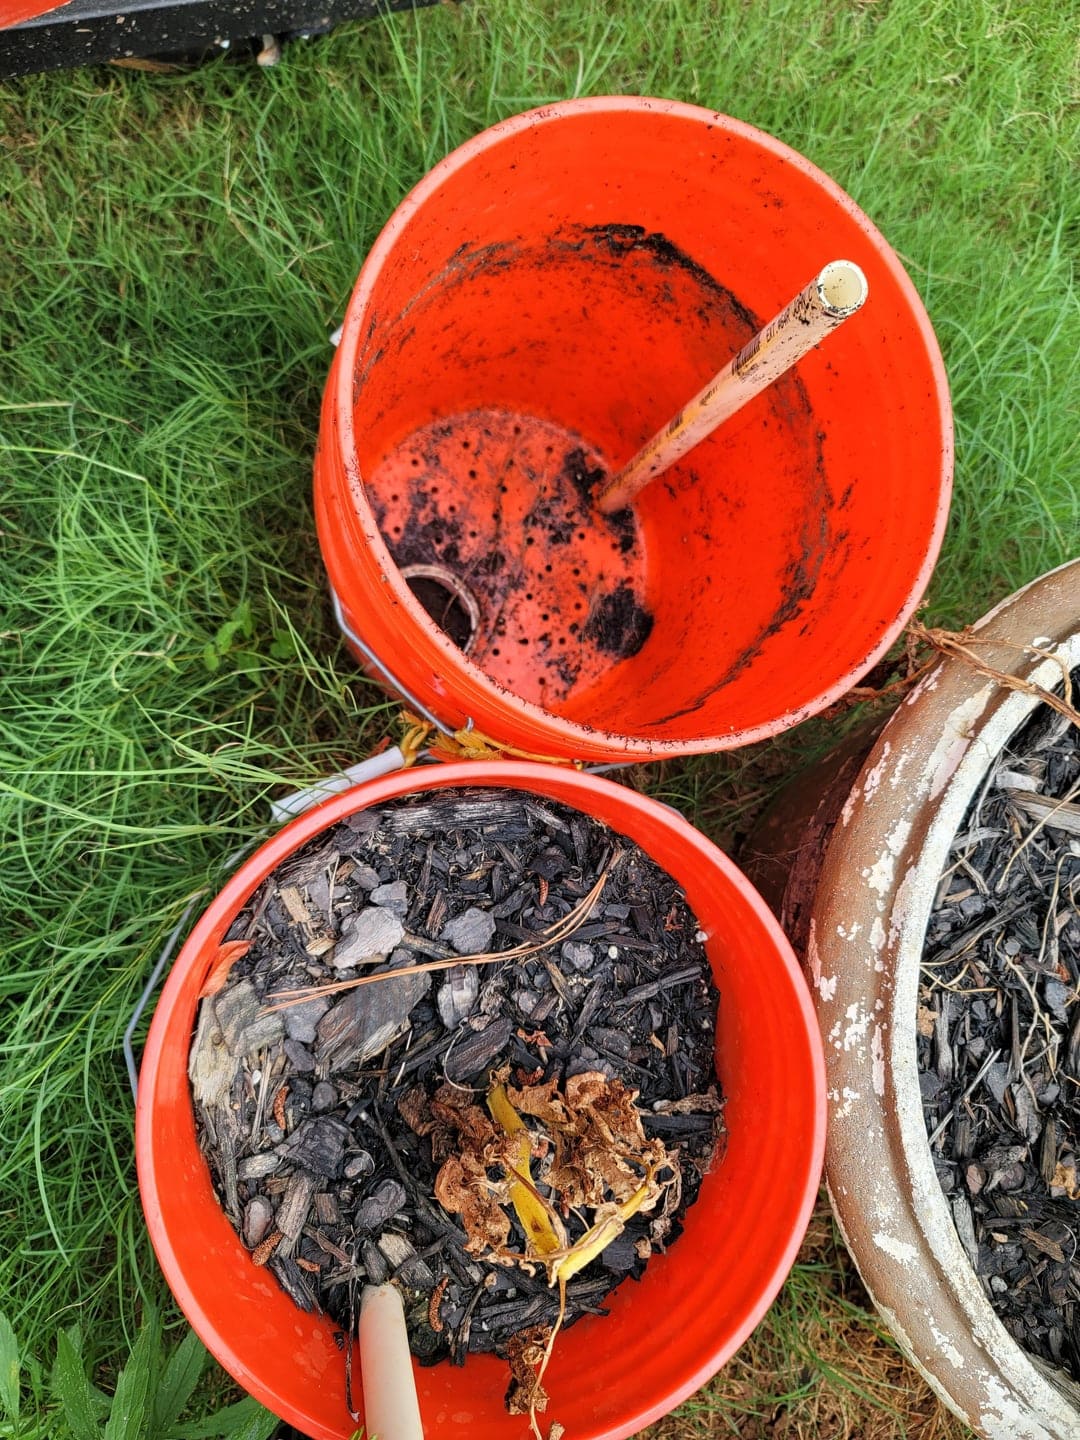
Creating Perfect Drainage
Here’s where many beginners stumble: drainage isn’t optional, it’s absolutely critical. Potatoes sitting in waterlogged soil will rot faster than you can say “potato salad.”
Using a ¼-inch drill bit, create 8-10 holes evenly spaced across the bottom of your bucket. I also add 4-6 holes around the sides, about one inch from the bottom, for extra drainage insurance.
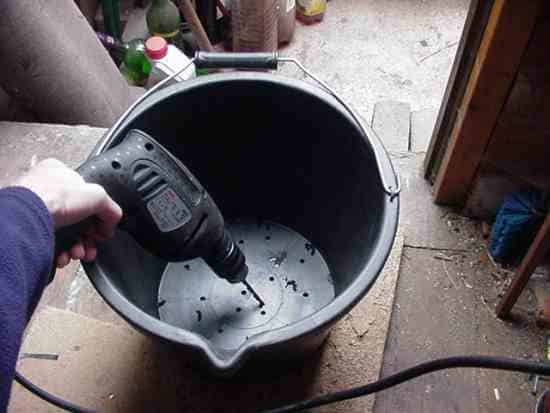
Place a piece of window screen or landscape fabric over the holes before adding soil. This prevents soil from washing out while still allowing excellent drainage. If you’re concerned about the bucket sitting in standing water after heavy rains, elevate it on bricks or wooden blocks to ensure water can escape freely.
Creating the Perfect Growing Environment
Soil: The Foundation of Success
The beauty of container growing is creating the perfect growing environment from scratch. Your ideal mix should be loose, well-draining, and rich in organic matter.
After years of experimentation, here’s the blend that consistently delivers outstanding results: equal parts quality potting soil and well-aged compost, with about 20% perlite or coarse sand mixed in for drainage.
This combination gives your potatoes room to develop while retaining just enough moisture to keep them happy. Avoid garden soil entirely in containers—it compacts too heavily and restricts root development. Some growers swear by adding coconut coir or aged manure, and both can be excellent additions if you have access to them.
Temperature and Timing Considerations
Potatoes thrive in moderate temperatures, preferring soil temperatures between 60-70°F during the day. They can tolerate a range from 45-80°F, but production slows significantly outside their comfort zone. This temperature preference makes timing crucial for success.
In most regions, plant your potato buckets 2-3 weeks before your last expected frost date. The soil should be workable and not frozen solid. If you’re unsure about your local frost dates, check with your county extension service or use online growing calendars specific to your zip code.
For those in warmer climates (zones 9-10), consider fall and winter plantings to avoid summer heat stress. The beauty of bucket growing is that you can move containers to shadier locations during heat waves or into protected areas during unexpected cold snaps.
From Sprout to Spud: The Complete Growing Process
Preparing Your Seed Potatoes
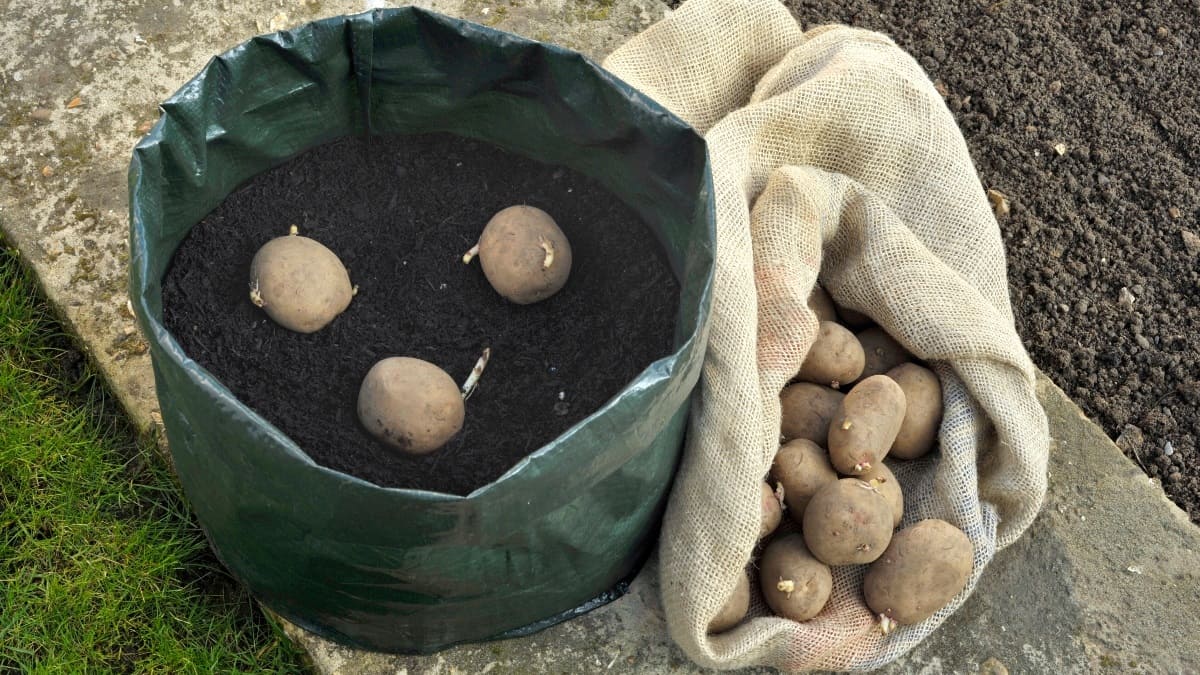
You have two main paths here: certified seed potatoes or organic grocery store potatoes that have started sprouting. Seed potatoes are the gold standard—they’re disease-free and bred for growing rather than eating. But I’ll be honest, some of my best harvests have come from organic potatoes I forgot about in my pantry.
If you go the grocery store route, make sure they’re organic (conventional potatoes are often treated with sprout inhibitors) and show clear signs of sprouting. Those little “eyes” developing shoots are exactly what you want to see.
For larger seed potatoes (bigger than a golf ball), you can cut them into pieces to stretch your investment further. Each piece should have at least one or two healthy eyes.
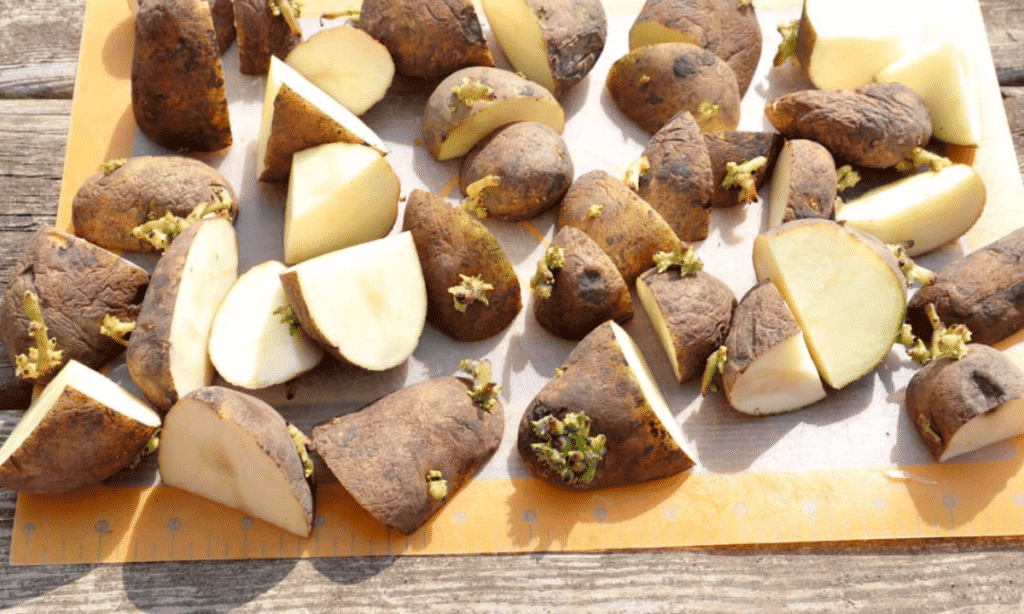
After cutting, let the pieces sit in a cool, dry place for 1-2 days until the cut surfaces form a protective “skin” or callus. This prevents rot when you plant them. Smaller potatoes can be planted whole.
The chitting process (pre-sprouting your potatoes) isn’t required, but it can give you a 2-3 week head start. Simply place your seed potatoes in egg cartons with the most eyes facing up, then leave them in a cool, bright spot for 2-4 weeks until shoots are about ¾-inch long. Keep them out of direct sunlight to prevent the shoots from becoming weak and spindly.
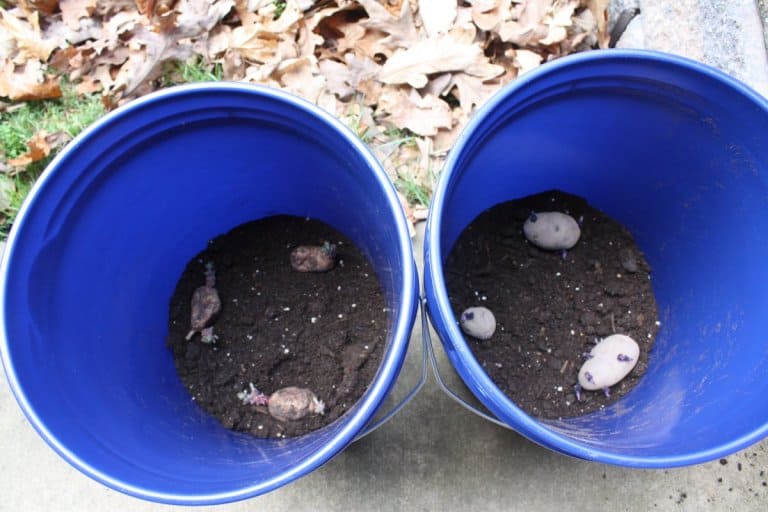
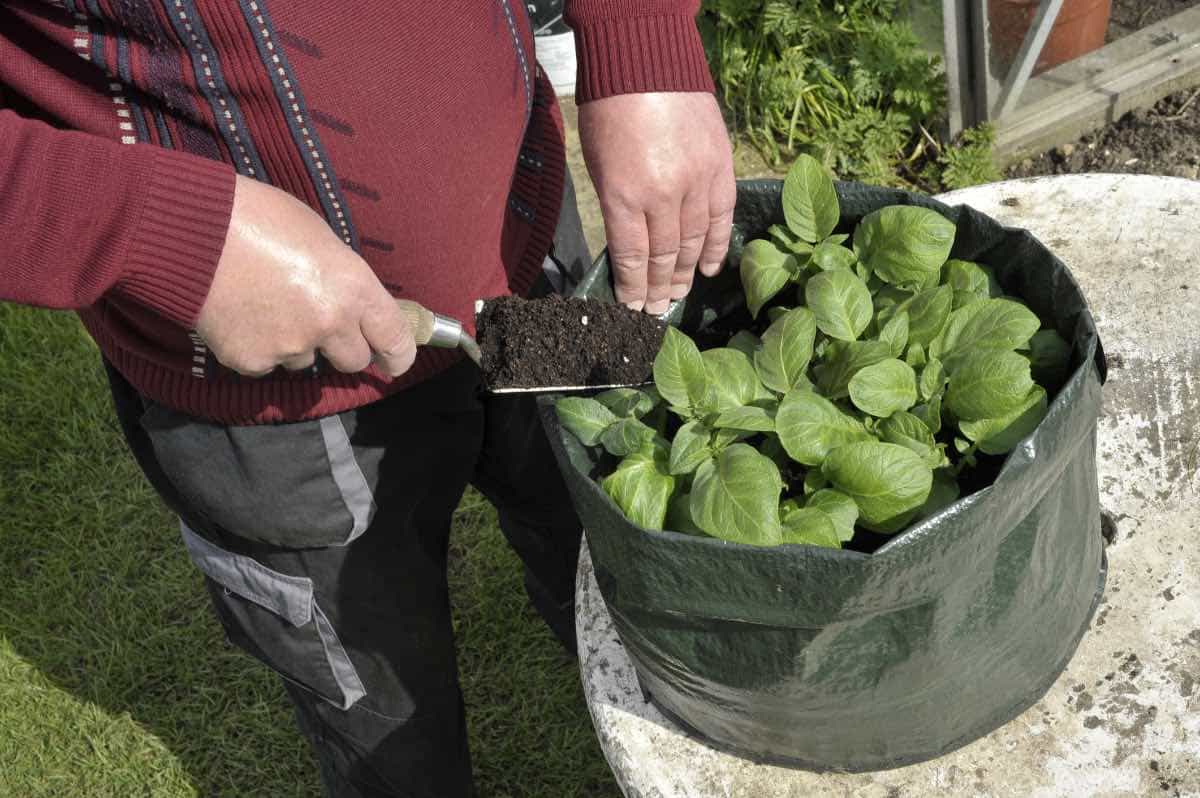
Planting Day: Setting the Foundation
This is where bucket growing differs significantly from traditional methods, and where I see many people get confused by conflicting advice. Some sources tell you to start with just a few inches of soil and gradually fill the bucket as plants grow. Others recommend filling the entire bucket from day one.
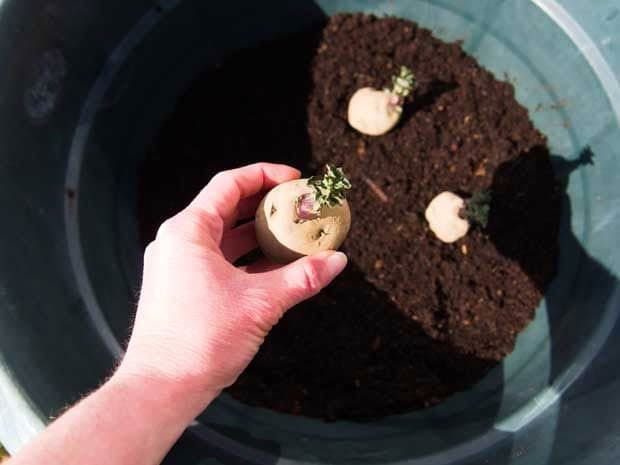
I’ve had success with both methods, but prefer the gradual approach for its flexibility and resource efficiency. Start with 4-6 inches of your soil mix in the bottom of the bucket, then place 2-3 seed potatoes (depending on bucket size) about 6 inches apart with eyes facing up. Cover with another 2-3 inches of soil—just enough to bury them completely.
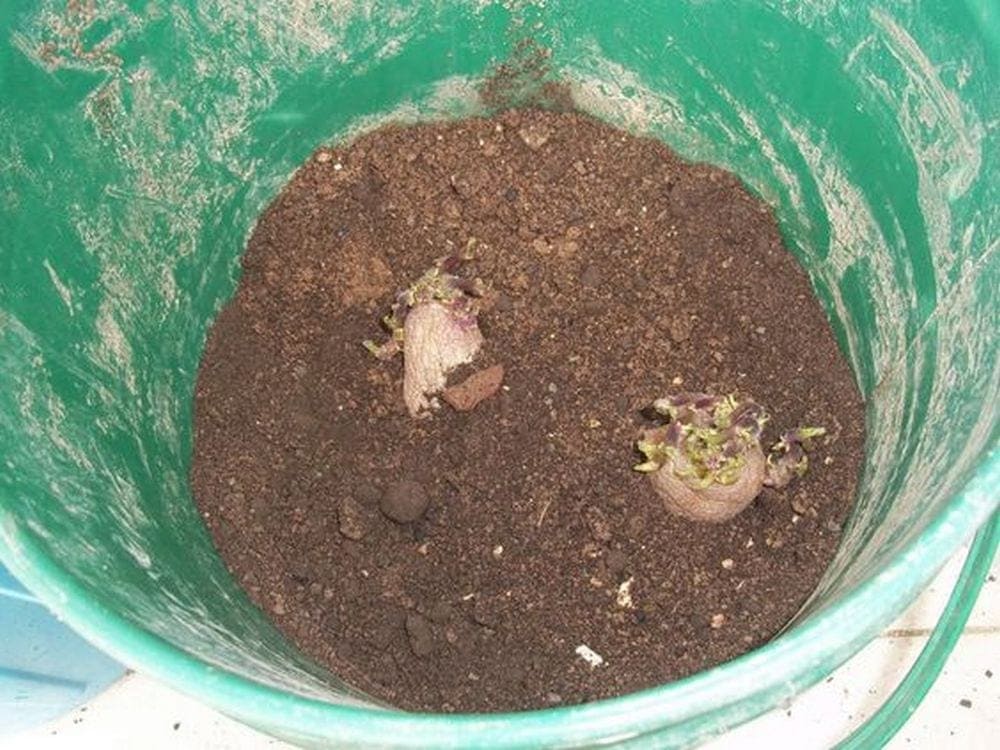
Water thoroughly until you see drainage from the bottom holes, then place in a sunny location that gets at least 6 hours of direct sunlight daily. Within 1-3 weeks, depending on soil temperature, you should see the first green shoots emerging.
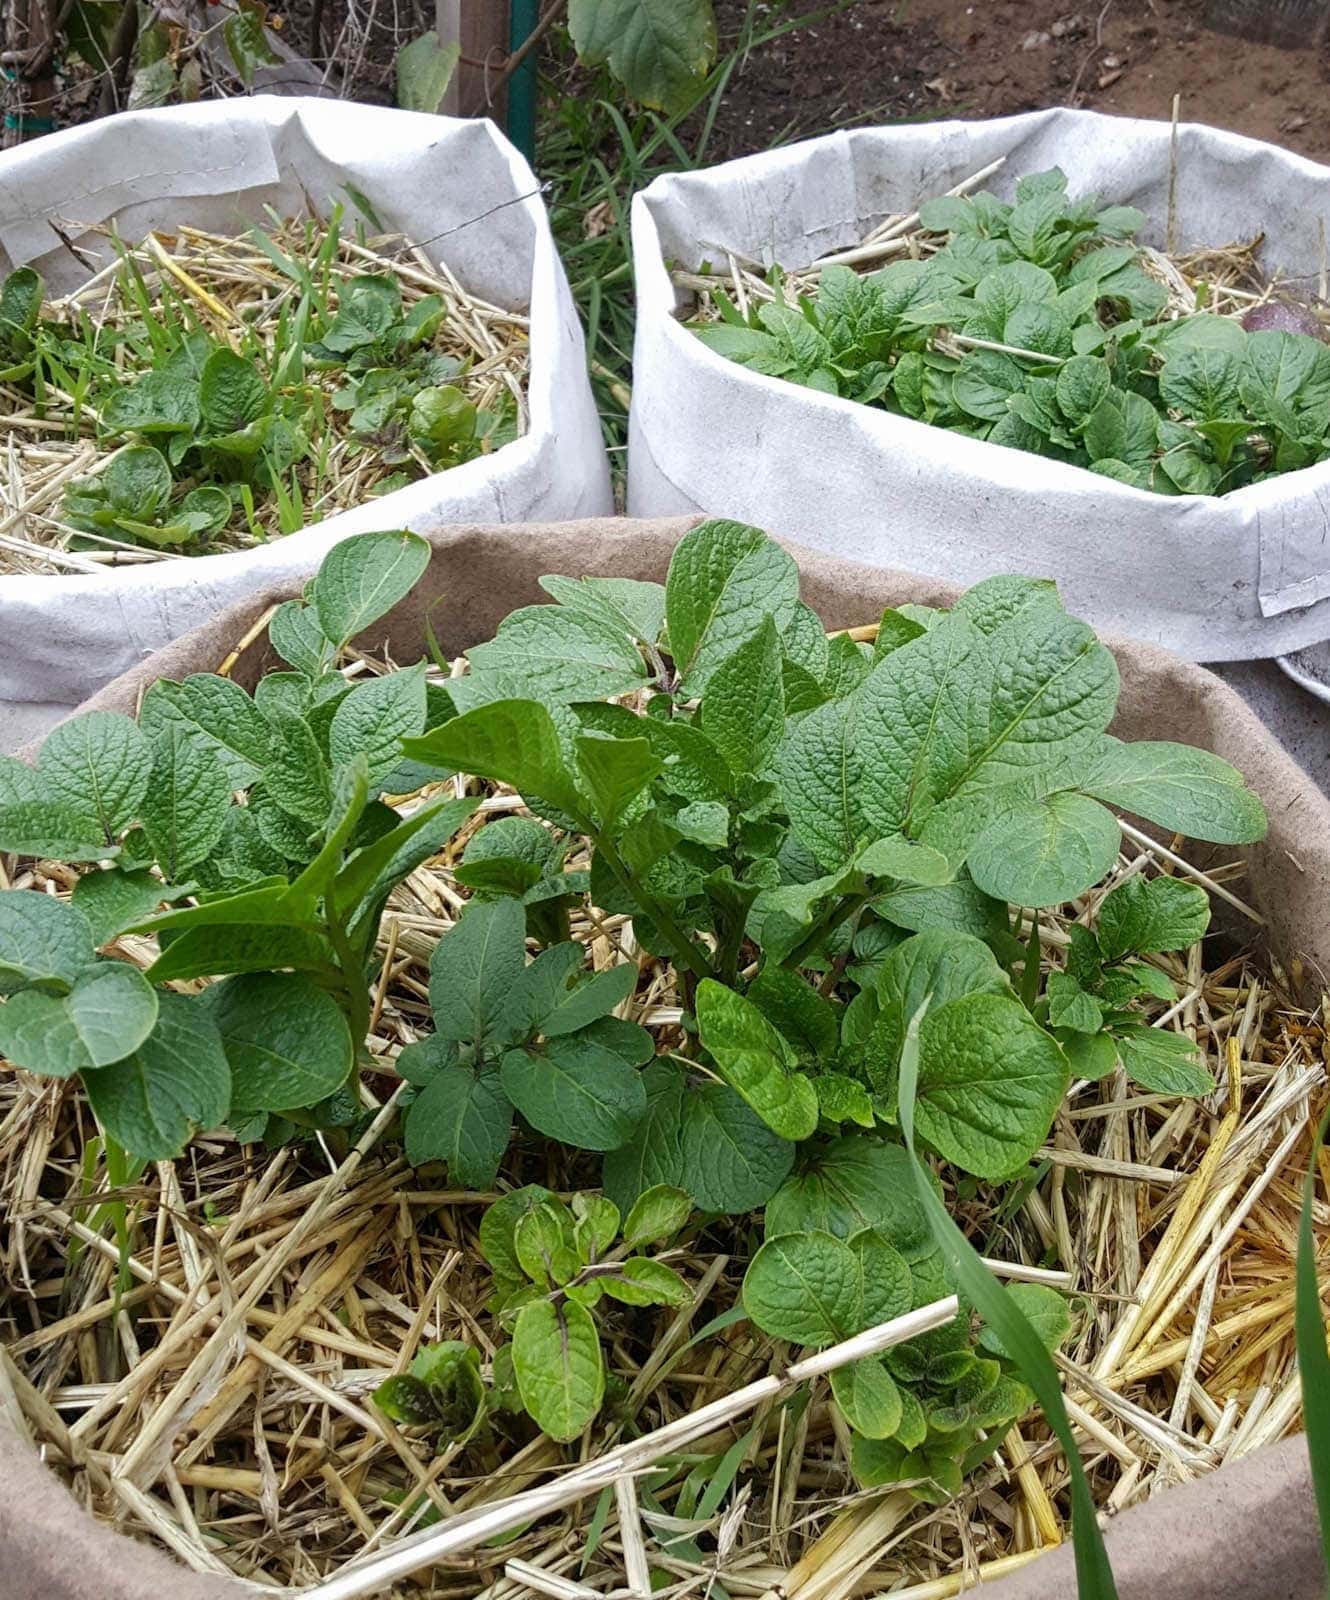
The Progressive Hilling Technique
As your potato plants emerge and grow, you’ll begin the process that makes bucket growing so productive: progressive hilling. This is where those underground stems develop additional potatoes, multiplying your harvest significantly.
When green shoots reach 6-8 inches tall, it’s time for your first hilling. Add enough soil mix to cover about two-thirds of the visible stems, leaving just the top leaves exposed. Your plants will quickly grow through this new soil layer, and the covered stems will develop new potato-producing roots.
Repeat this process every 2-3 weeks until your bucket is nearly full or your plants stop gaining significant height. Most varieties will top out after 3-4 hilling sessions. Leave at least 2-3 inches of space at the top of your bucket for watering and to prevent soil from washing out.
Mulching for Better Results
Once your bucket is full and hilling is complete, add a 2-3 inch layer of organic mulch on top of the soil.
Straw, shredded leaves, or grass clippings work excellently. This mulch serves multiple purposes: it conserves moisture, moderates soil temperature, suppresses any weeds that might sprout, and prevents potatoes from being exposed to light (which causes them to turn green and become toxic).
Mulching is particularly valuable during hot summer weather when containers can dry out quickly and soil temperatures can stress the plants.
Daily Care and Management
Mastering the Watering Balance
Container plants dry out faster than their in-ground cousins, making consistent moisture management crucial. Check your potato buckets daily by sticking your finger 2 inches into the soil. If it feels dry at that depth, it’s time to water.
When you do water, water deeply until you see drainage from the bottom holes. This encourages roots to grow down rather than staying shallow, and ensures the entire root zone gets moisture. During hot summer weather, you might need to water daily or even twice daily. In cooler weather or if you’ve mulched well, every 2-3 days may be sufficient.
Watch for signs of both overwatering and underwatering. Overwatered plants often develop yellowing leaves starting from the bottom, while drought-stressed plants will wilt and may show browning leaf edges.
Related posts:
- Why Are My Cucumber Leaves Turning Yellow? Top Causes & Solutions
- How to Identify and Fix Brown Spots on Your Snake Plant
Feeding Your Potato Plants
Potatoes are what gardeners call “heavy feeders”—they need substantial nutrition to produce those plump tubers we’re after. Start with a balanced, slow-release fertilizer mixed into your initial soil at planting time. Look for something with equal or nearly equal numbers (like 10-10-10) for the first application.
About four weeks after planting, begin supplemental feeding with a fertilizer that’s lower in nitrogen but higher in phosphorus and potassium (something like 5-10-10). This shift encourages tuber development rather than excessive leaf growth. Apply this every 3-4 weeks throughout the growing season.
Organic options like fish emulsion, kelp meal, or compost tea work beautifully and release nutrients slowly. Whatever you choose, always follow package directions and water thoroughly after applying granular fertilizers.
Troubleshooting Common Problems
Yellow or browning leaves can indicate several issues. If it starts from the bottom and works up gradually as the season progresses, it’s often natural aging as harvest approaches. But if it happens suddenly or affects young leaves, check your watering routine first—both overwatering and drought stress can cause similar symptoms.
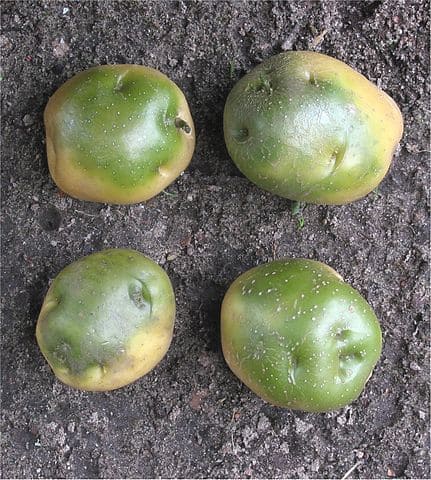
Green potatoes occasionally develop when tubers get exposed to light. Simply add more soil or mulch to cover any visible potatoes. Green potatoes produce solanine, a toxic compound, so any that turn green should be discarded rather than eaten.
Poor yields usually trace back to insufficient sunlight, overcrowding (too many seed potatoes per bucket), inadequate nutrition, or inconsistent watering. Each plant needs adequate space to develop properly—resist the temptation to cram extra seed potatoes into your containers.
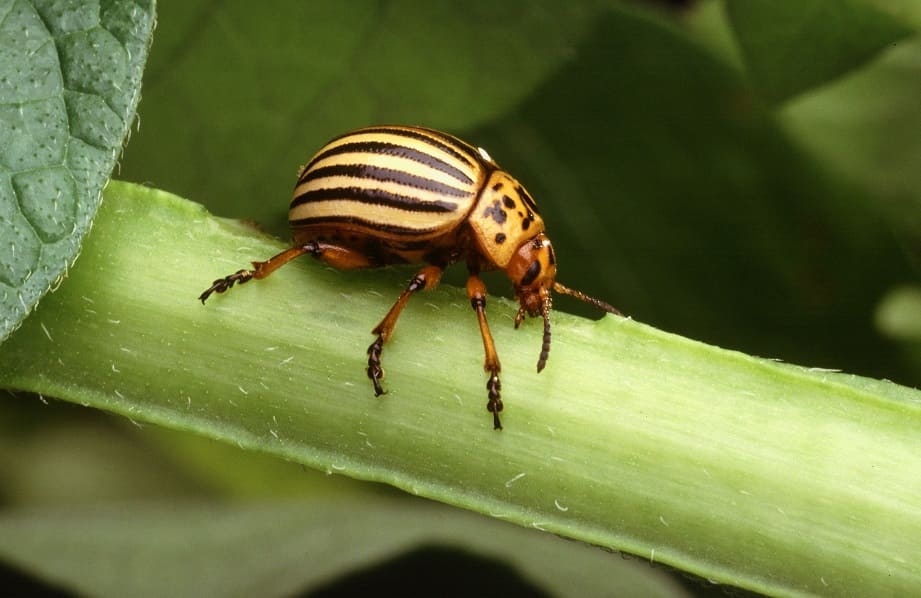
Colorado potato beetles can sometimes find container plants, but they’re much easier to spot and hand-pick when your plants are at a convenient height. Check plants weekly during the growing season and remove any orange egg masses or striped beetles you find.
Harvest Time: Recognizing the Signs
One of my favorite aspects of potato growing is that the plants themselves tell you when they’re ready. As harvest time approaches, the lush green foliage begins to yellow and die back naturally. This typically happens 10-20 weeks after planting, depending on the variety you’ve chosen.
Early varieties like Yukon Gold or Red Pontiac are usually ready in 10-12 weeks and are perfect for beginners who want faster gratification. Main crop varieties like Russets can take 18-20 weeks but often produce larger yields and better storage potatoes.
You can also harvest “new potatoes” early in the season—these are young, thin-skinned potatoes that are incredibly tender and sweet. Simply reach into your bucket and feel around for marble- to egg-sized tubers, taking only what you need for immediate use while leaving the rest to mature.
For the main harvest, wait until the foliage has been yellowing and dying back for at least two weeks. This allows the potato skins to set properly and improves storage life. When you’re ready to harvest, choose a dry day if possible. Wet potatoes are more prone to storage problems.
The Big Reveal and Post-Harvest Care
Harvest day feels like Christmas morning. Spread out a tarp in your yard, tip the bucket upside down, and carefully sift through the soil to find every last potato. It’s incredibly satisfying work, and kids absolutely love helping with this treasure hunt aspect.
Let harvested potatoes dry in a shaded, well-ventilated area for several hours before storing them. This allows the skin to set and any surface moisture to evaporate. Brush off excess soil, but don’t wash them until you’re ready to use them—the soil actually helps preserve them during storage.
For long-term storage, cure your potatoes in a cool (45-55°F), dark, humid location for about two weeks. This process toughens the skin and heals any minor scratches, significantly extending storage life. After curing, move them to your final storage location: ideally 35-40°F with high humidity and good air circulation.
Choosing the Right Varieties for Container Success
Not all potato varieties are created equal when it comes to container growing. Early and mid-season varieties generally perform better than late-season types in the confined space of a bucket, and compact varieties tend to be more productive than sprawling ones.
Yukon Gold remains my top recommendation for bucket growing. These golden-fleshed beauties are incredibly reliable, produce consistent yields, and have excellent flavor whether you’re making mashed potatoes or roasting them whole. They’re also forgiving of minor care mistakes, making them perfect for beginners.
Red Pontiac offers beautiful red skin and white flesh, with good disease resistance and reliable production in containers. The red skin adds visual appeal to your harvest and the potatoes store well.
Fingerling varieties like German Butterball or Russian Banana deserve special mention for container growing. Their smaller size requirements make them ideal for bucket cultivation, and their unique shapes and flavors command premium prices in stores. Growing your own gives you access to varieties you’ll never find in supermarkets.
For those interested in making their own french fries, Kennebec potatoes perform well in containers and have the high starch content that creates crispy exteriors and fluffy interiors when fried.
Avoid late-season giants like some Russet varieties in smaller containers. These need more space and time than 5-gallon bucket growing typically provides, though they can work in larger containers if you have the space and patience.
Extending the Season and Maximizing Production
One advantage of bucket growing that’s often overlooked is season extension. Because your containers are portable, you can move them to protected areas during temperature extremes or even bring them indoors entirely.
I start my first containers in early spring, about 2-3 weeks before the last frost date, keeping them in my garage during cold snaps. This gives me new potatoes by early summer when store prices are highest. A second planting in mid-summer provides fresh potatoes for fall and early winter meals.
In milder climates, you might even manage three crops per year with careful timing and variety selection. The key is understanding your local climate patterns and choosing varieties with appropriate maturation times.
Sustainable Practices and Cost Considerations
That nutrient-rich soil doesn’t need to go to waste after harvest. I reuse potato soil for other garden projects, though I avoid planting tomatoes, peppers, or eggplants in it since they’re all in the same plant family and can share diseases. The soil works beautifully for flowers, herbs, or completely different vegetable families.
From a cost perspective, initial setup runs about $15-20 per bucket including the container, soil, and seed potatoes. After the first year, you mainly need new seed potatoes (around $3-5 per bucket). Given that each bucket can produce $10-15 worth of organic potatoes, you typically break even in the first year and profit thereafter.
The real value, though, goes beyond pure economics. There’s something deeply satisfying about producing your own food, knowing exactly how it was grown, and having access to varieties you’ll never find in stores.
Frequently Asked Questions
- How many potatoes should I expect from one bucket?
A 5-gallon bucket typically yields 2-5 pounds of potatoes, depending on variety, care, and growing conditions. That’s roughly equivalent to 8-20 medium-sized potatoes—enough for several family meals.
- Can I grow potatoes indoors year-round?
Yes, but you’ll need a very sunny location (6+ hours of direct sunlight) or supplemental grow lights. South-facing windows work best. Indoor growing works particularly well for fingerling varieties that don’t need as much space.
- What’s the biggest mistake beginner bucket growers make?
Overcrowding! It’s tempting to plant 4-5 seed potatoes in a 5-gallon bucket, but 2-3 plants will actually produce more total weight of potatoes because each plant has adequate space to develop.
- Do I need to worry about crop rotation with bucket growing?
Since you’re using fresh soil each season, traditional crop rotation concerns are minimized. However, I still recommend using fresh potting mix each year for best results, and avoid reusing soil for other nightshade family plants.
- When is it too late in the season to plant potatoes?
This depends on your climate, but generally you need 10-20 weeks of growing season depending on variety. In most areas, your last planting should be 12-16 weeks before your first expected fall frost.
Your Path to Potato Success
Growing potatoes in buckets isn’t just a gardening technique—it’s a gateway to food independence that works for everyone, regardless of space, experience, or soil quality.
Whether you’re an apartment dweller with a sunny balcony, a suburban gardener looking to maximize production, or someone who’s always been intimidated by traditional vegetable gardening, this method offers a clear path to success.
The real magic isn’t just in the potatoes you’ll harvest, though they’re pretty magical too. It’s in the confidence you’ll build, the satisfaction of producing your own food, and the knowledge that you can create abundance even in small spaces.
Every time you see those green shoots pushing through the soil or feel around in your bucket for hidden tubers, you’re connecting with thousands of years of human agricultural tradition.
That first bucket of potatoes taught me something profound: you don’t need perfect conditions to grow amazing food. You just need curiosity, a willingness to try, and maybe a few forgotten potatoes sprouting in your kitchen cabinet.
Ready to get started? Grab a bucket, drill some holes, and let those potato plants show you what they can do. Your future self—the one enjoying incredibly fresh, homegrown mashed potatoes next fall—will thank you for taking that first step.
Happy growing, and here’s to never looking at a plastic bucket the same way again!