
Have you ever watched an onion walk across your garden? No, you’re not imagining things. There really is an onion that “walks”—and it might just become your new favorite garden plant.
While other gardeners fuss over annual onion crops each spring, carefully planting seeds and worrying about storage through winter, Egyptian walking onions ask almost nothing of you.
Plant them once and enjoy fresh onions for decades. They’re perennial, nearly indestructible, and produce food from both ends—bulbs underground and miniature onions in the air.
Best of all, they plant themselves, literally “stepping” to new locations as their top-heavy stems topple over and take root.
By the end of this guide, you’ll know exactly how to grow, harvest, and enjoy these remarkable plants.
Whether you’re a beginner looking for foolproof vegetables or an experienced grower seeking something unique, Egyptian walking onions deserve a permanent spot in your garden.
What Are Egyptian Walking Onions?
Egyptian walking onions (Allium × proliferum) are a natural hybrid between common bulbing onions and Welsh bunching onions, combining the best traits of both parents.
They go by many names: tree onions, top-setting onions, winter onions, or simply walking onions.
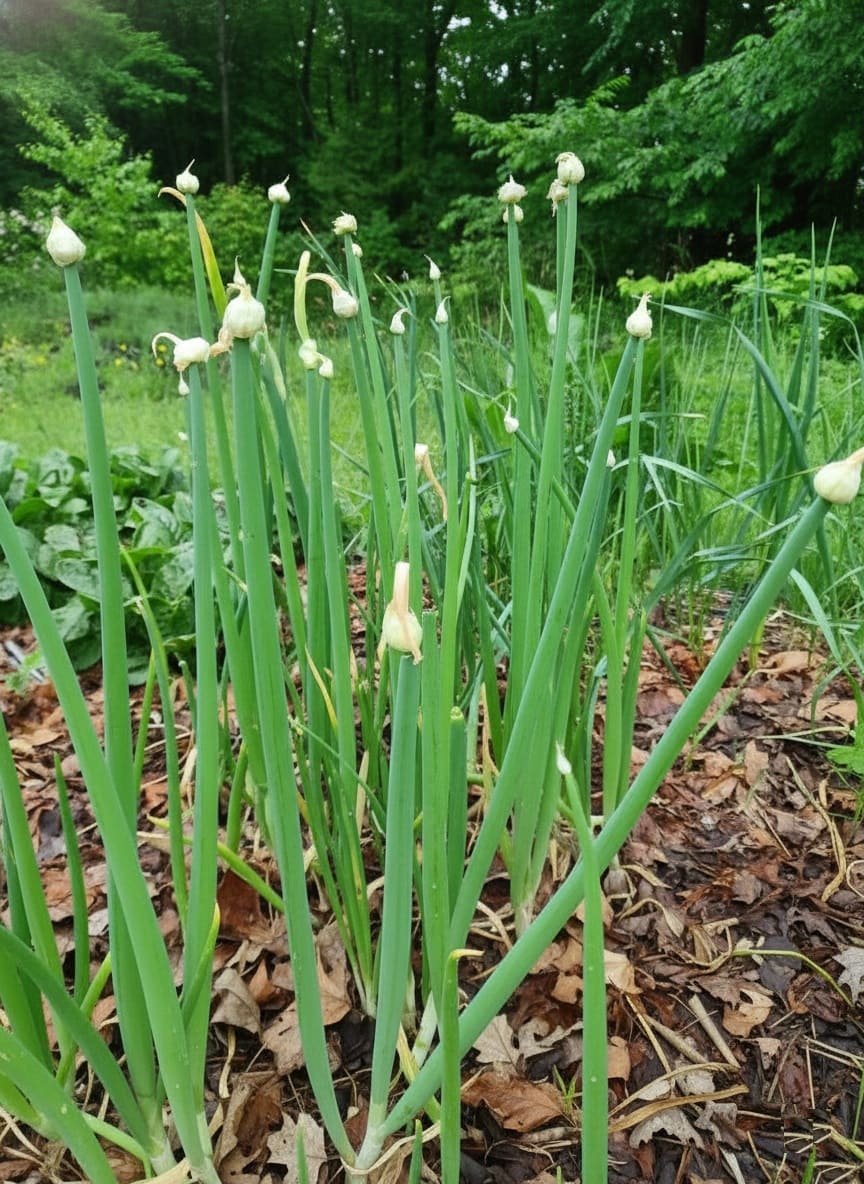
The “Walking” Phenomenon
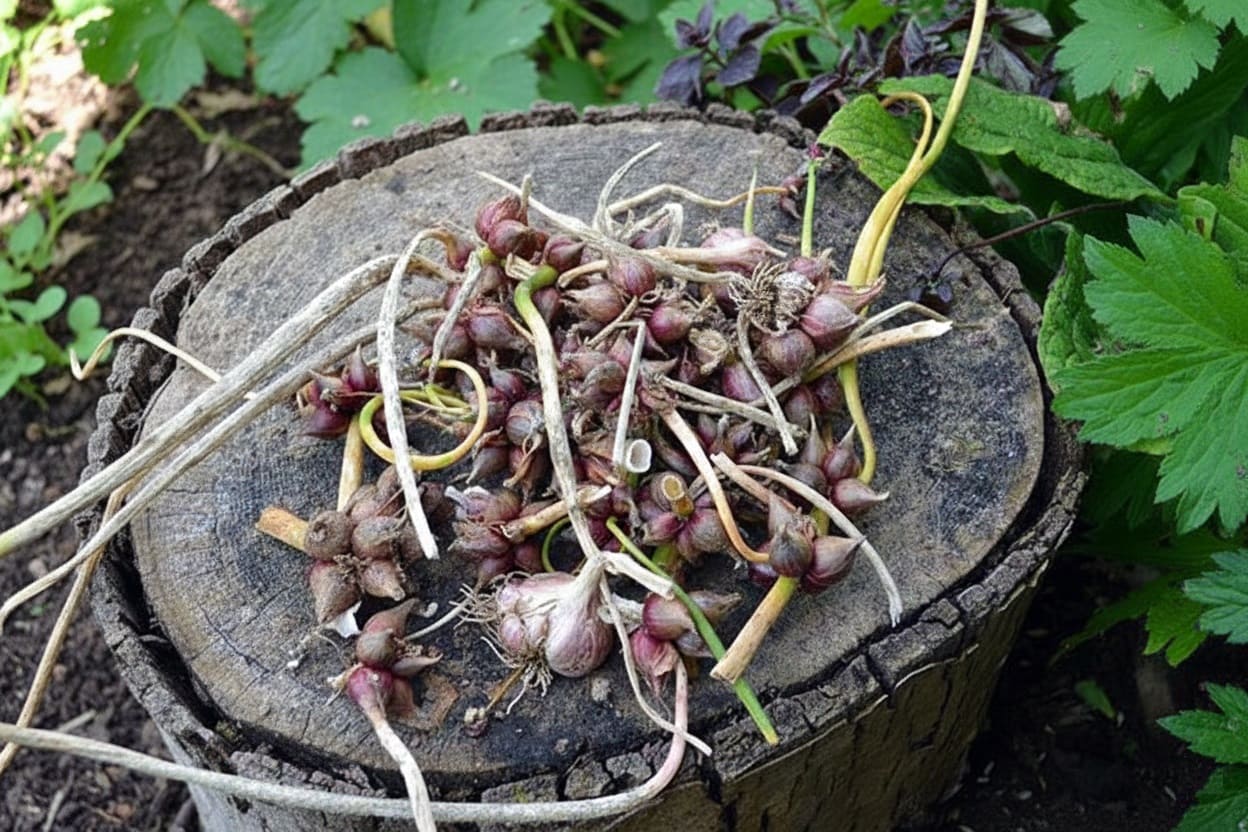
Instead of producing flowers and seeds, these onions grow clusters of miniature bulbs—called bulbils or topsets—at the top of their stems.
As summer progresses, these clusters can contain anywhere from a handful to several dozen tiny onions, each one a complete plant with its own papery skin, roots, and shoots.
When the topsets mature and become heavy (usually by late summer), the hollow stems can’t support their weight.
The stalks bend over, sometimes reaching 2-3 feet from the mother plant, and when the bulbils touch the ground, they send out roots and grow as new plants.
The following year, these new plants repeat the process, and the onions gradually “walk” across your garden bed.
What appears to be simple gravity may actually be something more deliberate—many growers observe their onions seeming to “seek” bare, fertile soil, bending toward optimal conditions.
Why “Egyptian”?
The origin of the “Egyptian” name remains a delightful mystery. Ancient Egyptians revered onions, believing their spherical shape and concentric rings symbolized eternal life, but these onions likely originated in Central Asia or the Middle East.
One theory suggests “Egyptian” is a corruption of “Gypsy,” referring to traveling peoples who carried these onions along migration routes. Regardless of its etymology, the mystique adds to their charm.
Understanding Growth Patterns and What to Expect
Egyptian walking onions follow a predictable seasonal rhythm that’s helpful to understand before planting.
- Late Winter Through Spring:
Among the earliest plants to emerge, green shoots push through snow and frost, providing fresh greens when little else is growing.
First-year plants (grown from bulbils planted the previous season) focus entirely on leaf growth and building underground bulbs—they won’t produce topsets yet.
- Late Spring Into Summer:
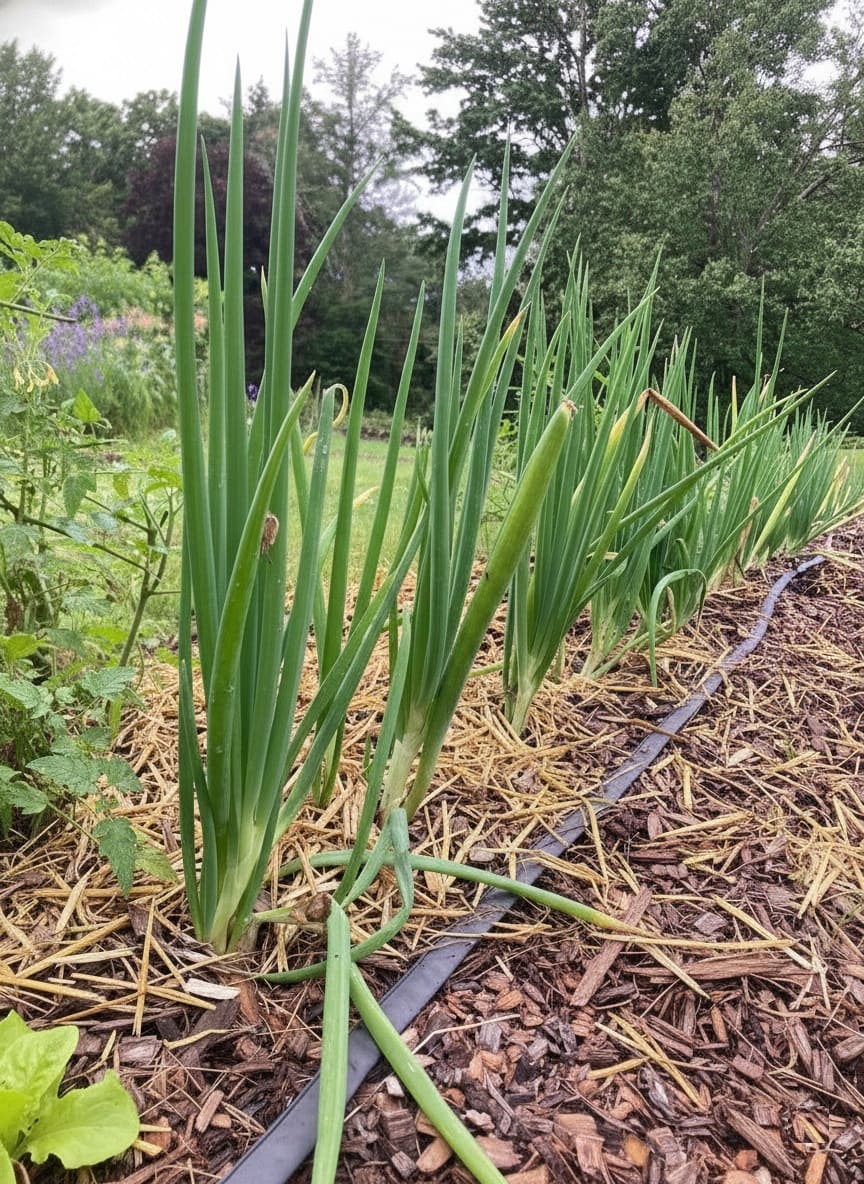
Established plants (year two and beyond) send up thick central stalks that reach 2-3 feet tall.
At the top, clusters of bulbils develop inside a papery white capsule that eventually tears open.
Some plants produce a second or even third tier of topsets on branching stalks, creating the “tree onion” effect.
👉 Related post: Should You Let Garlic Flower? Pros & Cons Explained
- Late Summer Through Fall:
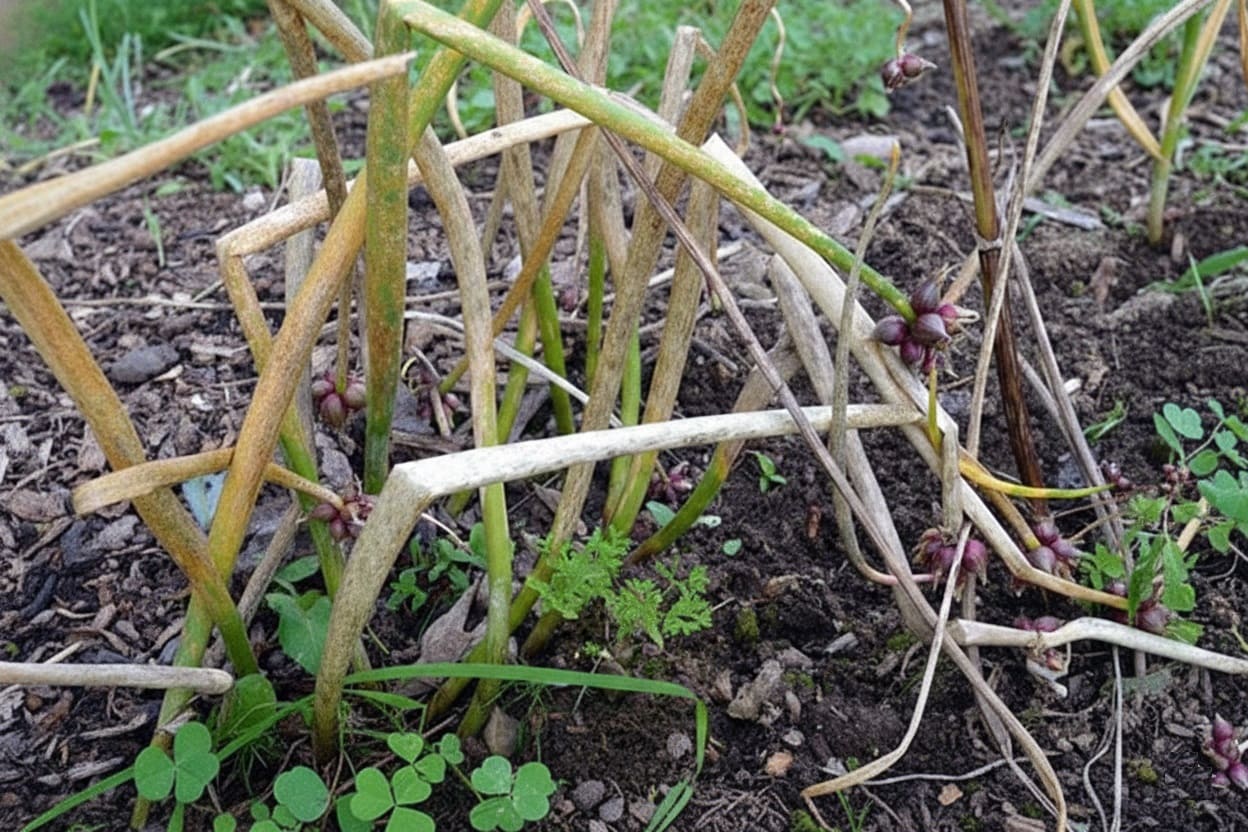
As topsets mature and stems dry, the characteristic “walking” occurs. When bulbils contact bare soil, they root quickly.
Underground, the original bulb has divided into a cluster of 4-8 offset bulbs, similar to shallots.
- Winter:
In cold climates, foliage dies back completely but bulbs remain alive underground, surviving temperatures down to -24°F or lower.
In mild climates, green growth may persist through winter, providing year-round harvests.
From planting to first harvest, expect this timeline:
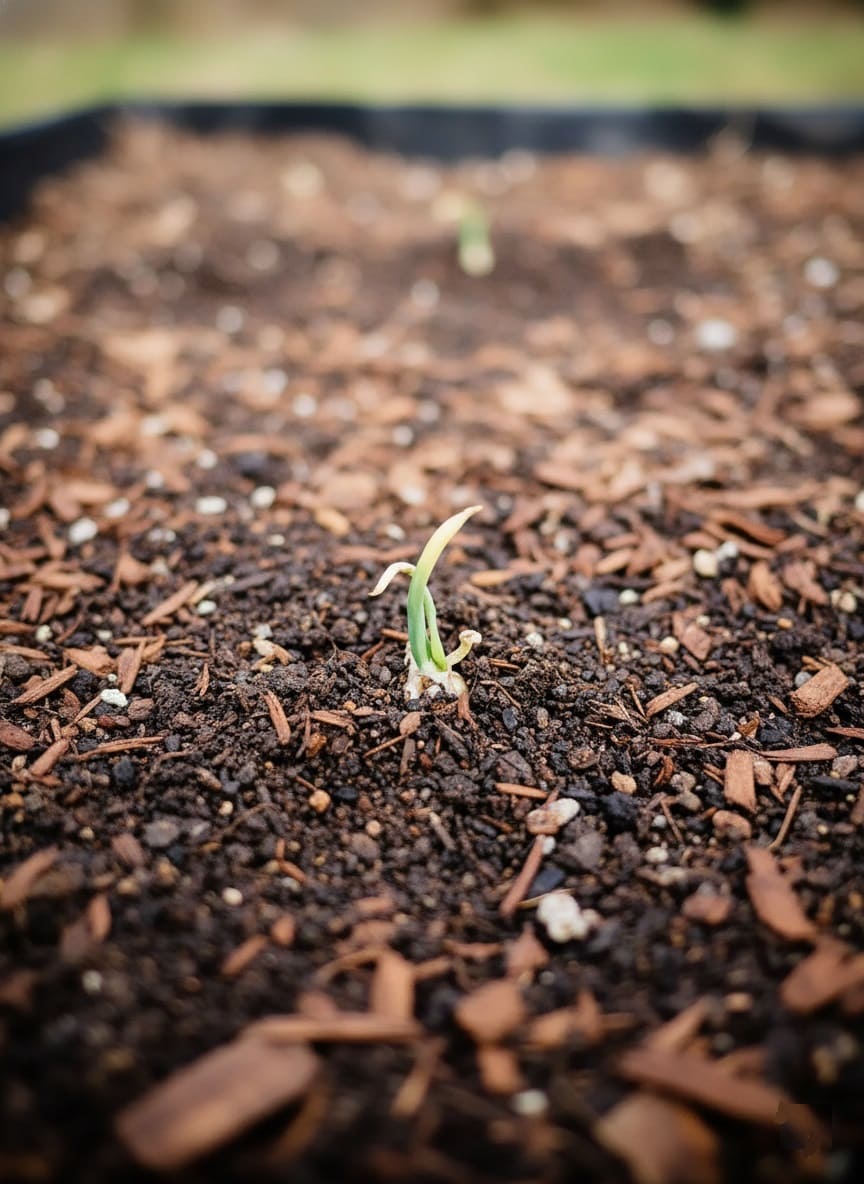
Fall-planted bulbils produce harvestable greens by early spring (4-6 months), with topsets appearing in year two (18-20 months).
Underground bulbs reach good size by late summer of year two (20-22 months). Once established, plants produce continuously for decades.
Planting: Getting Started Right
The beauty of these onions lies in their flexibility—you can plant them almost any time the ground isn’t frozen.
Optimal Planting Times
Fall planting (September-November) is ideal in most regions. Fall-planted bulbils establish strong root systems during cool weather and often produce topsets in their first summer if large enough.
Spring planting (March-May) works perfectly well, especially in cold climates, though plants likely won’t produce topsets until year two. You can even plant in winter if you can dig a hole—just mulch well afterward.
👉 Here’s How to Plant Garlic in the Fall: Planting, Care & Harvest Guide
Choosing the Right Location
Egyptian walking onions thrive in full sun (6-8 hours daily) but tolerate partial shade.
They prefer well-drained soil with moderate fertility and a pH of 6.0-7.0. Avoid heavy, waterlogged clay—like all onions, they hate constantly wet conditions.
Choose a spot where you’re happy to have them for years, since they’re perennial and will spread via walking if allowed.
Many gardeners dedicate a permanent corner or border, while others use containers to control their wandering.
Interestingly, these onions tolerate juglone (the compound produced by black walnut trees that’s toxic to most plants), making them one of the few edibles that will thrive beneath walnuts.
Soil Preparation
Work 1-2 inches of compost or well-aged manure into the top 4-6 inches of soil before planting.
Don’t overdo the nitrogen—onions perform best in moderately fertile soil. Too much rich fertilizer produces lush foliage at the expense of bulb development, and the resulting bulbs won’t store well.
If your soil is heavy clay, mix in sand or perlite to improve drainage.
Planting Technique
- Step 1:
You’ll most likely receive bulbils (the small topsets). If you receive a cluster, gently break it apart into individual bulbils, though you can plant clusters if you prefer tighter spacing.
- Step 2:
Plant each bulbil 1-2 inches deep with the pointy end (where shoots emerge) facing up and the flat base (where roots emerge) facing down.
Getting the orientation right matters more than exact depth—some growers barely cover bulbils with soil, just pressing them into the surface.
- Step 3:
For spacing, allow 6-10 inches between bulbils if you want large individual plants with good air circulation and maximum bulb size.
For growing primarily as scallions or if space is limited, 3-4 inches works fine. In containers, 4-5 inches is adequate.

- Step 4:
Water thoroughly after planting to settle soil around bulbs.
If planting mature underground bulbs (from divisions), set them about 2 inches deep with roots down and the neck pointing up, using the same spacing guidelines.
Container Growing:
Use containers at least 12-14 inches deep with excellent drainage. Fill with quality potting mix enriched with compost.
Space bulbils 4-5 inches apart. Container-grown plants need more frequent watering but otherwise require no special care.
Care and Maintenance: The Easy Part
One of the greatest joys of Egyptian walking onions is how little they demand once established.
Watering
Keep soil consistently moist while plants are establishing, then water when the top inch feels dry—usually once weekly in average conditions.
Well-established plants are quite drought-tolerant, though regular watering produces better growth and larger bulbs. Avoid waterlogged conditions.
Fertilizing
One application of compost or balanced organic fertilizer in early spring is usually sufficient.
These are light feeders. If you top-dress beds with compost annually, you may not need additional fertilizer.
Avoid high-nitrogen products, which promote excessive leaf growth at the expense of bulbs.
Mulching
A 2-3 inch layer of organic mulch (straw, shredded leaves, wood chips) retains moisture, suppresses weeds, moderates temperature, and provides slow-release nutrients as it decomposes.
In cold climates, winter mulch prevents frost heaving, though it’s not strictly necessary given their extreme hardiness.
Weeding
Keep beds weed-free, especially while plants are young, since onions compete poorly with aggressive weeds. Once established, dense mature growth helps suppress most weeds naturally.
Dividing Clumps
Every 2-3 years, dig up crowded clumps and divide them. Overcrowded plants produce smaller bulbs and topsets, more flowers, and reduced vigor.
Lift clumps with a garden fork, gently separate bulbs, and replant the healthiest ones at proper spacing. Use extras for cooking or sharing.
Managing the “Walking”
Egyptian walking onions spread if allowed, but they’re far from invasive.
To control them, simply cut off stems once topsets form and before they topple—use the topsets for cooking, planting elsewhere, or sharing.
Planting in contained beds bordered by paths or hardscaping prevents unwanted spreading. In containers, walking is impossible—just harvest topsets as they form.
If you have space, allow some plants to walk naturally while harvesting from others.
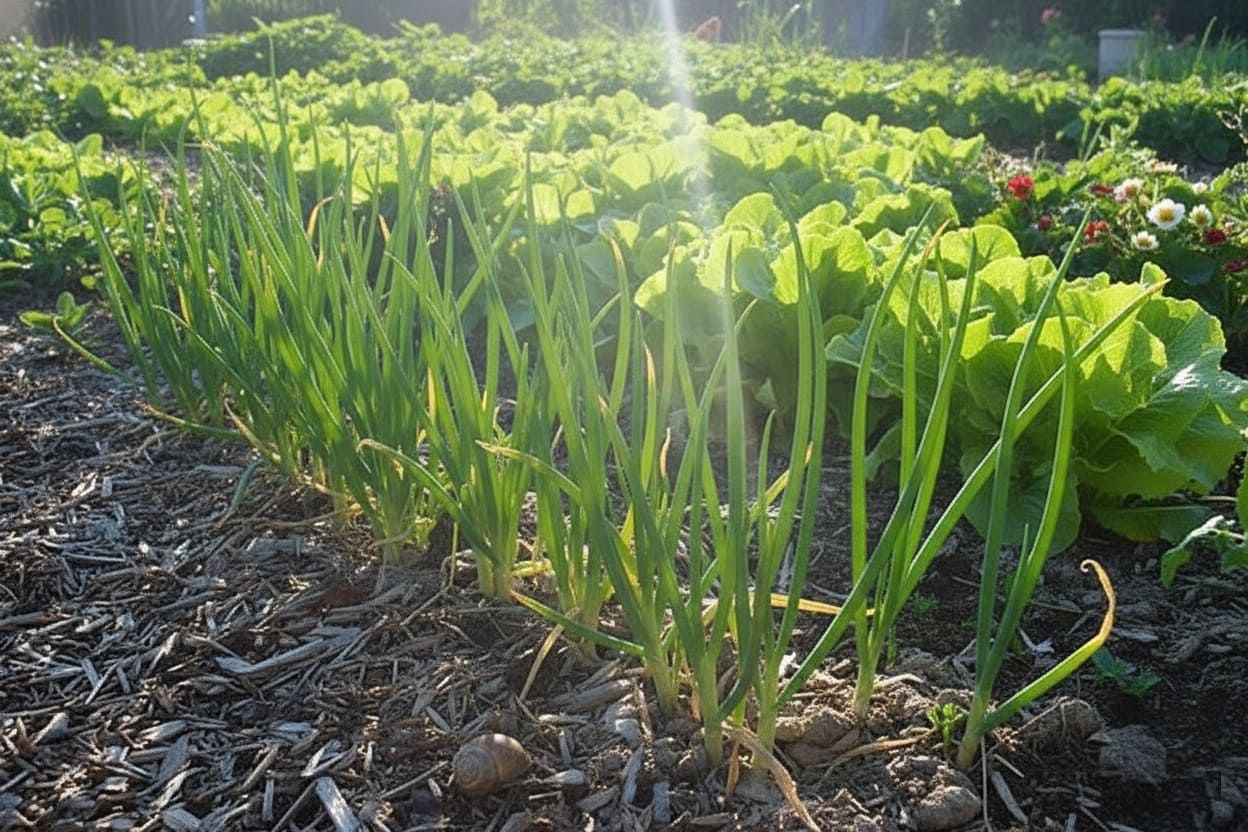
Companion Planting Strategies
Egyptian walking onions make excellent companions for many vegetables. Their strong onion scent deters common pests like aphids, beetles, and rabbits, making them valuable border plants around more vulnerable crops.
They pair well with tomatoes, peppers, carrots, brassicas (cabbage, broccoli, kale), and strawberries.
Avoid planting them directly adjacent to beans, peas, asparagus, or other alliums, which may compete for similar nutrients or attract the same pests.
Since walking onions are perennial and stay in place for years, they work best along the edges of annual vegetable beds rather than mixed into rows that need frequent replanting.
Their vertical growth habit and hollow stems allow good air circulation around neighboring plants, reducing fungal disease pressure in the garden.
Some growers interplant them with lettuce or other shade-tolerant greens, using the onion stalks to provide light afternoon shade during hot weather.
The Complete Harvest: Three Crops From One Plant
Egyptian walking onions reward you with three distinct harvests throughout the year, making them remarkably productive.
The Greens (Year-Round in Mild Climates)
Harvest tender green leaves any time for use like scallions or chives. Cut individual leaves 1-2 inches above ground level, leaving several per plant for continued growth. New leaves regrow within weeks.
Early spring greens, harvested just as plants emerge, are mildest in flavor—perfect for eating raw in salads or as garnishes.
Summer greens can be quite pungent and strong, similar to wild garlic, and may be too hot for eating raw.
Taste-test before adding liberally. Cooking mellows the intensity considerably, making them excellent in soups, stir-fries, and cooked dishes.
After topsets mature and fall in late summer, fresh new greens emerge from the base—tender and delicious for fall harvests. In mild winters, you can continue harvesting greens through December and January.
The Topsets/Bulbils (Mid-Summer to Fall)
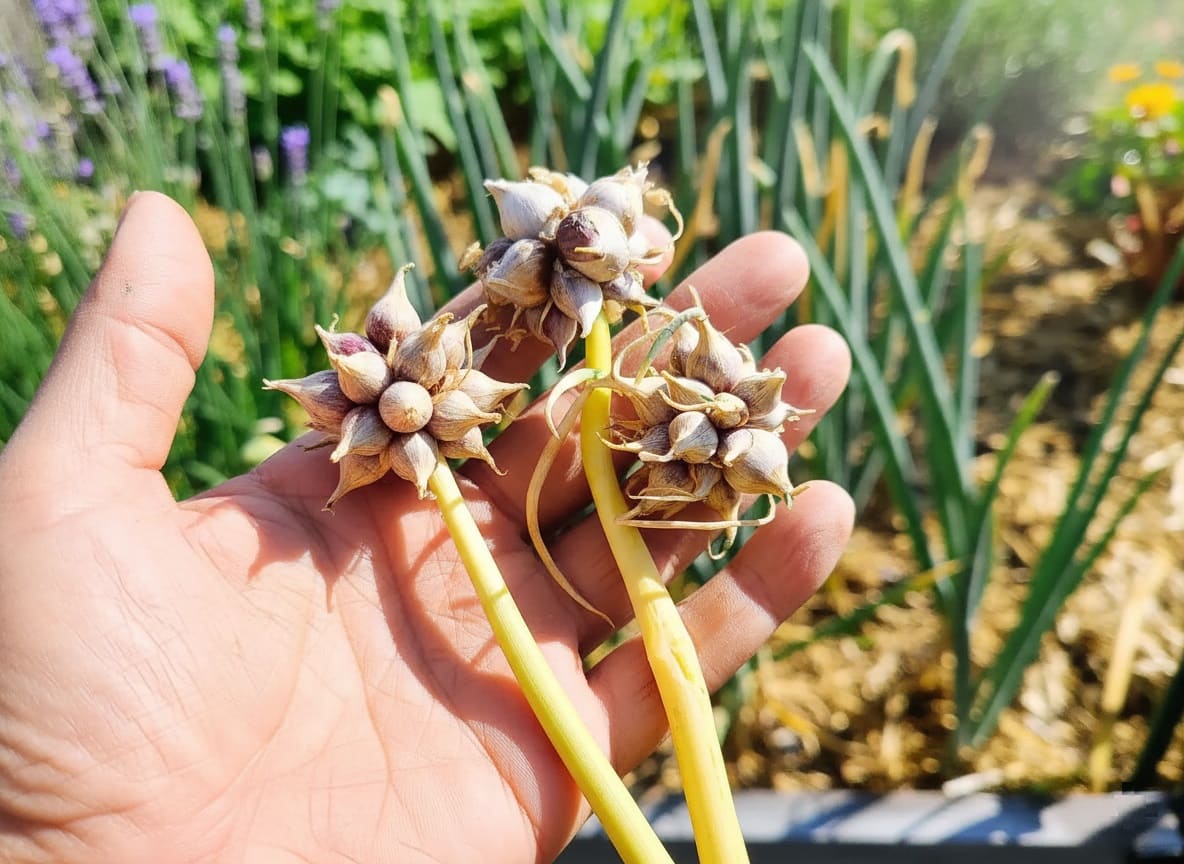
Harvest bulbils when they’re fully formed and stems begin to dry and turn brown, typically late July through September.
You’ll know they’re ready when they resemble miniature onions with papery reddish-purple or brown skins. The stems will feel brittle and may have already started toppling.
To harvest, pluck the entire cluster from the stem or cut the stem and remove individual bulbils later.
Some will still have green shoots or small roots—these are perfectly edible and actually the most vigorous for replanting.

From a mature plant, expect anywhere from 10 to 30+ bulbils per stem, depending on the plant’s age, growing conditions, and how crowded it is.
A well-established clump of 6-8 plants can easily produce 100-200 bulbils in a season—far more than most families can use, which is why these onions are famous for being shared among gardening friends.
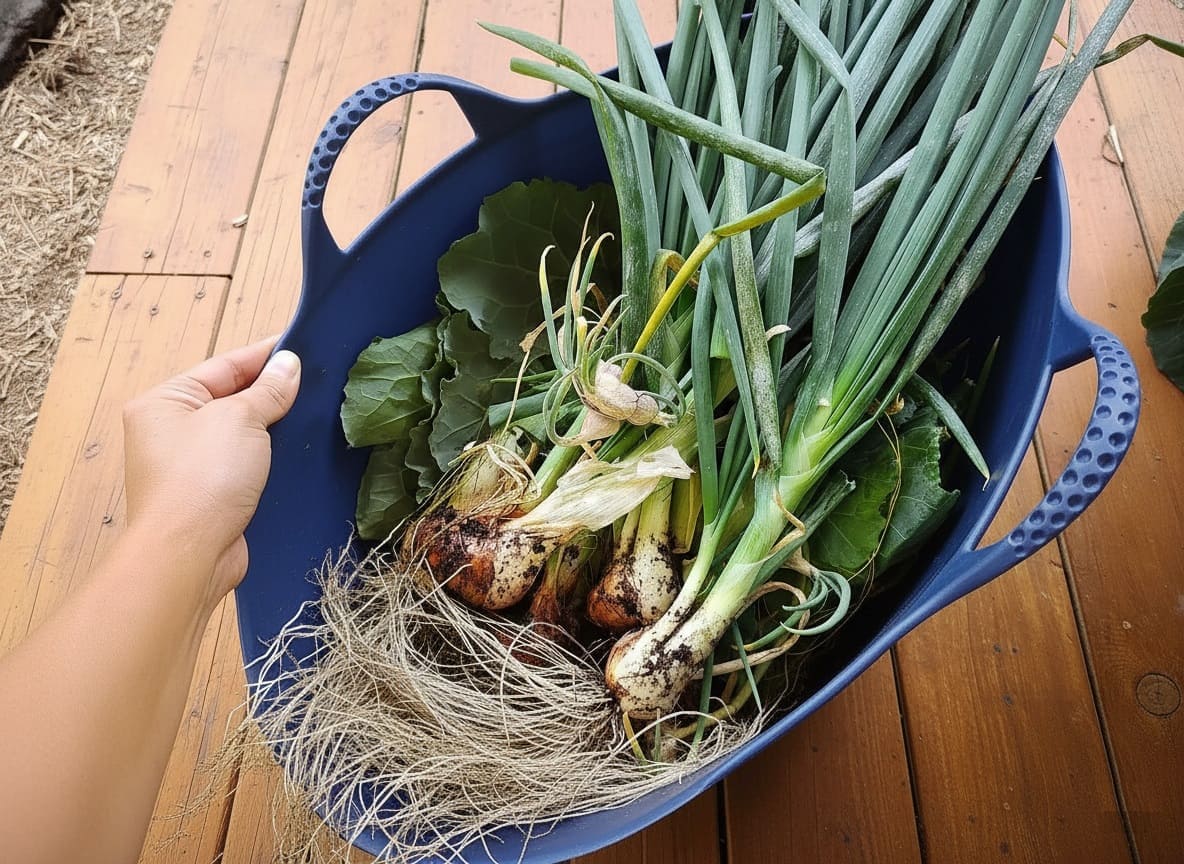
The Underground Bulbs (Late Summer to Fall)
Harvest mature underground bulbs once foliage begins to yellow and die back, typically September through October in most zones.
Alternatively, harvest in spring before new growth starts if you need to thin crowded patches.
Use a garden fork to carefully lift clumps without damaging bulbs. Each original bulb will have divided into multiple smaller bulbs, typically 4-8 per clump, resembling shallots in size and shape (usually 1-2 inches in diameter).
- Critical point:
Harvesting underground bulbs kills that plant—it won’t regrow. Only harvest bulbs you plan to eat, leaving sufficient plants for next year’s crop.
Many growers prefer to divide clumps, replanting some bulbs while harvesting others for the kitchen.
To encourage larger underground bulbs, cut off the topset stem as soon as it begins forming in early summer.
This redirects the plant’s energy below ground rather than into producing bulbils. You’ll sacrifice topsets but gain bulbs that can reach 2-3 inches in diameter.
Storage Methods for Maximum Shelf Life
Storing Bulbils for Planting
If saving bulbils for future planting, cure them first: spread in a single layer in a cool, dry, well-ventilated location out of direct sunlight.
Allow skins to dry completely (2-4 weeks depending on size and humidity). Once cured, store in mesh bags or paper bags in a cool (35-50°F), dry, dark location.
Properly cured bulbils can last 3-6 months or more. Check periodically and remove any showing signs of rot or premature sprouting.
Storing Underground Bulbs for Eating
Cure underground bulbs similar to regular onions: after lifting, brush off excess soil but don’t wash. Spread in a warm (75-85°F), dry, well-ventilated area out of direct sunlight for 2-3 weeks.
Bulbs are cured when outer skins are papery and necks are completely dry and constricted. Once cured, store in mesh bags or hang braided by their dried stems in a cool, dark, dry location.
Egyptian walking onion bulbs don’t store as long as commercial storage onions—plan to use within 2-4 months. Many gardeners prefer leaving bulbs in the ground and harvesting as needed rather than storing them.
Storing Greens
Fresh-cut greens are best used immediately but can be refrigerated for 3-5 days. Rinse just before use; don’t wash before storing.
For longer storage, chop and freeze greens in ice cube trays with a little water or oil, creating convenient portions for soups and stir-fries.
Dried greens also work well—chop finely, spread on dehydrator trays, and dry completely before storing in airtight containers.
Related posts:
- How to Dry Mint at Home (4 Easy Methods for Best Flavor)
- How to Harvest, Dry & Use Red Clover: A Complete Guide for Beginners
Culinary Uses: From Garden to Kitchen
Egyptian walking onions have a distinctive flavor—stronger and more complex than standard onions, similar to shallots but with extra kick. The intensity varies by season and plant part.
Creative Uses for Each Part
The Greens
Use like scallions, chives, or leeks. Chop raw into salads (use young spring growth for mildest flavor), stir into soups and stews, mix into scrambled eggs or frittatas, sprinkle over baked potatoes, fold into dips and spreads, or add to stir-fries.
The greens can be fibrous when mature—cut them into small pieces (1/4-1/2 inch) rather than long strips.
The Bulbils
Try them whole (pickled like pearl onions, roasted alongside root vegetables, added to soups and stews, or fried as tempura).
For chopped applications, use a garlic press—this brilliant shortcut eliminates tedious peeling.
Just pop a bulbil in the press, squeeze, and the onion pulp comes through while the skin stays behind.
Use minced bulbils in any recipe calling for onions or sautéed as a base for sauces.
The Underground Bulbs
Use like shallots or small onions. They’re particularly good caramelized for pizza or pasta, sliced into rings for frying, chopped for soups and stocks, roasted whole or halved, or diced for salsa and chutney.
The flavor is more intense than standard onions—adjust quantities to taste. When raw, they can be quite sharp; cooking mellows them to sweet and savory.
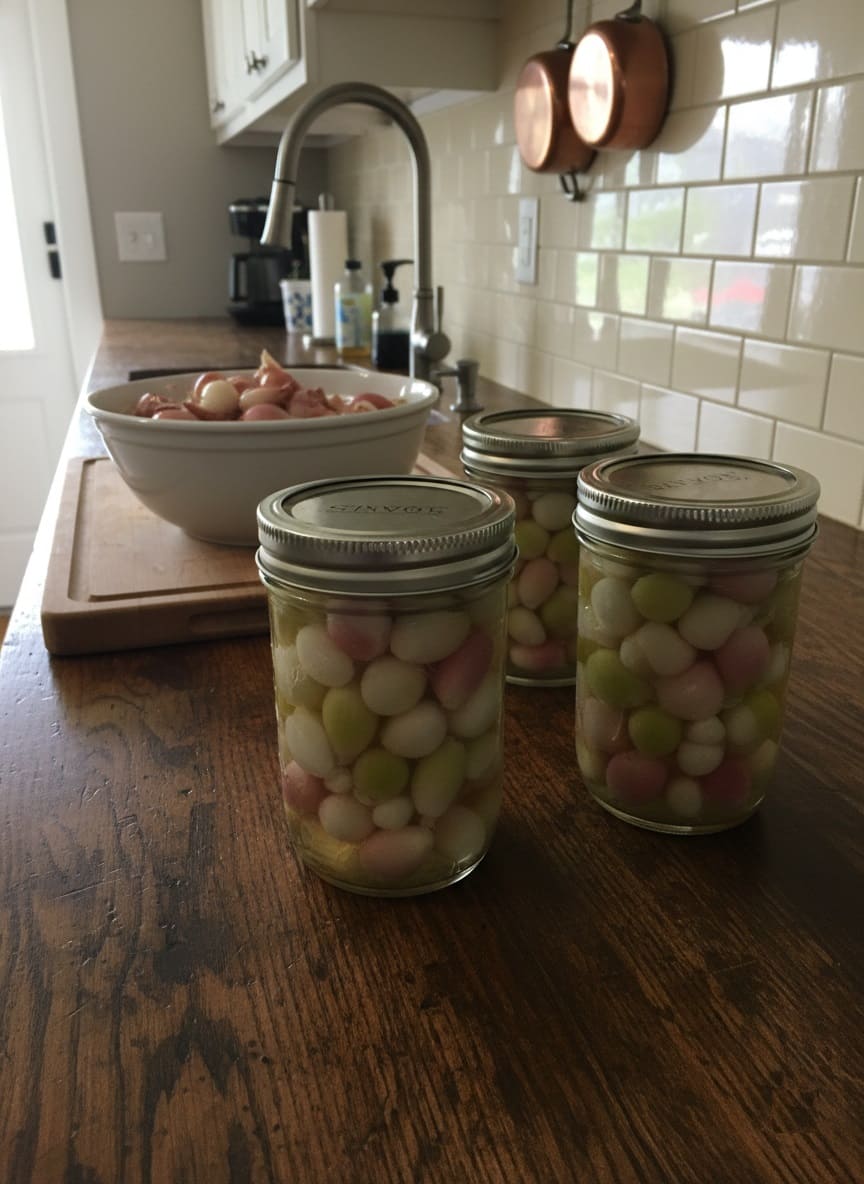
Quick Pickled Bulbils Recipe
This recipe makes excellent use of your abundant topset harvest:
Blanch 1 cup peeled bulbils in boiling salted water for 8 minutes until just tender. Drain and rinse under cold water.
Meanwhile, bring 1/2 cup each water and red wine vinegar, 1/2 cup sugar, 1½ tablespoons mustard seeds, 1/2 teaspoon coriander seeds, and 1/2 teaspoon black peppercorns to a boil, stirring until sugar dissolves.
Pour hot liquid over bulbils in a glass jar and refrigerate for at least 1 hour (better after 1-2 days).
Store in refrigerator up to 2 weeks. These make excellent additions to cheese plates, cocktails, or salads.
👉 Here’s How to Ferment Vegetables at Home (Simple, Safe, and Incredibly Cheap)
Troubleshooting Common Problems
Egyptian walking onions are remarkably trouble-free, but occasional issues arise.
- Onion Thrips:
These tiny insects suck plant juices, causing whitish streaks on leaves. They mainly bother young plants; mature onions tolerate them well.
Spray off with strong water, encourage beneficial insects, or in severe cases apply neem oil.
- Onion Maggots:
Adult flies lay eggs at plant bases in spring. Larvae burrow into bulbs, causing rot and death.
Use row covers in early spring to prevent egg-laying, remove and destroy affected plants, and ensure good growing conditions that help plants resist attack.
- Fungal Diseases:
Downy mildew and fusarium basal rot occasionally affect plants in humid, poorly drained conditions.
Ensure excellent drainage, space plants properly for air circulation, water at the base avoiding overhead watering, and remove infected plants promptly.
- Poor Bulb Development:
Small underground bulbs despite healthy foliage usually indicates overfertilization with nitrogen or overcrowding.
Use balanced fertilizer or just compost, divide crowded clumps every 2-3 years, and remove topset stems early if you want larger bulbs.
- No Topsets on Mature Plants:
If year-two or older plants fail to produce topsets, ensure they receive full sun (6+ hours daily), avoid overfertilizing, and be patient—sometimes plants skip a year.
- Not Walking/Stems Stay Upright:
This is actually fine—it means you have very vigorous, sturdy plants. Simply harvest the topsets manually rather than waiting for them to fall.
Some plants in crowded clumps naturally stay upright while edge plants tend to walk more.
Regional Considerations
- Cold Climates (Zones 3-5):
Egyptian walking onions excel in cold areas, overwintering successfully without protection. Plant topsets in early fall or early spring.
Expect complete dormancy November through February, with new growth emerging while snow still covers the ground.
- Moderate Climates (Zones 6-8):
Ideal zones for walking onions. Plants may remain partially green through winter, with nearly year-round green harvests. Fall or spring planting both work excellently.
- Hot Climates (Zones 9-10):
Walking onions can struggle in extreme heat but many gardeners grow them successfully with adjustments:
Provide partial shade (especially afternoon), keep soil consistently moist during hot months, and do fall/winter planting to allow establishment during cooler weather.
Expect smaller plants and potentially die-back in extreme summer heat.
Quick-Reference Growing Guide
- Hardiness: Zones 3-10
- Planting Time: Fall (best) or spring
- Planting Depth: 1-2 inches
- Spacing: 6-10 inches for large bulbs, 3-4 inches for scallions
- Sun: Full sun preferred, tolerates partial shade
- Soil: Well-drained, pH 6.0-7.0, moderate fertility
- Water: Keep moist but not waterlogged; drought-tolerant when established
- Fertilizer: Light feeding; compost in spring
- First Harvest: Greens in 4-6 months, topsets in 18-20 months
- Propagation: Divide clumps or plant topsets
- Special Features: Perennial, self-propagating, juglone-tolerant
Why Every Garden Needs Walking Onions
Egyptian walking onions embody the best qualities a home gardener could ask for: low-maintenance, productive, perennial, cold-hardy, and endlessly entertaining.
Once established, they provide fresh onion greens nearly year-round, plus two types of bulbs to harvest—all without replanting or much effort on your part.
Beyond practical benefits, these onions bring wonder to the garden.
Watching miniature onions sprout and grow atop tall stalks, observing them topple and take root in new locations, and sharing the quirky bulbils with friends creates connections—to the land, to ancient growing traditions, and to your community.
If you’ve been struggling with annual onions or simply want vegetables that take care of themselves, Egyptian walking onions are your answer.
Plant them once in a sunny spot with decent drainage and step back. They’ll do the rest, walking their way into your garden and your heart.
Ready to start?
Seek out bulbils from fellow gardeners, online marketplaces, or specialty seed companies.
Plant a handful this fall, and by next summer you’ll be watching your very own onions take their first steps.
Welcome to the magical world of Egyptian walking onions—where your vegetables do the planting for you, and fresh onions are always just a snip away.