
Close your eyes for a moment and imagine walking through a garden where nature does most of the work.
- The air hums with bees moving between flowers.
- Tomatoes climb trellises next to nitrogen-fixing beans.
- Fruit trees shade medicinal herbs below, while chickens scratch contentedly through the mulch, turning last season’s leaves into next year’s fertility.
- Water flows from your roof into planted swales that guide it slowly through the landscape.
Nothing goes to waste. Everything connects. This isn’t fantasy. This is permaculture.
What Exactly Is Permaculture?
Permaculture is a design system for creating food-producing ecosystems that work with nature instead of against it.
Coined by Australians Bill Mollison and David Holmgren in the 1970s, the word blends “permanent agriculture” and “permanent culture”—signaling this goes beyond gardening techniques.
It emerged as a response to industrial agriculture’s devastating impacts: poisoned waterways, eroded topsoil, collapsed biodiversity, and communities dependent on inputs they couldn’t control.
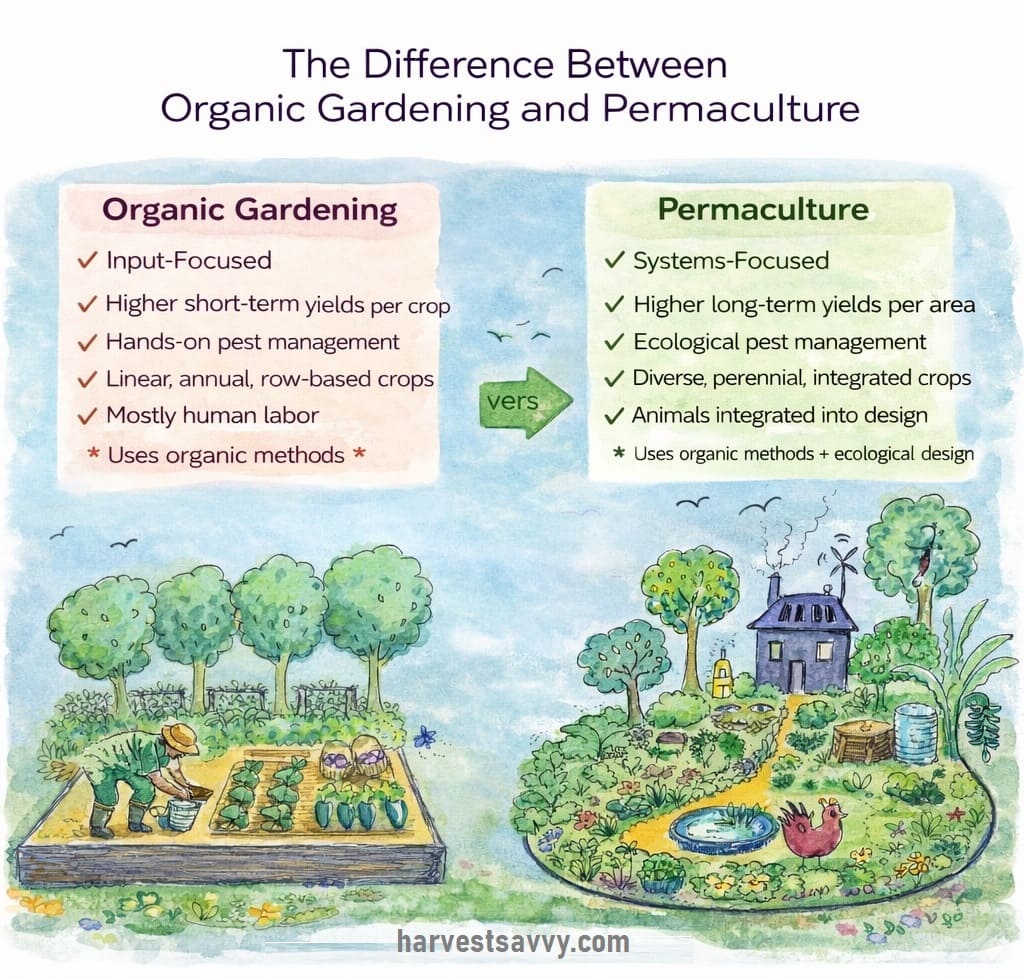
What separates permaculture from organic gardening or sustainable agriculture is its systematic design approach guided by ethics and principles.
Whether you’re working with a balcony or a hundred-acre farm, permaculture provides a framework for creating self-maintaining landscapes that regenerate while feeding people.
The Ethical Foundation
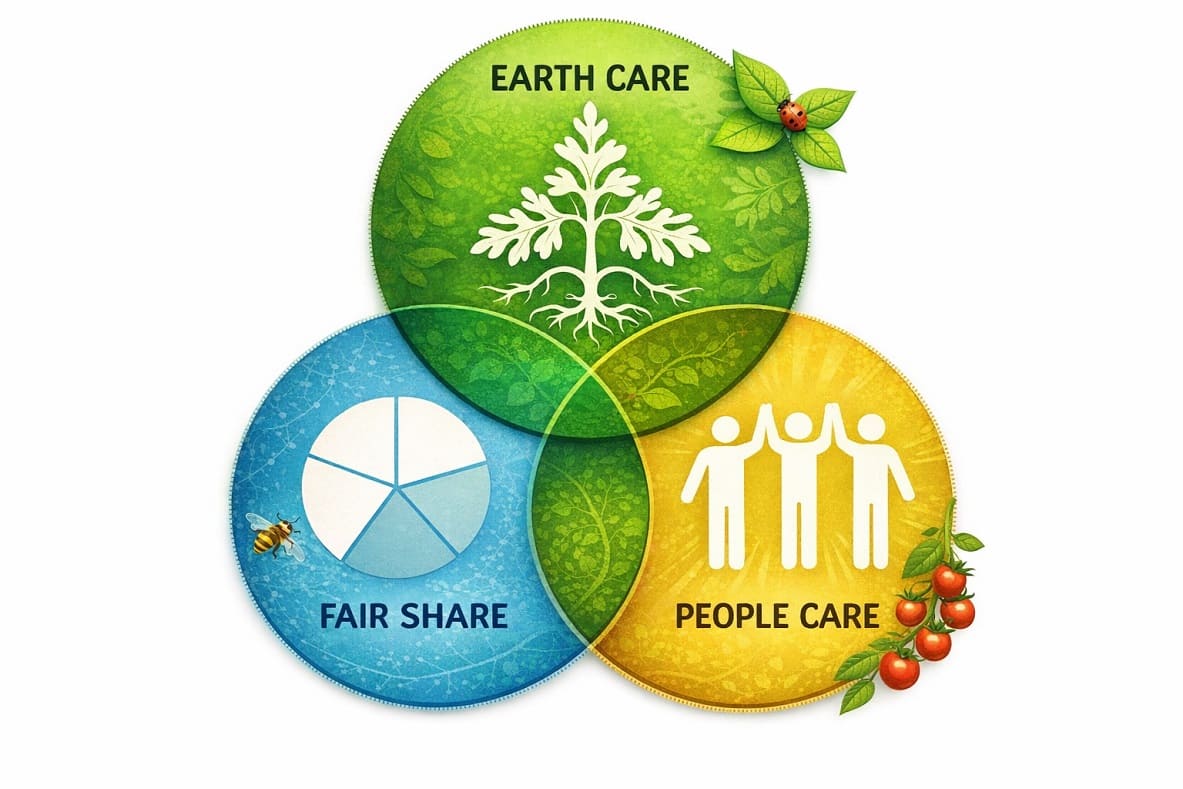
Three ethics guide every permaculture decision:
1. Earth Care asks: Does this build soil, support biodiversity, and strengthen ecosystems?
Harvesting rainwater, planting trees that sequester carbon, building soil rather than depleting it—all express this ethic.
2. People Care recognizes that hungry, struggling people can’t care for the earth.
It means designing systems that meet human needs: food security, meaningful work, beauty, health. This includes fair treatment, knowledge sharing, and community resilience.
3. Fair Share tackles consumption directly. Take what you need. Share surplus. Reinvest excess.
When your fruit trees overproduce, that abundance becomes preserved food, gifts to neighbors, compost for fertility, or feed for wildlife.
The 12 Design Principles: Your Permaculture Toolkit
David Holmgren articulated twelve principles that translate those ethics into action. Think of these as thinking tools rather than rigid rules:
- Observe and Interact
Before you dig, watch. Where does water flow during rainstorms? Which areas stay cool in summer? Where do pollinators congregate?
Spend a full year observing your site through all seasons before making major changes.
- Catch and Store Energy
Nature provides pulses of abundance—summer sun, winter rains, autumn harvests. Design systems that capture these gifts when they’re plentiful and store them for lean times.
Rainwater tanks, solar panels, root cellars, and preserved foods all embody this principle.
- Obtain a Yield
You can’t work on an empty stomach. Every system should provide returns on your investment of time and energy.
This might be food, income, beauty, or community connection—but it must sustain you enough to continue the work.
- Apply Self-Regulation and Accept Feedback
Nature self-regulates through feedback loops. If your compost smells awful, it’s too wet or nitrogen-heavy.
If pests overwhelm your crops, diversity is lacking. Listen to what the system tells you and adjust.
- Use and Value Renewable Resources
Choose perennial plants over annuals where possible. Use solar energy instead of fossil fuels.
Build with local, renewable materials. Let chickens provide pest control instead of chemicals.
- Produce No Waste
In nature, waste doesn’t exist—one organism’s output becomes another’s input.
Your kitchen scraps feed worms, which create castings that feed plants, which feed you. Design closed loops.
- Design from Patterns to Details
Nature repeats patterns: spirals, branches, waves. Observe these patterns first, then fill in the details.
A swale follows the contour of land (pattern) before you decide which trees to plant along it (detail).
- Integrate Rather Than Segregate
Instead of isolated components, create beneficial relationships. Plant pest-repelling herbs near vegetables.
Position the chicken coop where birds can access and fertilize garden beds. Let each element support multiple others.
- Use Small and Slow Solutions
Start with one raised bed instead of plowing an acre. Small systems are easier to manage, require fewer resources, and teach you more.
As permaculturist Bill Mollison quipped: the goal is “maximum hammock time.”
- Use and Value Diversity
Monocultures fail spectacularly. Diverse systems resist pests, adapt to change, and produce year-round harvests.
Mix annuals and perennials, vegetables and herbs, domestic and native species.
- Use Edges and Value the Marginal
The most productive zones occur where two systems meet—forest edge, pond shore, garden border.
Increase edge by creating curves, spirals, and keyhole beds rather than straight lines.
- Creatively Use and Respond to Change
Change is inevitable. Rather than resist it, observe carefully and intervene at the right moment to turn challenges into opportunities.
How Permaculture Design Actually Works
Understanding principles is one thing. Applying them is another. Here’s the systematic process permaculturists use:
Step 1: Site Analysis—Reading Your Land
Before planting anything, you need to understand what you have. This involves two key analyses:
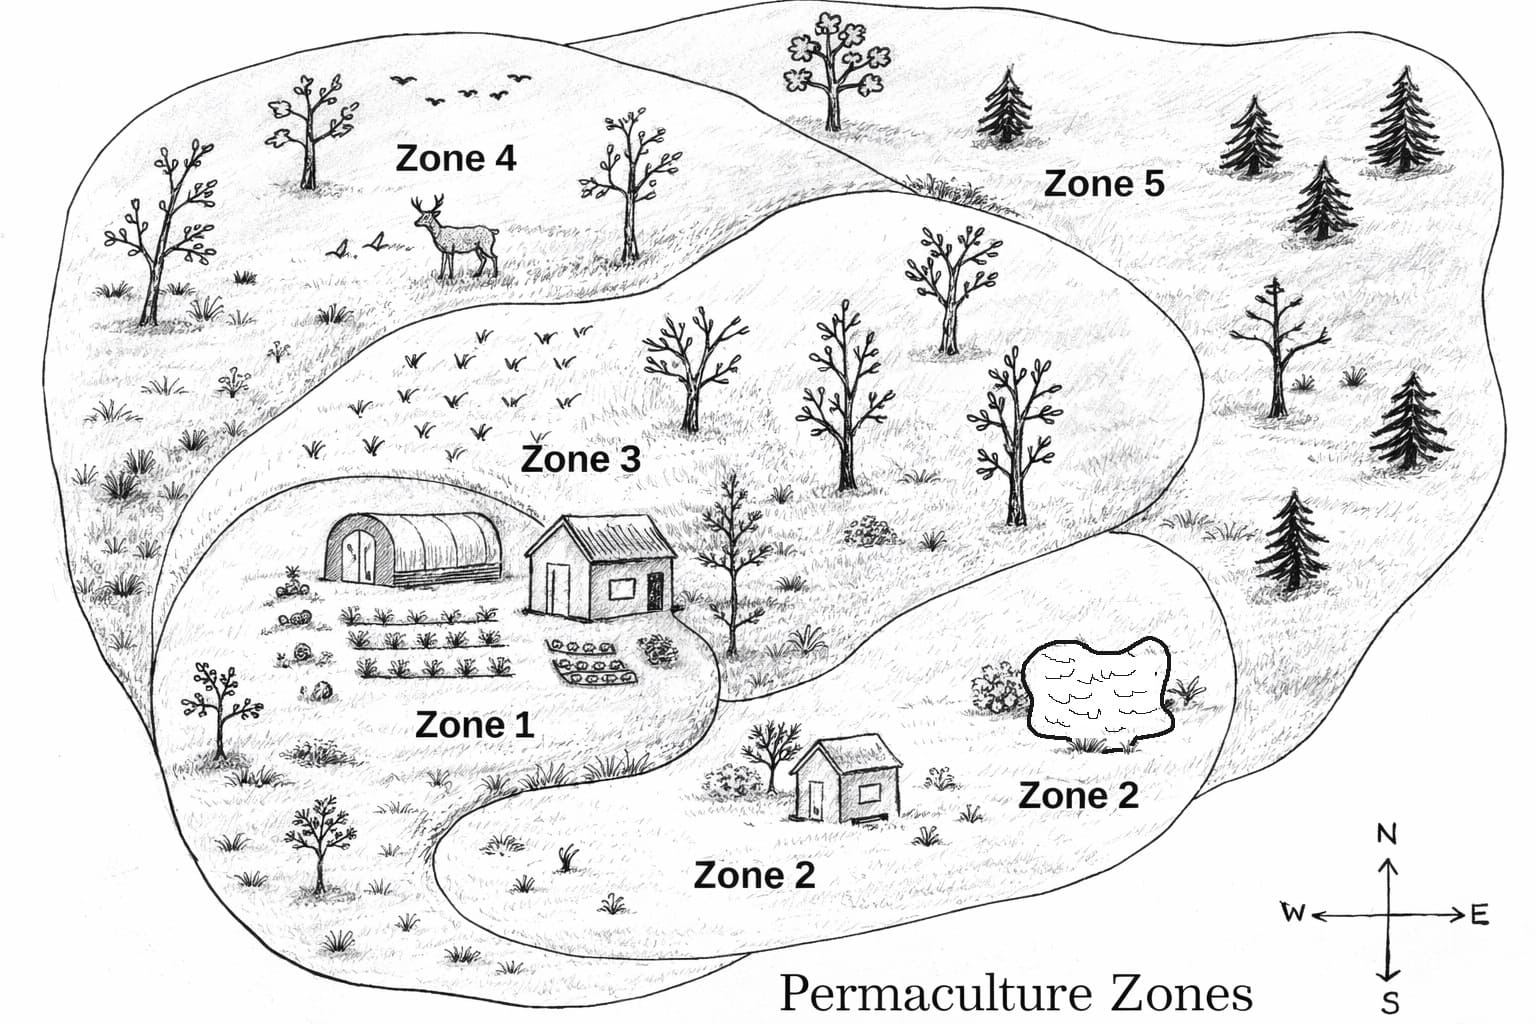
Zone Planning organizes your space by how frequently you’ll visit each area:
- Zone 0: Your house and immediate surroundings
- Zone 1: Daily visits—kitchen garden with herbs, salad greens, compost
- Zone 2: Weekly visits—larger vegetables, small fruits, chicken coop
- Zone 3: Monthly visits—main crops, orchards, larger livestock
- Zone 4: Occasional visits—foraging areas, timber production
- Zone 5: Wild areas left for observation and wildlife
A balcony gardener might have all five zones in containers and vertical space. A farm spreads them across acres. The principle remains: intensive management close, extensive management distant.
Sector Analysis maps energy flows through your property:
- Sun paths: Where does morning sun hit versus afternoon? Where are year-round sunny spots versus seasonal shade?
- Wind: What direction do prevailing winds come from? Where are wind tunnels versus protected pockets?
- Water: How does water flow across your land during rain? Where does it pool or rush?
- Fire risk: Which direction would wildfire approach from? (Critical in fire-prone regions)
- Views and noise: What do you want to block or highlight?
- Wildlife paths: Where do animals naturally move through?
You map these sectors as wedges radiating from your house. This reveals where to place windbreaks, solar panels, water harvesting features, and fire-resistant plants.
Step 2: Functional Design—Making Elements Work Together
Now you start placing elements based on your analysis. The magic happens in the relationships you create.
Stacking Functions means each element serves multiple purposes. A deciduous tree on your home’s south side provides:
- Summer shade (cooling)
- Winter sun (warming when leaves drop)
- Fruit harvest (food)
- Mulch from fallen leaves (soil building)
- Wildlife habitat (ecosystem support)
- Beauty (quality of life)
Creating Guilds groups species that benefit one another. Here’s a detailed example around a peach tree:
The Peach Guild:
- Peach tree (center) – provides fruit and shade
- Comfrey (circle around tree) – deep roots mine minerals, leaves provide mulch, flowers feed bees
- White clover (ground cover) – fixes nitrogen, feeds soil, crowds out weeds, stays green when mowed
- Garlic & chives (pest barrier) – strong scent confuses pests like borers and aphids
- Calendula & borage (pollinator magnets) – attract beneficial insects, self-seed annually
- Yarrow (dynamic accumulator) – accumulates potassium, attracts predatory wasps that eat pests
- Strawberries (edge planting) – provide ground cover, extra harvest, spread naturally
Each plant performs multiple jobs. The system becomes resilient because if one element fails, others compensate.
Step 3: Layering in Space and Time
Rather than flat rows, permaculture creates three-dimensional productivity by mimicking forest structure:
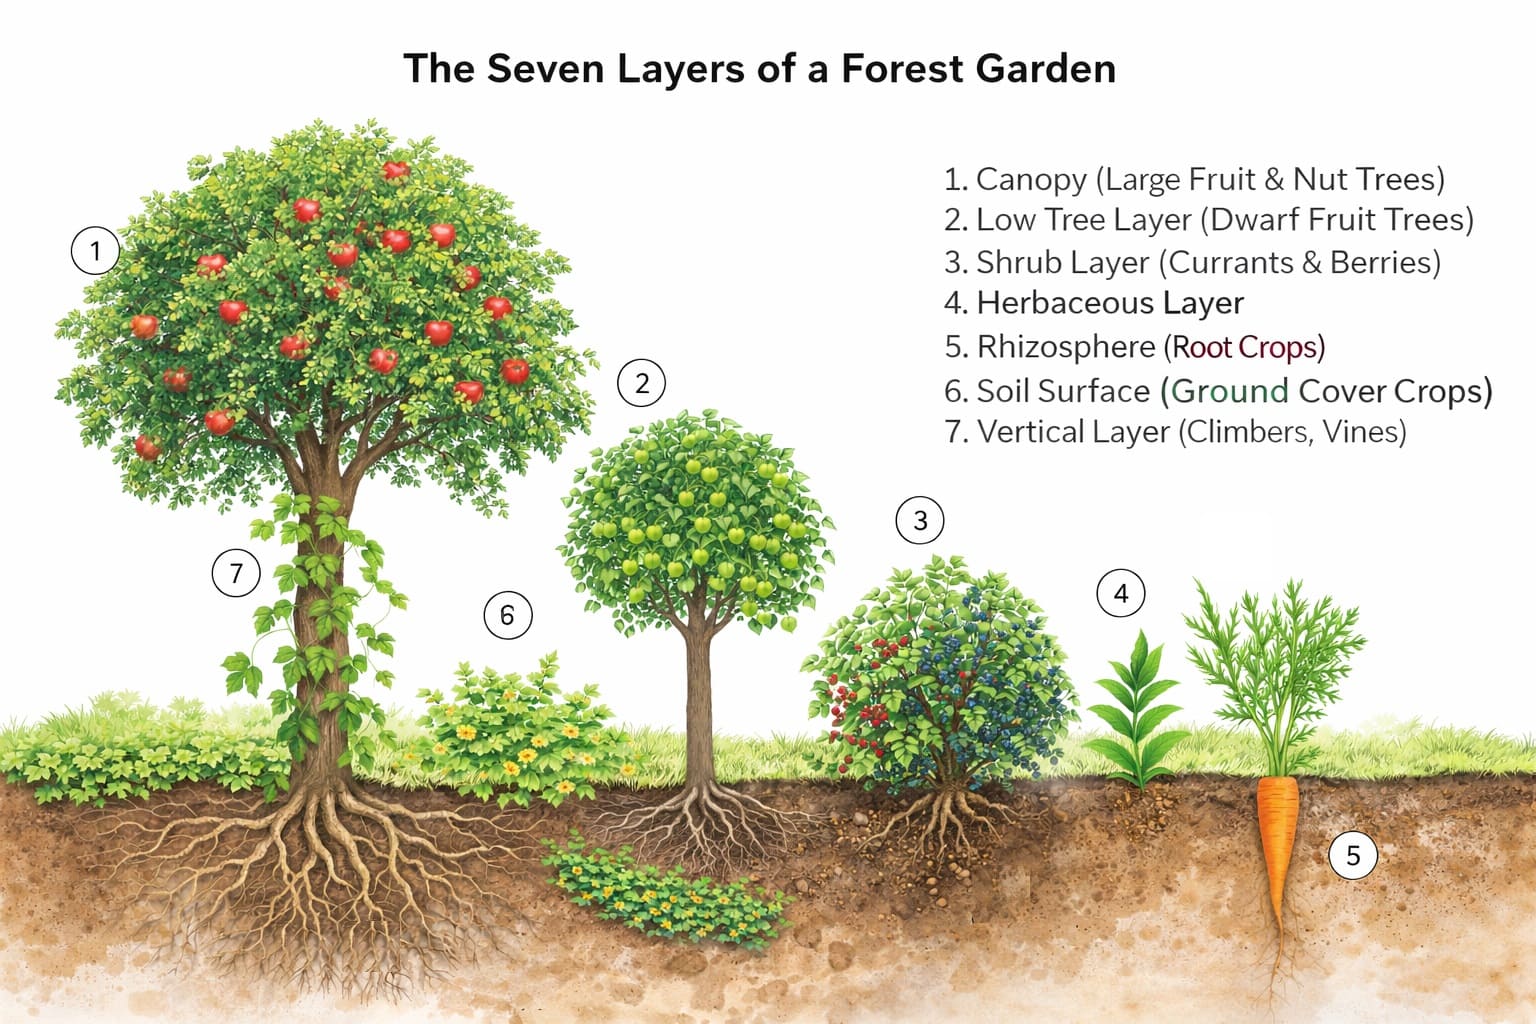
The Seven Layers:
- Canopy – Tall nut and fruit trees (walnut, oak, pecan)
- Understory – Smaller fruit trees (apple, pear, persimmon)
- Shrub – Berry bushes (blueberry, currant, elderberry)
- Herbaceous – Perennial vegetables and herbs (asparagus, rhubarb, lovage)
- Ground Cover – Low-growing edibles (strawberry, sweet potato, nasturtium)
- Root – Underground crops (garlic, potato, ginger, sunchoke)
- Vertical – Climbing vines (grapes, kiwi, beans, passion fruit)
But you also layer in time through succession planning. Your first-year garden might have:
- Spring: Early greens and peas (cool season)
- Summer: Tomatoes and squash taking over as spring crops fade (warm season)
- Fall: Brassicas planted in late summer now thriving (cool season returns)
- Winter: Garlic and cover crops building soil (regeneration)
Meanwhile, your perennial systems mature over years:
- Years 1-2: Fast-growing nitrogen fixers (beans, clover) establish and improve soil
- Years 3-5: Fruit shrubs begin producing while trees mature
- Years 5-10: Tree crops hit stride as nitrogen fixers get removed or coppiced
- Years 10+: Mature food forest requires minimal intervention
Essential Permaculture Practices
Theory becomes real when you put hands in soil. Here are the foundational techniques:
Water: The Keystone Resource
Water management often determines success or failure. Permaculture’s approach: slow it, spread it, sink it.
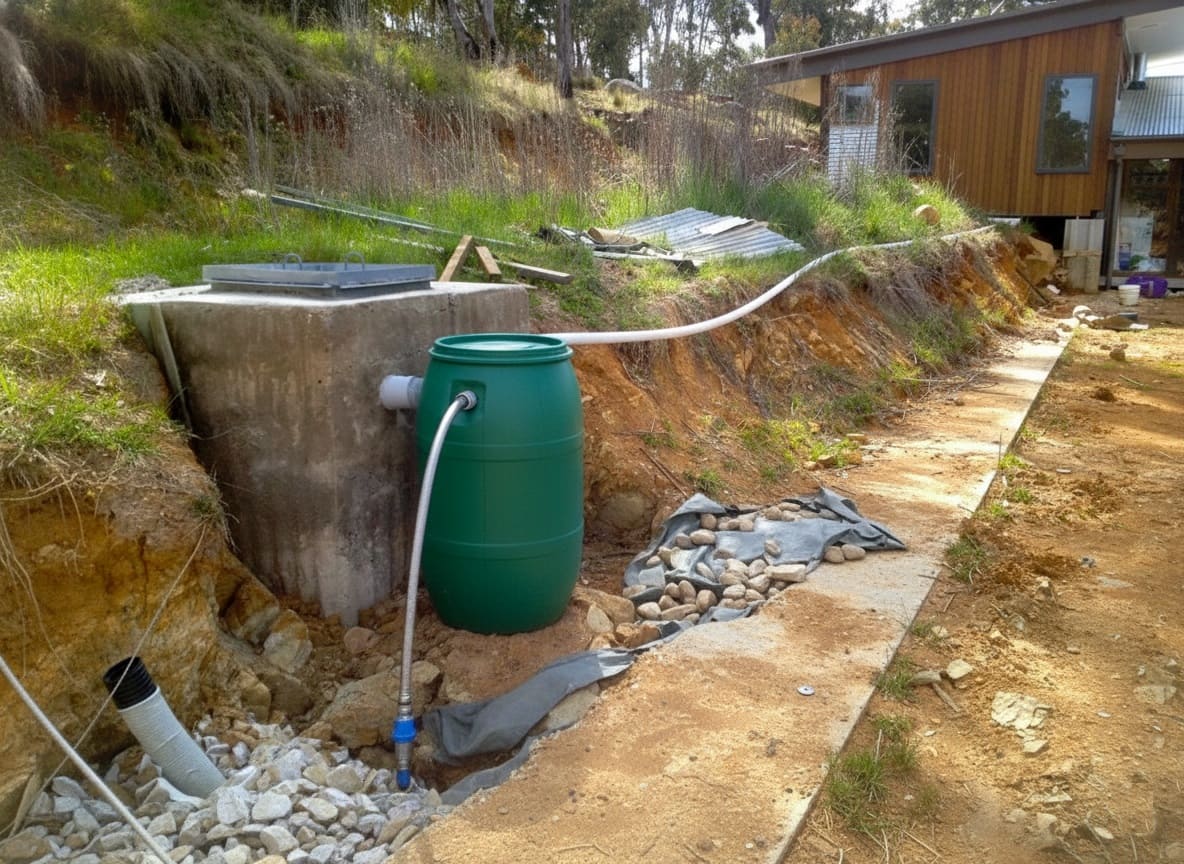
1. Rainwater Harvesting captures water before it leaves your property. A 1,000-square-foot roof collecting 30 inches of annual rainfall yields over 18,000 gallons. That’s significant in any climate.
Connect gutters to tanks, use first-flush diverters to skip dirty initial runoff, and gravity-feed water to gardens below.

👉 Here’s How to Use Goldfish for Mosquito Control in Rain Barrels
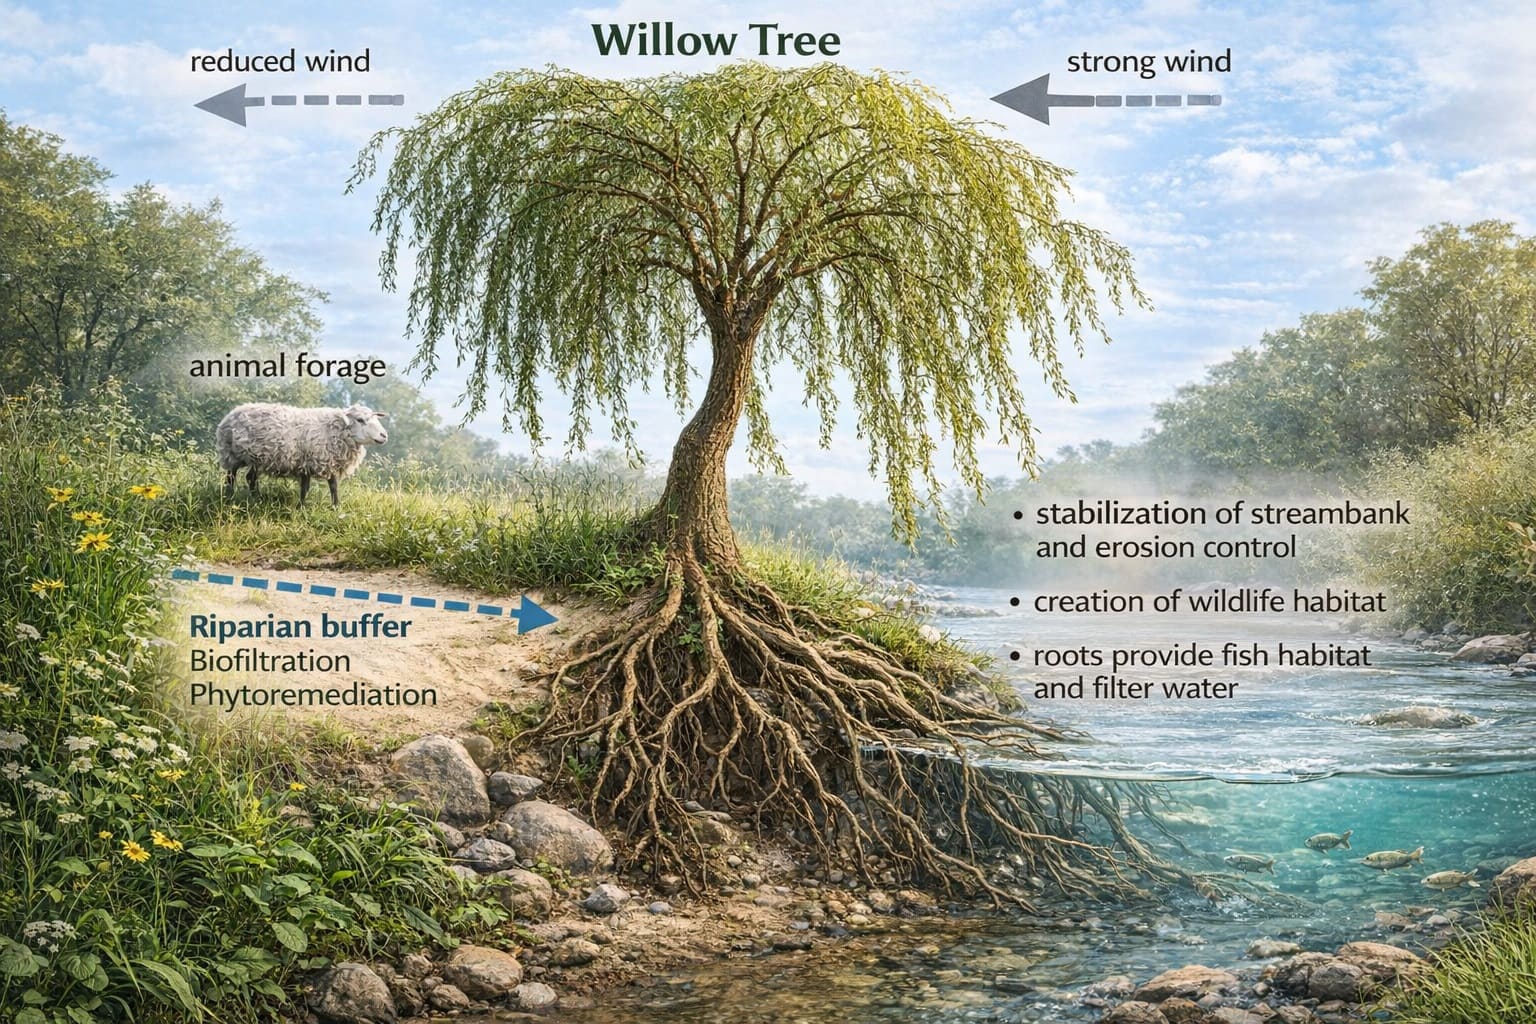
2. Swales are shallow trenches dug on contour (following the land’s elevation) that catch runoff and allow it to infiltrate slowly rather than eroding downhill.
Plant the swale’s downhill berm with trees whose roots access that stored water. In dry climates, swales can be the difference between thriving orchards and dead sticks.

3. Greywater Systems reuse water from sinks, showers, and laundry for irrigation. Simple systems divert shower water directly to mulch basins around fruit trees.
More complex systems include filters and distribution networks. Check local codes—legality varies.
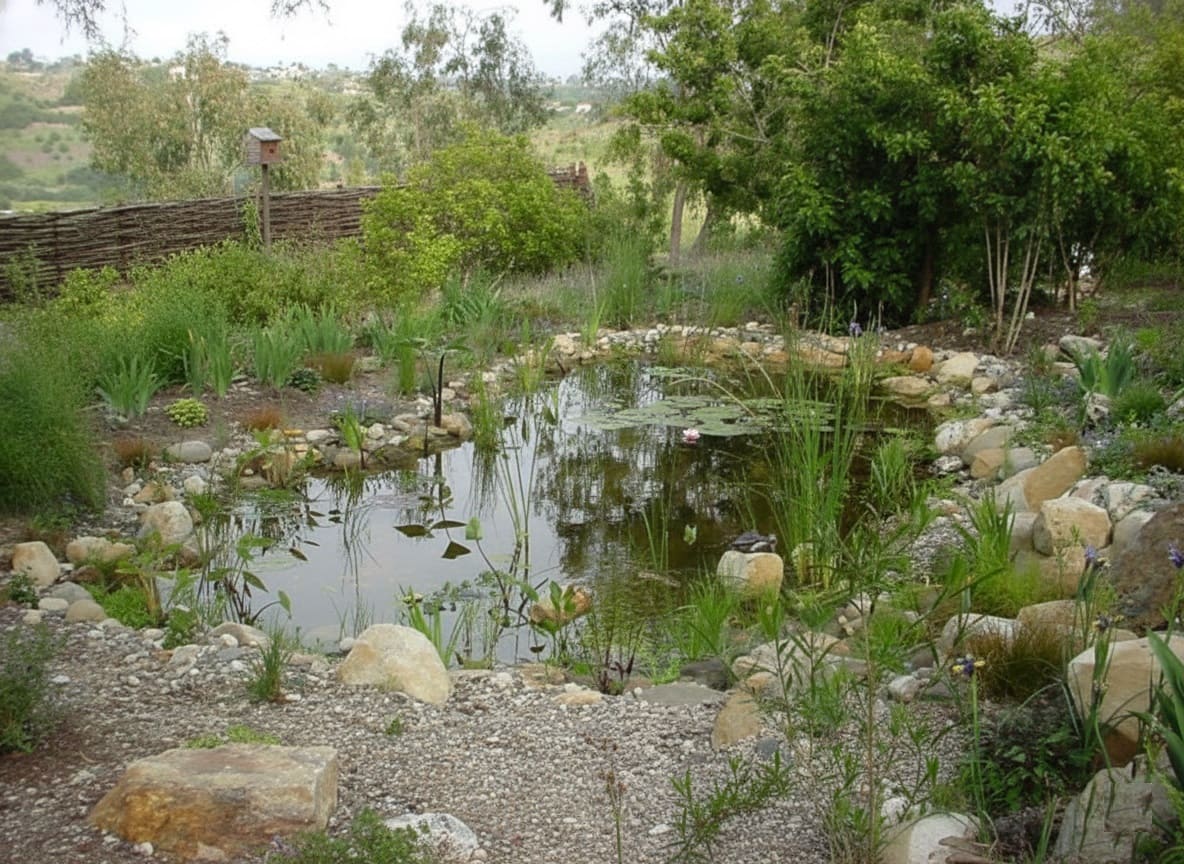
4. Ponds serve multiple functions: water storage, wildlife habitat, aquaculture, microclimate moderation (cooling in summer), fire protection, and beauty.
Position them high in your landscape if possible, allowing gravity-fed distribution to areas below.
Soil Building Without Destruction
Healthy soil is everything. Permaculture builds it through addition and protection, not tillage.
Sheet Mulching transforms lawn or weedy ground into planted beds without digging:
- Mow existing vegetation short
- Add nitrogen source (manure, compost, or blood meal)
- Layer cardboard or newspaper (overlap edges)
- Add 4-6 inches of mixed compost
- Top with 2-4 inches of wood chips or straw
- Plant immediately through the layers or wait 2-3 months
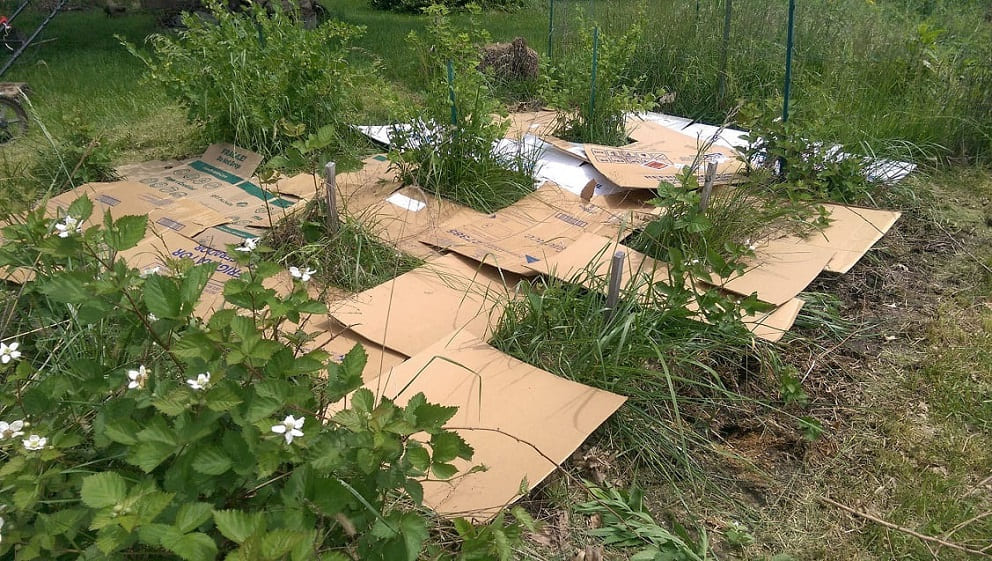
The cardboard smothers grass while decomposing into soil. Worms and microbes do the work you’d otherwise do with a spade.
Hügelkultur buries logs and branches under soil to create raised beds that hold water and slowly release nutrients as wood decomposes:
- Dig a shallow trench or build on flat ground
- Place logs and woody debris (avoid allelopathic species like black walnut)
- Add smaller sticks, leaves, and compost
- Mound soil over the wood (12-24 inches deep)
- Plant into the mound immediately
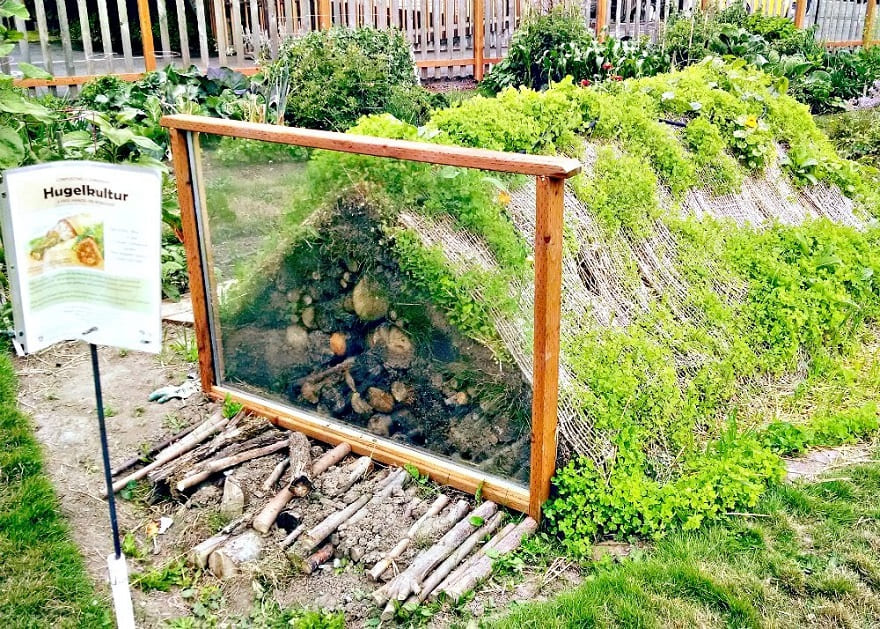
These beds can last 5-7 years without watering in many climates because decomposing wood acts like a sponge. They’re ideal for water-challenged sites.
Chop-and-Drop Mulching uses certain plants (comfrey, borage, nitrogen-fixing trees) as living fertilizer factories.
Cut them back periodically and drop the nutrient-rich leaves directly around other plants. They break down quickly, feeding soil life and suppressing weeds.
Integrating Animals Strategically
Animals aren’t decoration in permaculture—they’re workers. But integration requires thoughtful management.
1. Chicken Tractors are mobile coops moved daily or weekly across garden beds. The birds:
- Clear crop residues after harvest
- Eat pests, larvae, and weed seeds
- Scratch and aerate the surface
- Deposit high-nitrogen manure
- Turn the bed into planting-ready condition in 1-2 weeks
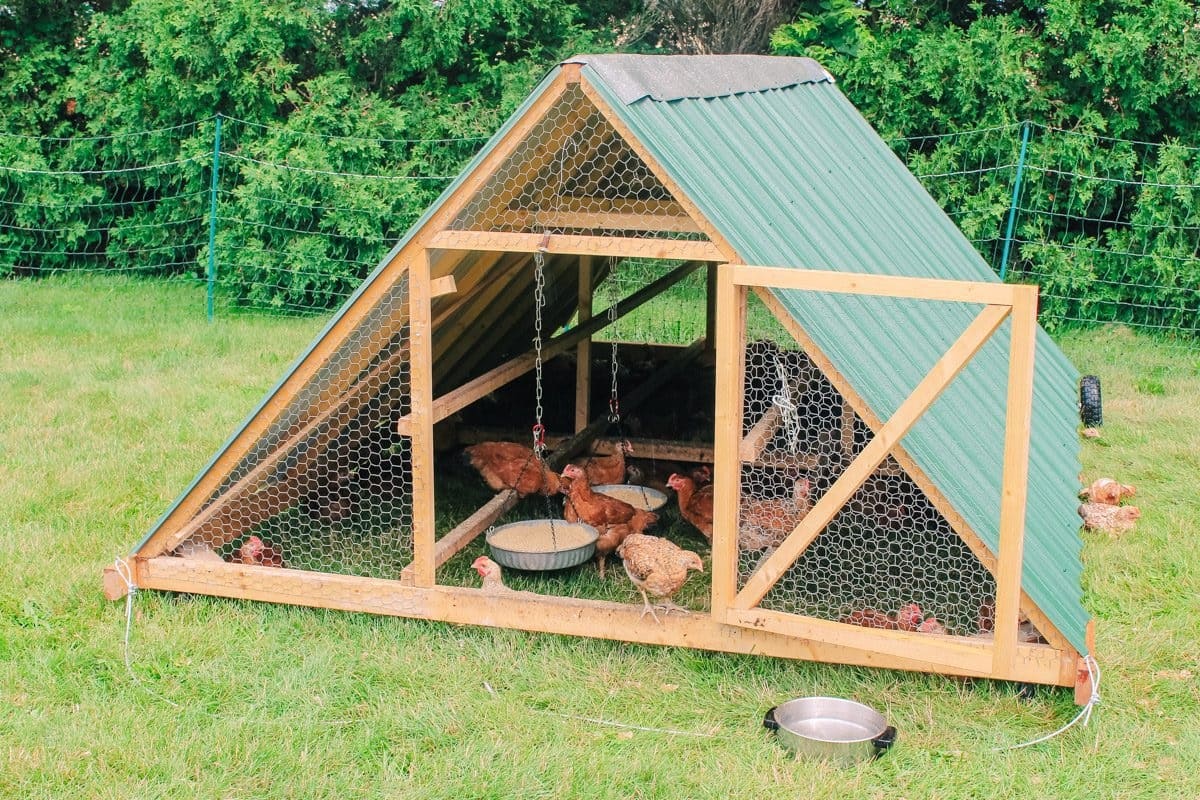
You control their impact through timing. Too long in one spot and they’ll compact soil and denude everything. Moved correctly, they prepare beds better than you could with tools.
2. Rotational Grazing applies similar logic to larger animals. Rather than continuous grazing that degrades pasture, move cattle, sheep, or goats frequently (daily to weekly).
This mimics wild herbivore patterns: intense grazing followed by long rest periods. Results include:
- Deeper-rooted, more diverse pasture
- Better water infiltration
- Increased soil carbon
- Reduced parasite loads
- Higher animal health and weight gain
The key is observation. Move animals when they’ve eaten the top third of grass, not more. Give pastures 30-90 days rest before returning.
3. Aquaponics creates closed-loop fish and plant production. Fish waste becomes plant fertilizer. Plants clean water for fish.
Small backyard systems can produce year-round greens and modest fish harvests with minimal water use (just replacing what evaporates).
Your First Year: A Realistic Implementation Plan
Most permaculture advice skips the messy reality of getting started. Here’s a practical timeline:
Season 1 (Months 1-3): Observe and Document
This feels passive but it’s crucial:
- Photograph your site weekly from the same spots
- Track sun and shade patterns through the day
- Note where water flows during rain
- Record what’s already growing (some “weeds” are useful)
- Test soil with a basic kit or lab analysis
- Identify existing microclimates (cold pockets, hot spots, wind tunnels)
- Talk to neighbors about local challenges (pests, weather patterns)
Create rough maps showing these observations. Graph paper and colored pencils work fine. Fancy software isn’t necessary.
Season 2 (Months 4-6): Design on Paper
With observation data, start designing:
- Draw your property to scale
- Mark zones based on access from your house
- Add sector analysis (sun, wind, water, views)
- Sketch potential swales, ponds, or water features
- Plan initial guilds around 1-3 starter trees or beds
- List plants suited to your climate and goals
- Estimate realistic time and budget
Make mistakes on paper. They’re free here, expensive in the ground.
Season 3 (Months 7-9): Start Small in Zone 1
Begin with what you’ll tend daily:
- Install one 4’×8′ raised bed near your door
- Plant a simple salad guild: lettuce, radishes, herbs
- Start a three-bin compost system (or single tumbler)
- Put one rain barrel on your largest downspout
- Plant one fruit tree with a basic guild around it
Resist doing more. This phase teaches you what works with your schedule and energy levels.
Season 4 (Months 10-12): Expand and Refine
Based on what you learned:
- Add 1-2 more Zone 1 beds or expand existing ones
- Try sheet mulching to convert a lawn section
- Plant perennials: berries, asparagus, rhubarb, herbs
- Install additional water harvesting if the first barrel fills
- Adjust your guilds based on what thrived or struggled
- Start saving seeds from successful plants
By year’s end, you’ll have functioning systems and real experience to guide Year 2 expansion.
Common Challenges and Realistic Solutions
Permaculture books often skip the failures. Let’s address them:
“My Guilds Aren’t Working”
- The problem: You planted the recommended guild but some plants died, others took over, and it looks nothing like the photos.
- Why this happens: Guilds are location-specific. A Mediterranean climate guild won’t work in Minnesota. Plus, textbook guilds often skip mentioning aggressive plants that dominate.
The fix:
Start with 2-3 compatible plants maximum. Once you see how they interact in your soil and climate, add more. Research can’t replace observation. Your site will teach you what works.
“I’m Drowning in Zucchini But Have No Tomatoes”
- The problem: Unbalanced yields or massive gluts you can’t use.
- Why this happens: Poor planning for succession and realistic consumption needs.
The fix:
Calculate backwards. If your family eats one salad daily, you need X lettuce plants replanted every 3 weeks, not 20 plants all at once.
For preservation crops like tomatoes, plant based on how many jars of sauce you’ll actually make. Share or trade surplus intentionally rather than letting it rot.
“The Chickens Destroyed My Garden”
- The problem: Free-ranging birds decimated your plants, scratched out seeds, ate everything green.
- Why this happens: Timing and access weren’t managed. Chickens are indiscriminate.
The fix:
Use them as tools, not free-roaming workers. Mobile tractors, temporary fencing, and scheduled access to specific areas prevent destruction while capturing benefits.
Never give chickens access to actively growing vegetables. Use them before planting or after harvest.
“Everything Died Over Winter/Summer”
- The problem: Seasonal stress killed poorly adapted plants.
- Why this happens: Choosing plants based on what you want rather than what suits your climate.
The fix:
Start with native and proven perennials. Gradually experiment with borderline species. Use microclimates strategically—plant tender species on warm south-facing walls, hardy species in exposed areas. Accept that some plants simply won’t work in your zone.
“I Don’t Have Time for This”
- The problem: Permaculture requires more observation and maintenance than promised.
- Why this happens: Young systems need establishment care. Also, initial enthusiasm leads to over-ambitious designs.
The fix:
Be ruthlessly honest about available time. If you have 3 hours weekly, design for that reality.
Mature permaculture systems do need less intervention, but reaching maturity takes 3-5 years. Scale back if overwhelmed. Ten well-tended plants beat 100 neglected ones.
Real Costs: What to Actually Expect
Permaculture can be cheap or expensive depending on your approach:
Minimal-Cost Start ($100-500):
- Seeds, compost, basic tools
- Free materials: cardboard, leaves, wood chips from arborists
- Salvaged rain barrels
- Repurposed materials for beds
- Time investment: significant
Mid-Range Investment ($500-5,000):
- Quality tools
- Purchased compost and mulch
- Fruit trees and perennials
- Simple irrigation setup
- Rain tank(s)
- Chicken coop materials
- Time investment: moderate
Established System ($5,000+):
- Extensive water infrastructure
- Professional design consultation
- Earthmoving for ponds or swales
- Greenhouse or larger structures
- Diverse mature plantings
- Fencing and animal infrastructure
- Time investment: lower once established
The permaculture approach actually saves money over time through reduced inputs, but establishment costs are real. Budget accordingly.
When Permaculture Excels
Permaculture isn’t always the answer. It works best when:
- You’re in it for the long term: If you’re renting short-term or plan to move soon, focus on portable containers and annual crops rather than permanent landscapes.
- You value resilience over maximum yield: A permaculture system might produce 70% of a conventional farm’s yield while using 30% of the inputs—better net efficiency, lower gross output.
- You enjoy observation and experimentation: This isn’t paint-by-numbers. You need to think, adjust, and learn continuously.
- You have some control over your land: Even renters can practice permaculture with landlord permission or in community gardens, but ownership gives you freedom to make permanent changes.
- You want diverse outputs: If you only want tomatoes, conventional intensive growing might serve better. Permaculture shines when you want food, medicine, habitat, beauty, and materials from the same space.
Success Stories Worth Learning From
1. Geoff Lawton’s Greening the Desert Project transformed 10 acres of barren Jordanian desert into productive oasis through aggressive water harvesting and strategic planting.

In a decade, the land grew abundant fruit trees, vegetables, and mushrooms. The key: massive initial water infrastructure capturing every drop.
2. Sepp Holzer’s Krameterhof in the Austrian Alps produces diverse crops at 5,000 feet elevation through terraced ponds, microclimates, and integrated animals—all without external inputs.
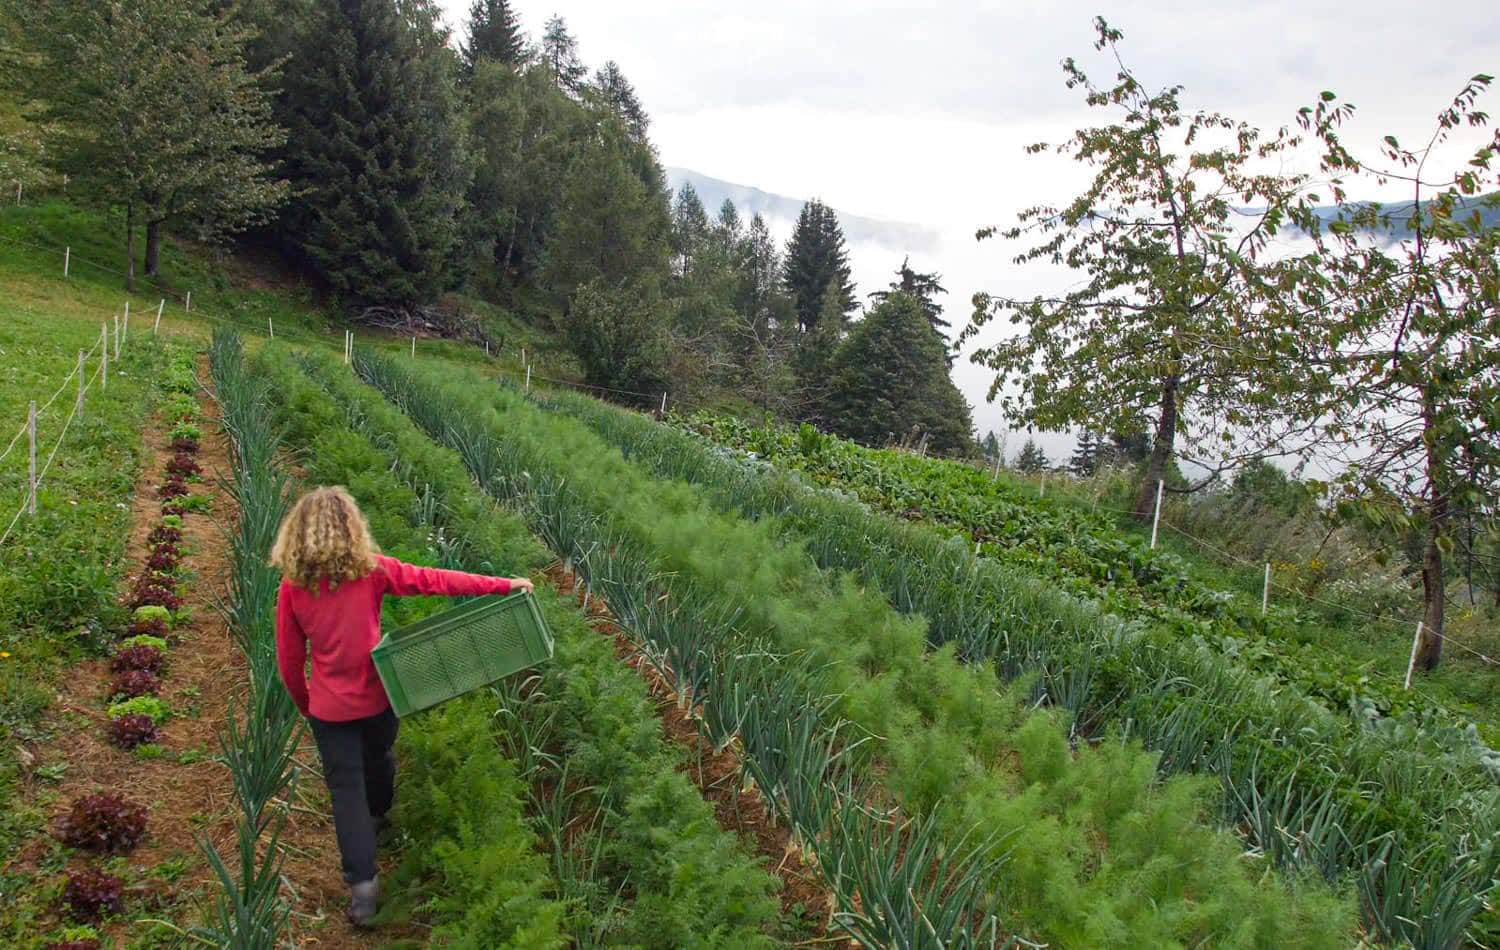
Started in the 1960s, it’s now a 50+ year case study in resilience.
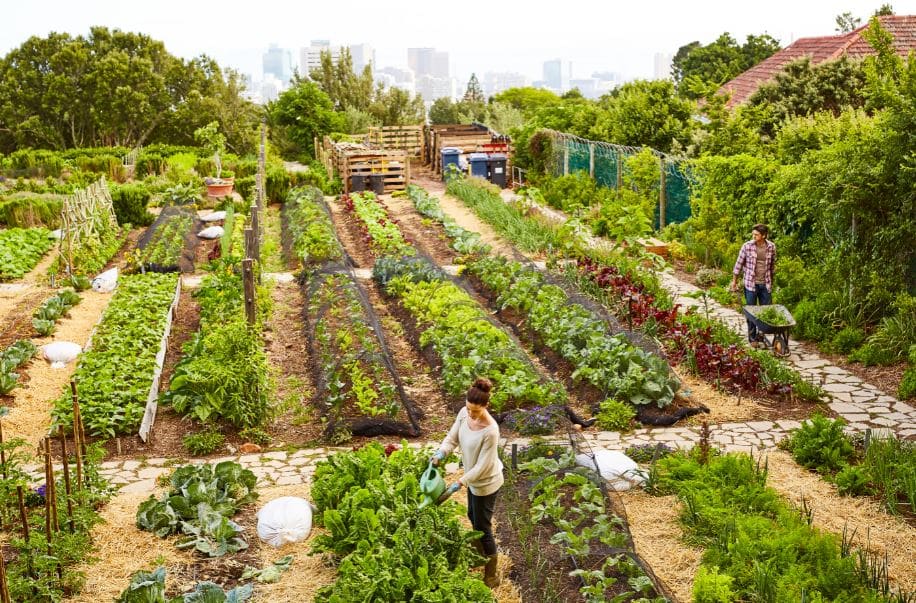
3. Urban Community Gardens across Los Angeles use permaculture to grow 6,000+ pounds of produce annually on former vacant lots.
Sheet mulching, intensive planting, and water harvesting transform degraded urban soil into productivity within 2-3 years.
These examples share common threads: water management came first, diversity was prioritized, and patient establishment yielded exponential returns.
Taking Your Next Step
If you’re ready to begin:
- Spend one season observing before changing anything. This patience prevents expensive mistakes.
- Start with water – even a single rain barrel or simple swale teaches you about flows and storage.
- Join or create community – online forums, local permaculture guilds, or garden clubs provide support and knowledge sharing.
- Take a Permaculture Design Course if you want depth. The standard 72-hour PDC covers design methodology comprehensively. Many are now available online.
- Read actively – Gaia’s Garden by Toby Hemenway remains the most practical intro. Holmgren’s Permaculture: Principles and Pathways Beyond Sustainability provides philosophical depth.
- Accept imperfection – your first designs will have flaws. That’s how you learn. Start small enough that mistakes don’t devastate you.
The Deeper Gift
After all this information, you might still struggle to explain permaculture in one sentence. That’s because it’s simultaneously a design methodology, an ethical framework, and a way of seeing the world.
What matters most is this: Permaculture teaches you to notice relationships instead of just things. To value the wild edge alongside the tidy row. To work less and observe more. To feed yourself while feeding the soil.
Your small patch of earth—whether balcony or farm—connects to the planet’s breathing, living skin. What you do there ripples outward in ways you’ll never fully see.
Start where you are. Use what you have. Observe deeply, design carefully, plant thoughtfully, and tend patiently.
Let the garden teach you. Share what you learn. Build soil. Feed pollinators. Harvest hope alongside your tomatoes.
The world needs more people growing food with dirt under their fingernails and wonder in their hearts.
It needs your small corner of abundance, however imperfect.
It needs you to begin.
Frequently Asked Questions
- How is permaculture different from organic gardening?
Organic gardening avoids synthetic chemicals but doesn’t necessarily involve systems thinking. You can have an organic monoculture.
Permaculture always emphasizes diversity, beneficial relationships between elements, and designing for self-maintenance. It includes organic methods but goes further into design methodology.
- Will permaculture work in my climate?
Yes, because permaculture is about observing YOUR specific site and working with what thrives there.
Desert permaculture looks completely different from tropical or temperate approaches, but the principles remain constant. The techniques adapt to place.
- How much time does it really take?
Establishment (Years 1-3) demands consistent time—perhaps 5-10 hours weekly. Once systems mature, maintenance drops dramatically.
A mature food forest might need 1-2 hours weekly for harvest and light pruning. Annual gardens always require more time than perennial systems.
- Can I practice permaculture if I’m renting?
Focus on containers, annual plantings, and portable systems. Sheet mulch in movable frames. Grow vertical gardens.
Some landlords welcome improvements like fruit trees (they increase property value), but always get permission for permanent changes. Community gardens offer another outlet.
- What’s the single most important thing to start with?
Water management. Whether capturing rain from your roof or reshaping land to slow runoff, controlling water flow creates the foundation for everything else. You can grow food without perfect soil or ideal plants, but without water, nothing thrives.