
Picture this: You step outside your back door on a warm July morning, coffee in hand, and pluck a perfectly ripe peach from a tree that’s barely taller than you are.
A few steps away, your dwarf apple trees are heavy with fruit that won’t be ready until fall, while your cherry tree—harvested just last month—is already setting buds for next year. Welcome to the magic of backyard orchard culture.
I learned about this revolutionary approach to fruit growing three years ago when I was staring at my small suburban yard, desperately wanting fresh fruit but convinced I’d need acres of land to make it happen. Like most people, I imagined orchards as endless rows of towering trees requiring tractors and ladders.
The reality? You can grow more varieties of fresh, tree-ripe fruit in your backyard than most commercial orchards produce—and you can do it in a space smaller than many people’s driveways.
What Is Backyard Orchard Culture (And Why It Changes Everything)
Backyard orchard culture flips traditional orchard thinking on its head. Instead of growing a few massive trees that produce hundreds of pounds of fruit all at once, you plant many smaller trees close together, each producing manageable amounts of different fruits that ripen throughout the growing season.
The concept was pioneered by Dave Wilson Nursery in California, and it’s built on a simple but brilliant insight: home fruit growers have completely different needs than commercial farmers.

Commercial growers want maximum yield per tree for a single variety that can be machine-harvested all at once. Home growers want variety, manageable harvests, and fresh fruit from spring through fall.
Here’s what makes it revolutionary:
- Space Efficiency: You can plant 4-6 trees in the space traditionally used for one, giving you multiple varieties instead of a single type of fruit.
- Extended Harvest: By choosing early, mid-season, and late varieties, you extend your fresh fruit season from a few weeks to several months.
- Manageable Scale: Smaller trees mean smaller harvests that a family can actually use, rather than being overwhelmed with 200 pounds of apples all ripening in the same week.
- Easy Maintenance: Everything happens at ground level—no ladders needed for pruning, thinning, or harvesting.
- Better Pollination: Having multiple varieties blooming at different times attracts more pollinators and often results in better fruit set across all your trees.
Understanding Rootstocks: The Foundation of Your Success
Before diving into planting, you need to understand one of the most important factors in fruit tree success: rootstock. Almost every fruit tree you buy is actually two plants grafted together—the top part (scion) that produces the fruit you want, and the bottom part (rootstock) that controls the tree’s size, hardiness, and adaptability.
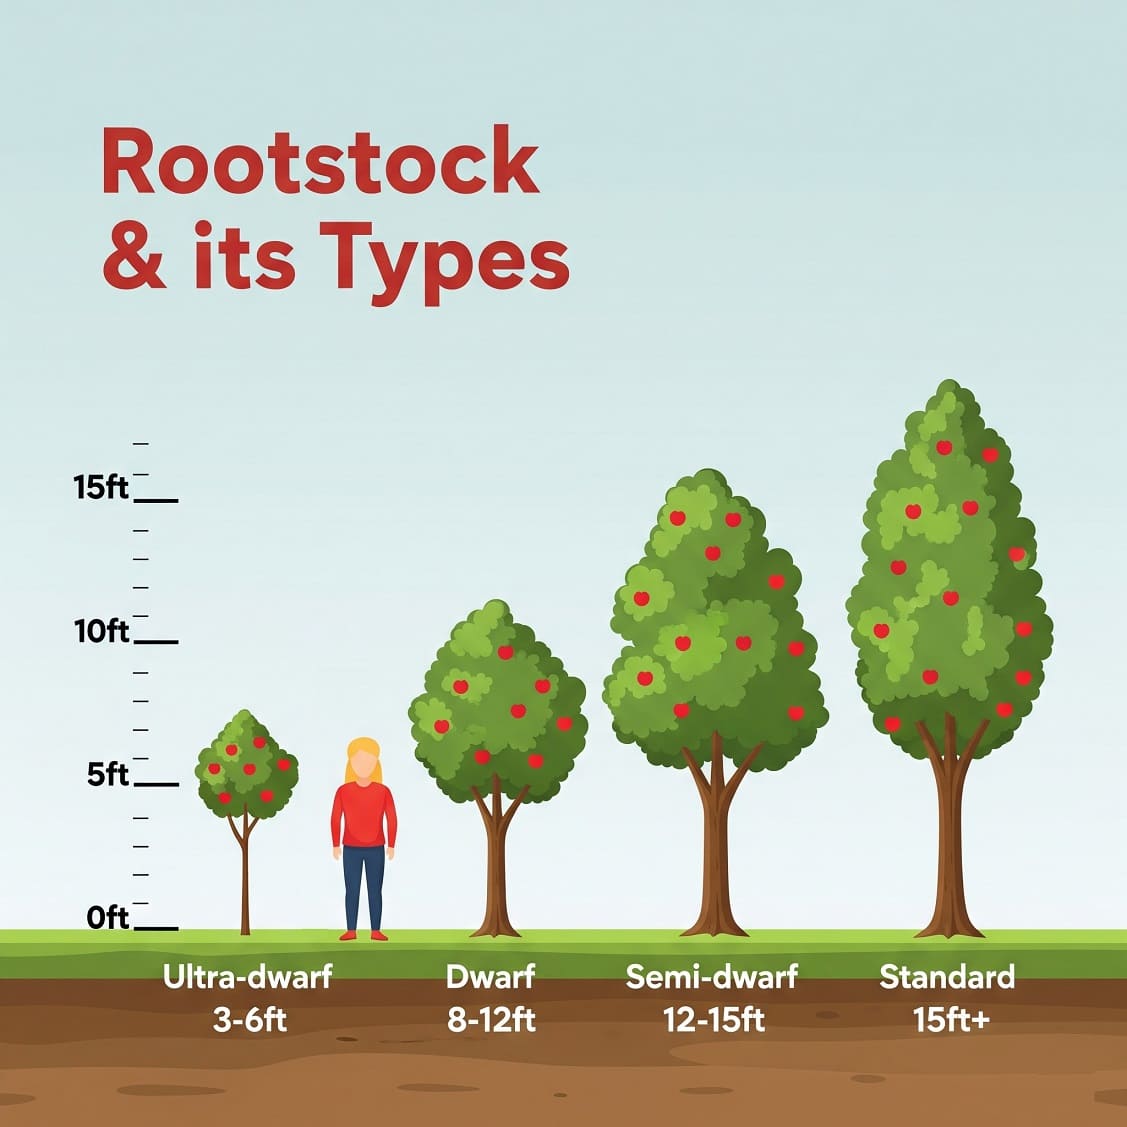
- Dwarf Rootstocks keep trees 6-10 feet tall but may need permanent staking and more intensive care. They’re perfect for containers or very small spaces but can be shorter-lived.
- Semi-Dwarf Rootstocks create trees 10-16 feet tall (which you’ll prune to 6-8 feet) and offer the best balance of manageable size, productivity, and longevity for most backyard situations.
- Standard Rootstocks would normally create full-sized trees, but with aggressive pruning, they can be kept small while providing excellent disease resistance and longevity.
The key insight? Don’t rely solely on rootstock for size control—pruning is what really keeps your trees manageable. A semi-dwarf tree that’s summer-pruned annually will stay smaller and more productive than a dwarf tree that’s left unpruned.
Getting Started: Setting the Stage for Success
Choose Your Location Wisely
Your mini orchard needs full sun—at least 6-8 hours of direct sunlight daily. Fruit trees are essentially farming sunlight to create sugar, and insufficient light means poor fruit quality and reduced yields.
I learned this lesson the hard way when I planted my first fig tree in what I thought was a sunny spot. It got morning sun beautifully, but by 2 PM, my neighbor’s garage cast it into shade. The tree grew fine, but the figs never developed their characteristic sweetness. After relocating it to a truly sunny spot, the difference was remarkable.
Look for a south-facing area of your yard that doesn’t get shaded by buildings or large trees. If you’re unsure, spend a day tracking sun patterns during the summer solstice—the longest day of the year will show you the maximum sun exposure any spot can receive.
The Drainage Test That Could Save Your Trees
Poor drainage kills more fruit trees than all pests and diseases combined. Most fruit trees hate “wet feet”—their roots need oxygen, and waterlogged soil essentially drowns them.
Here’s a simple test: dig a hole about 12 inches deep and 12 inches wide in your planned planting area. Fill it with water and let it drain completely. Fill it again and time how long it takes to drain the second time. If it takes more than 24 hours, you’ll need to improve drainage through raised beds or choose a different location.
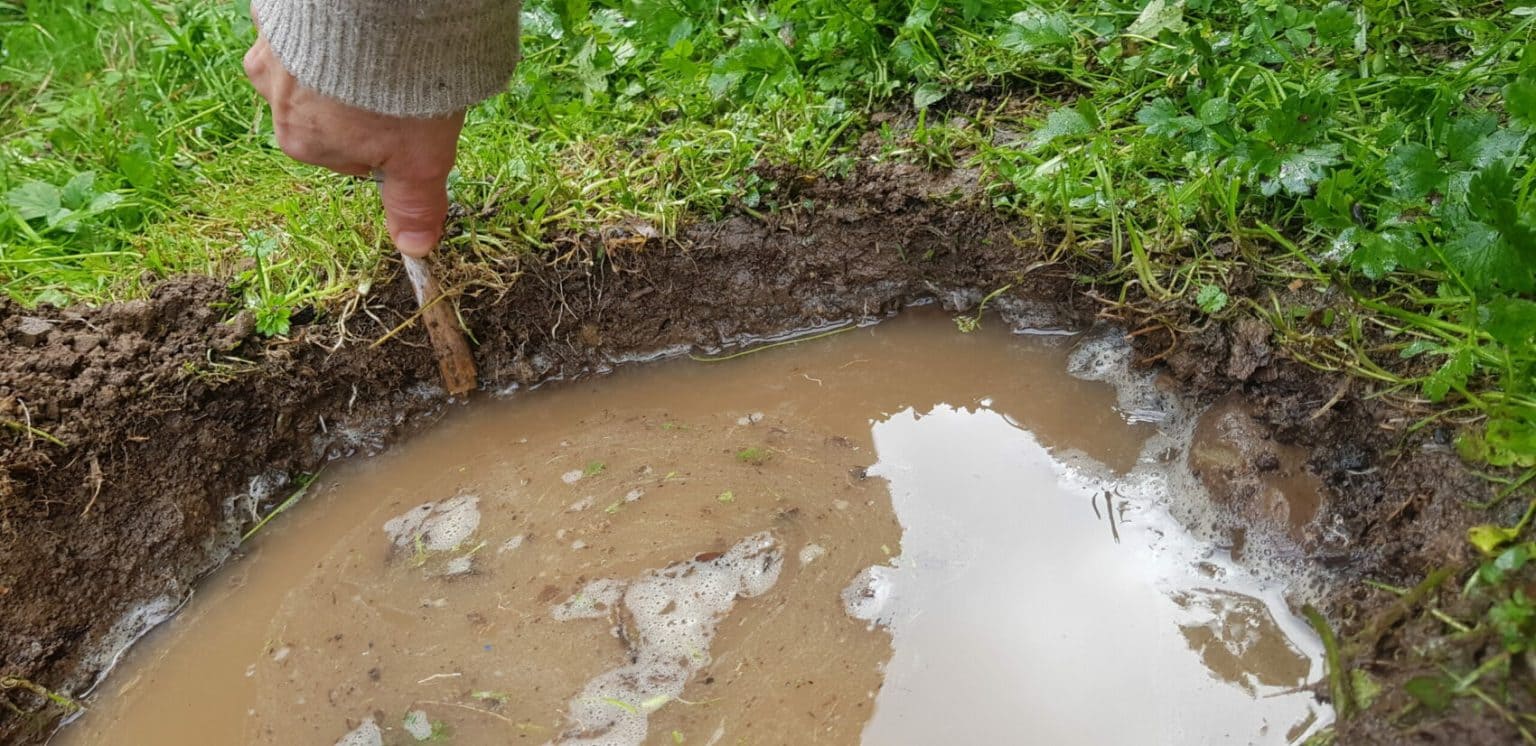
If you discover drainage issues, don’t despair. You can create raised beds or mounded planting areas 8-12 inches high using quality topsoil. Even this modest elevation can make the difference between thriving trees and dead ones.
Soil Testing: Know What You’re Working With
While fruit trees are adaptable, understanding your soil gives you a significant advantage. A basic soil test will tell you your pH and major nutrient levels. Most fruit trees prefer slightly acidic to neutral soil (pH 6.0-7.0), though blueberries are notable exceptions, preferring very acidic conditions (pH 4.5-5.5).
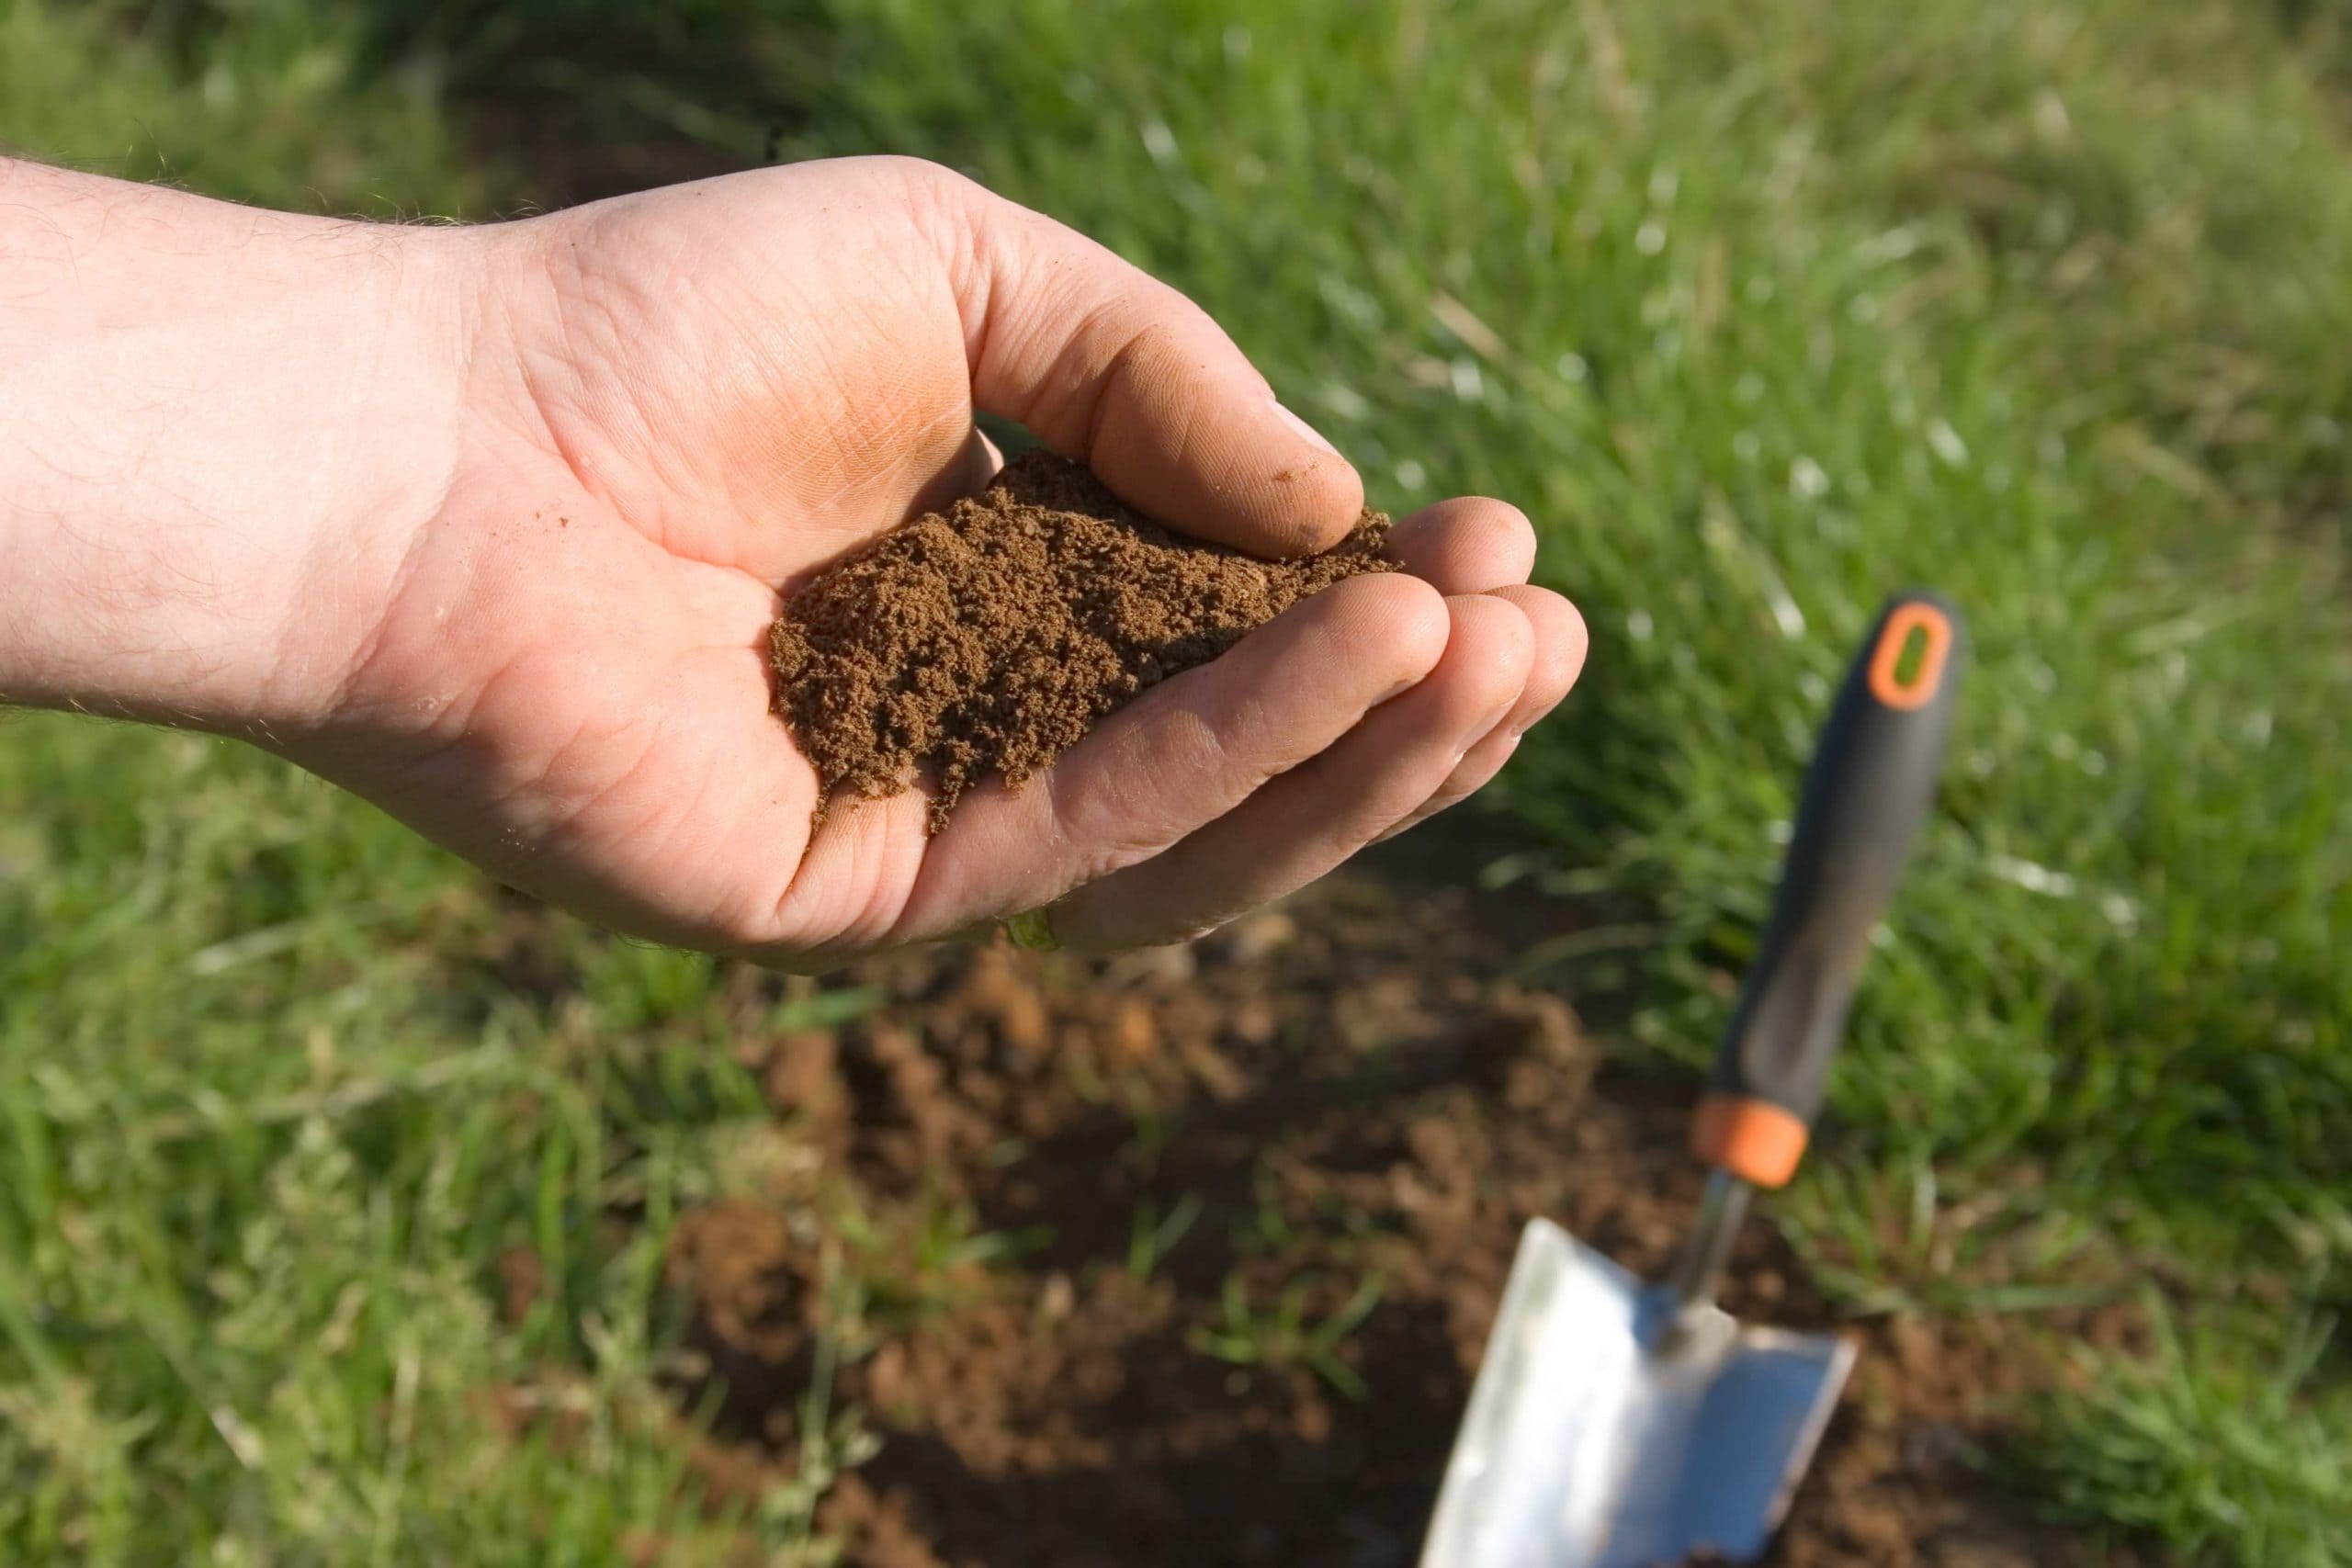
If your soil is too alkaline (common in areas with limestone bedrock), you can lower the pH with sulfur or organic matter. If it’s too acidic, lime can raise it. But here’s a secret: it’s often easier to choose varieties adapted to your existing conditions than to fight your soil chemistry.
Here’s How to Add Nitrogen to Soil: 18 Quick Fixes + Long-Term Solutions
Choosing Your Trees: The Art of Variety Selection
This is where backyard orchard culture gets really exciting. Instead of being limited to one or two types of fruit, you can create a diverse ecosystem that provides fresh options from late spring through fall.
Understanding Chill Hours (And Why They Matter)
One of the biggest mistakes new fruit growers make is choosing varieties that aren’t suited to their climate. Many fruit trees require a certain number of “chill hours”—hours between 32°F and 45°F during winter dormancy—to produce fruit properly.
If you live in southern California and plant a ‘Honeycrisp’ apple that needs 800+ chill hours, you’ll get a beautiful tree that never fruits. Conversely, if you’re in Minnesota and choose a low-chill variety bred for warm climates, your tree might not survive the winter.
Check with your local extension office or use online chill hour maps to determine your area’s average annual chill hours, then choose varieties accordingly. This one factor can mean the difference between success and frustration.
Pollination: The Secret to Abundant Harvests
Many fruit trees need cross-pollination to produce well, meaning they need pollen from a different variety of the same fruit type. This is actually a hidden advantage of backyard orchard culture—by planting multiple varieties, you’re naturally creating better pollination conditions.
Some fruits are self-fertile and will produce alone, while others absolutely require a pollinator partner. Here’s a quick guide:
- Self-fertile: Most peaches, nectarines, apricots, sour cherries, figs
- Need pollinators: Most apples, pears, sweet cherries, plums
- Partially self-fertile: Some varieties will produce alone but do much better with a pollinator
When planning your orchard, ensure that varieties needing cross-pollination have compatible partners that bloom at the same time. Your local nursery or extension office can provide compatibility charts for your area.
Here’s How to Create a Pollinator-Friendly Garden: A Step-by-Step Guide
The Succession Planting Strategy
This is where backyard orchard culture really shines. Instead of planting one apple tree that gives you 100 pounds of fruit in September, plant three different varieties: an early summer apple, a late summer variety, and a fall storage apple. Same space, same amount of total fruit, but spread over three months instead of three weeks.
Here’s a sample progression for a temperate climate:
- June: Sweet cherries, early summer apples, strawberries
- July: Apricots, early plums, summer pears, raspberries
- August: Peaches, nectarines, mid-season apples, blueberries
- September: Late plums, fall pears, main apple harvest
- October: Late apples, persimmons, late pears, cranberries
Disease Resistance: Your Insurance Policy
Nothing is more heartbreaking than losing years of growth to preventable diseases. When selecting varieties, prioritize disease resistance over famous names. An ‘Enterprise’ apple that resists scab, fire blight, and cedar apple rust will give you decades of reliable harvests with minimal intervention, while that ‘Red Delicious’ might require constant spraying to survive.
Modern breeding programs have developed remarkable disease-resistant varieties that often taste better than their famous ancestors. Don’t be afraid to try varieties you’ve never heard of—they might become your new favorites.
High-Density Planting Techniques: Maximizing Your Space
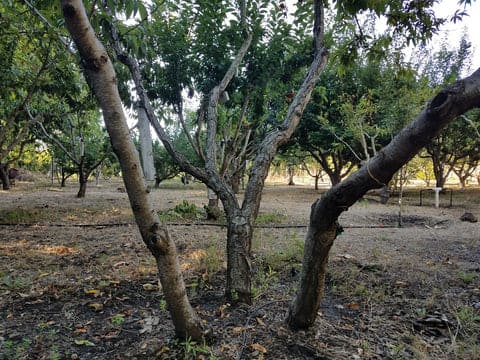
The Revolutionary “Multiple Trees in One Hole” Method
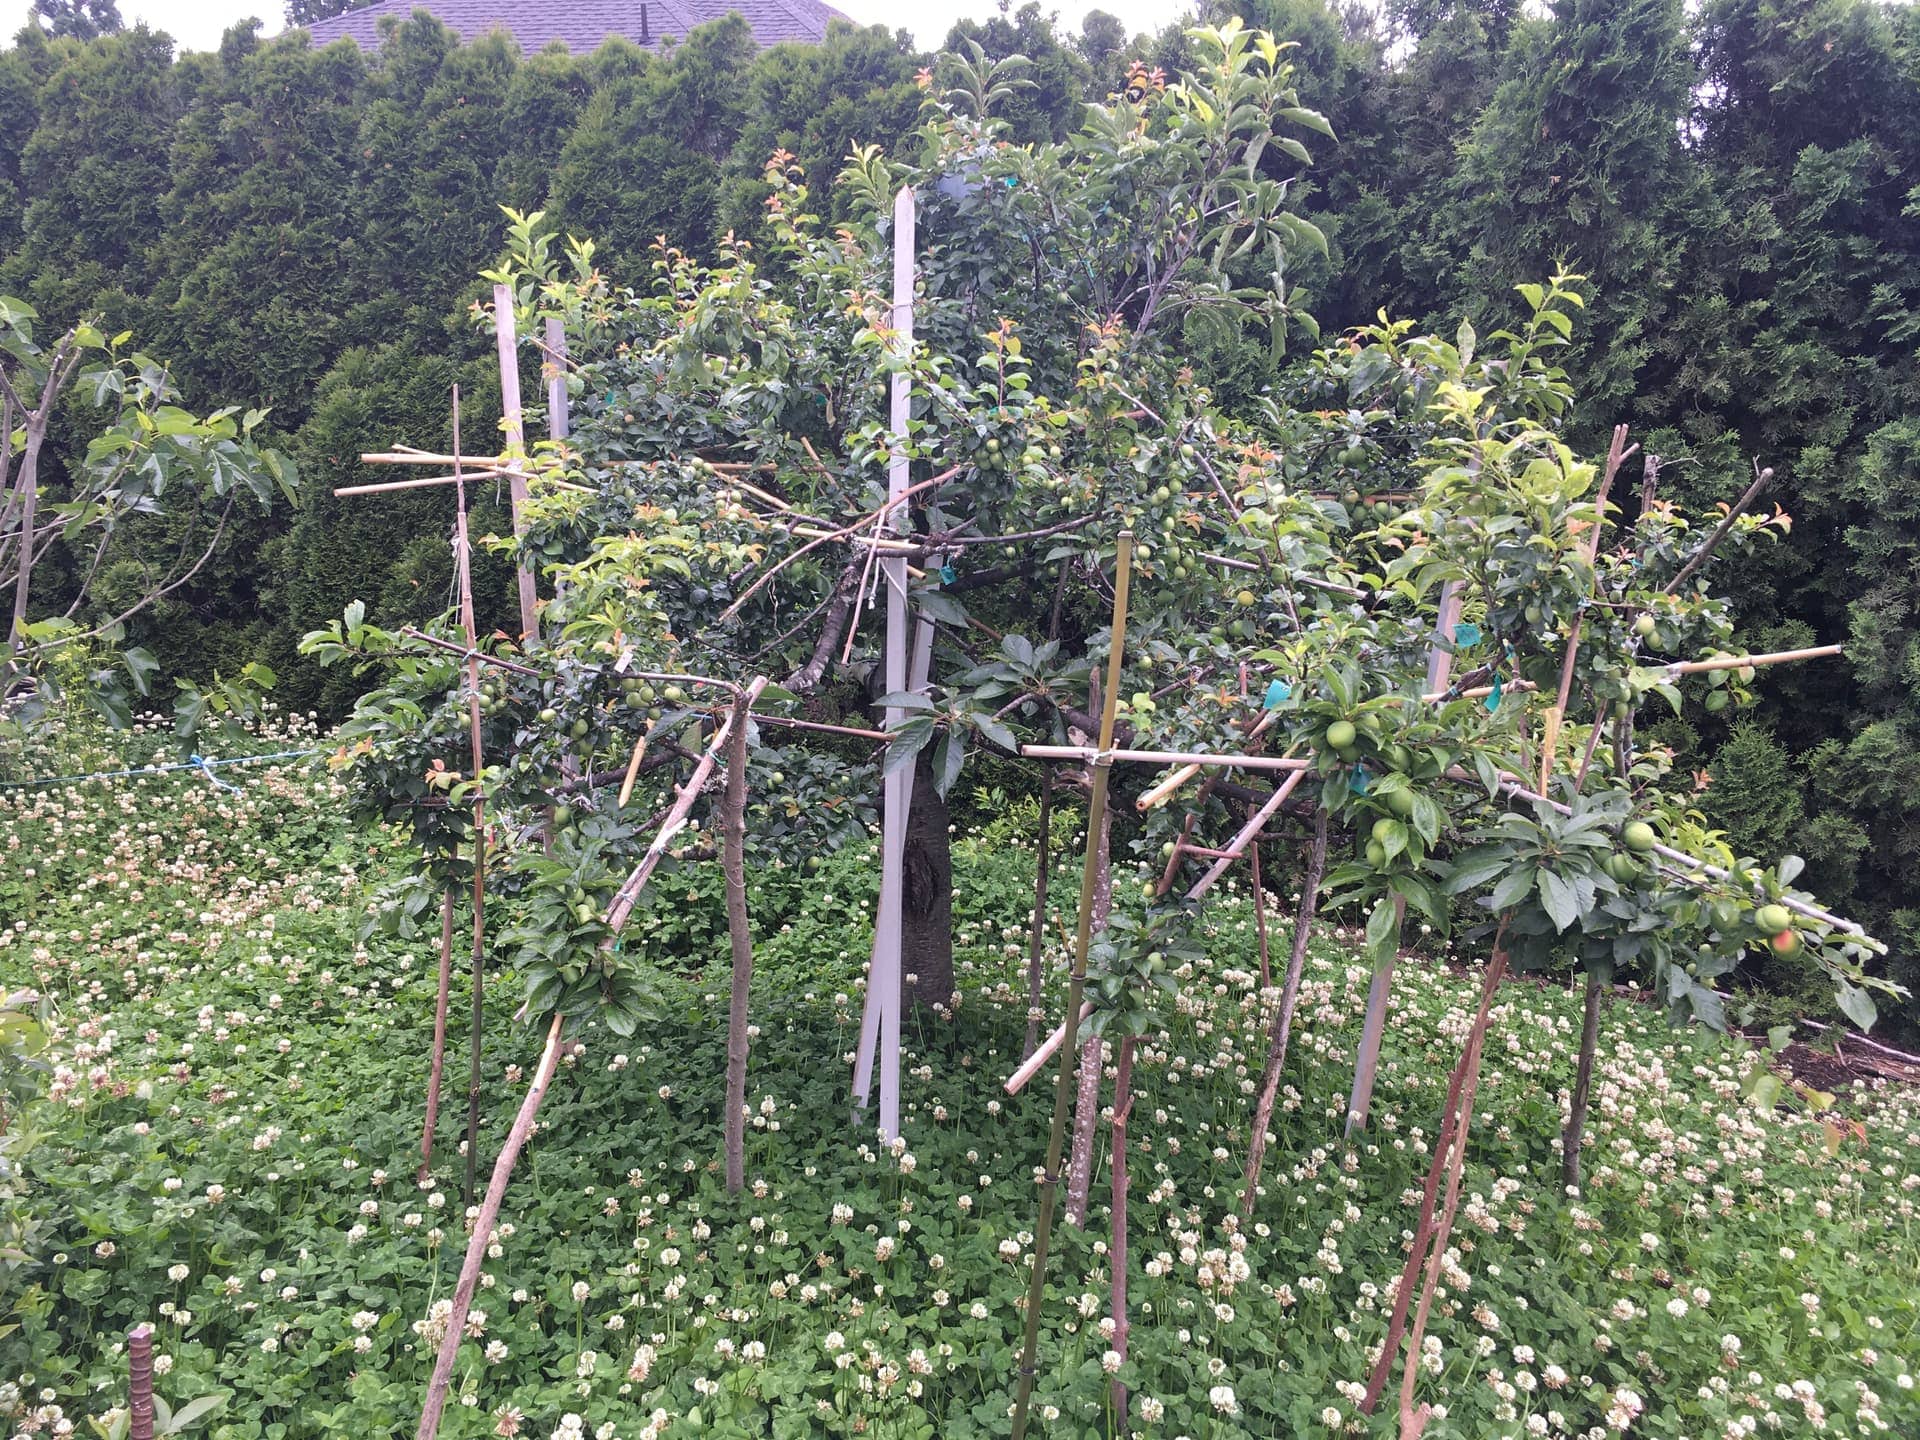
One of the most space-efficient techniques involves planting 2-4 compatible trees in a single large planting hole, spaced 18-24 inches apart. As they grow, they appear to be a single multi-trunked tree but actually produce multiple varieties with staggered harvest times.
The keys to success with this method:
- Choose varieties with similar vigor and growth habits
- Use compatible rootstocks (ideally the same type)
- Prune regularly to maintain balance between trees
- Plant at least 6 feet away from other tree groupings

I was skeptical when I first tried this with three apple varieties in my small yard. But five years later, that single “hole” gives me apples from July through October, and the trees have grown into a beautiful, naturally balanced form.
Espalier: Living Fences That Bear Fruit
Espalier involves training trees to grow flat against a wall, fence, or trellis system. This ancient technique can fit fruit production into incredibly narrow spaces—even a 2-foot-wide strip along a fence can accommodate multiple espaliered trees.
Popular espalier forms include:
- Horizontal cordon: Single trunk with horizontal branches
- Fan shape: Branches radiating from a short trunk
- Belgian fence: Diagonal branches creating a diamond pattern
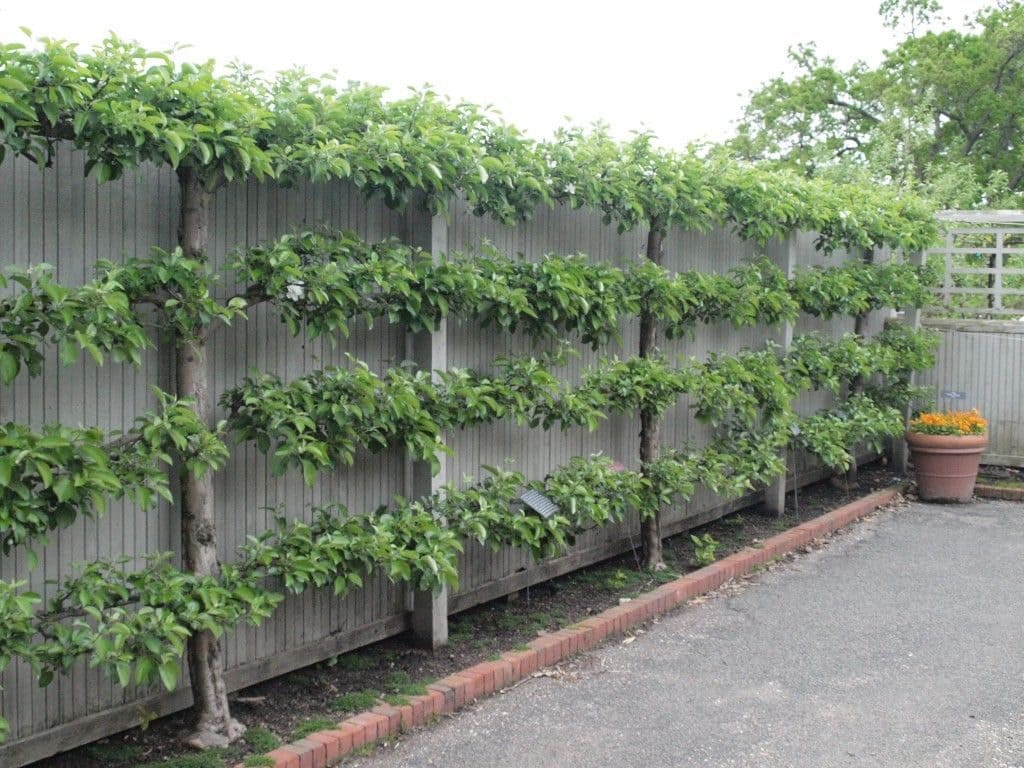
Espalier trees require more initial training and annual pruning, but they’re incredibly productive for their footprint and create stunning living architecture in your landscape.
Container Growing: Portable Orchards
Don’t let limited space or rental housing stop you from growing fruit. Many trees thrive in large containers (20-30 gallons minimum), giving you the flexibility to move them for optimal sun, protect them from severe weather, or take them with you if you relocate.
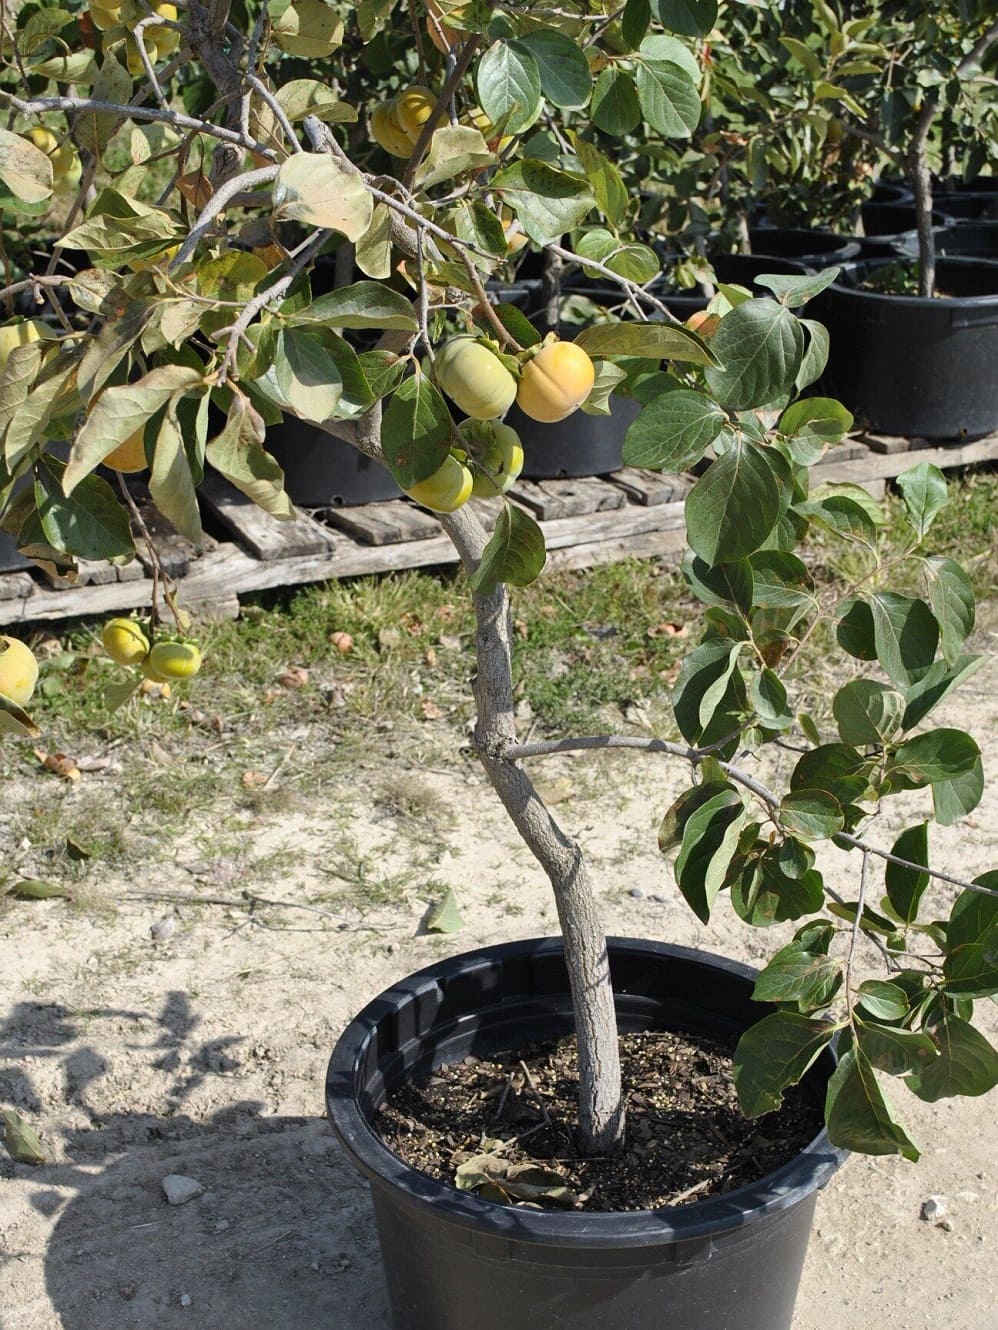
Container-grown trees require more attention to watering and fertilizing, but they also give you complete control over soil conditions. This is particularly valuable for plants with special requirements, like blueberries that need acidic soil.
Planting Your Mini Orchard: Getting Off to the Right Start
The Critical First Steps
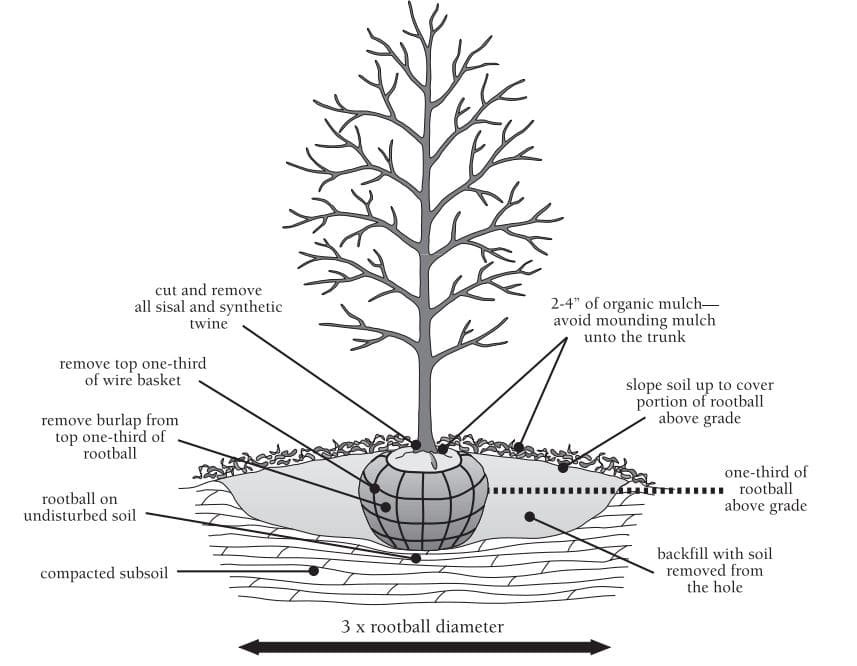
Proper planting technique can determine whether your trees thrive for decades or struggle from day one. Here’s what matters most:
- Hole Size: Dig holes only slightly larger than the root ball—huge, amended holes can actually hinder root development by creating a “bathtub effect” where roots circle within the improved soil rather than spreading into native soil.
- Planting Depth: This is crucial. The graft union (the swollen area where the scion meets the rootstock) should be 2-3 inches above the final soil level. Planting too deep can kill the tree or negate the rootstock’s dwarfing effects.
- Root Preparation: Gently tease apart circled roots, but don’t be too aggressive. Some trees, particularly those grown in containers, benefit from making shallow vertical cuts in the root ball to encourage outward growth.
- Backfilling: Use the native soil you removed—don’t amend it heavily. You want roots to spread into the surrounding soil, not stay confined to a rich pocket that differs dramatically from the native ground.
- Initial Watering: Water thoroughly after planting to eliminate air pockets, then maintain consistent moisture (not soggy) during the establishment period.
Spacing for Success
Spacing depends on your goals and maintenance willingness:
- Ultra-intensive: 3-4 feet apart (requires dedicated pruning)
- High-density: 4-6 feet apart (good balance of production and maintenance)
- Moderate spacing: 6-8 feet apart (easier maintenance, room for growth)
I space my trees about 6 feet apart, which gives me room to walk between them with a wheelbarrow while keeping them close enough to create beneficial microclimates and efficient use of space.
The First-Year Priority: Establishment Over Production
This might be the hardest advice to follow, but it’s crucial: remove any flowers or fruit that develop in the first year after planting. Yes, it’s heartbreaking to pinch off those first little apples, but you’re making an investment in your tree’s future.
A tree that spends its first year developing a strong root system will reward you with decades of healthy production. One that exhausts itself trying to ripen fruit while establishing roots often struggles for years.
Mulching: Your Secret Weapon
Apply a 3-4 inch layer of organic mulch (wood chips, shredded leaves, or straw) in a 4-foot circle around each tree, keeping the mulch 6 inches away from the trunk. Mulch conserves moisture, suppresses weeds, moderates soil temperature, and slowly breaks down to feed soil organisms.
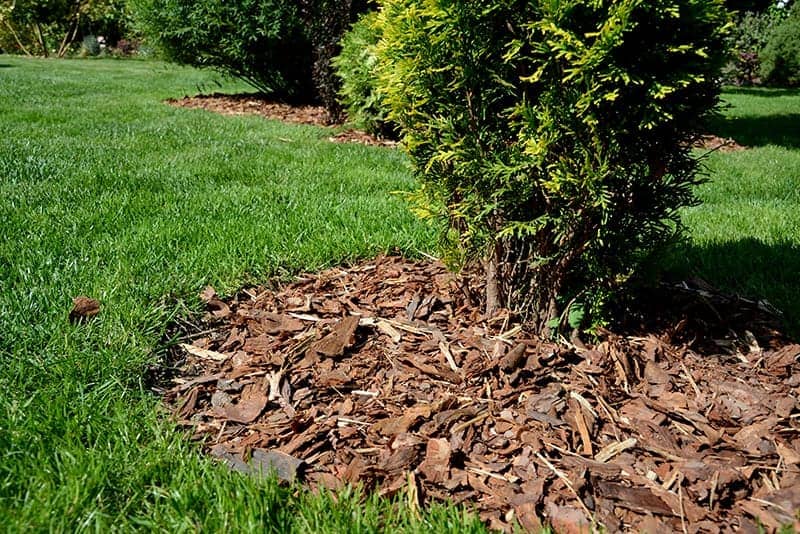
Good mulch can reduce your watering needs by 50% and virtually eliminate weeding around your trees. It’s one of the highest-impact, lowest-effort things you can do for your orchard.
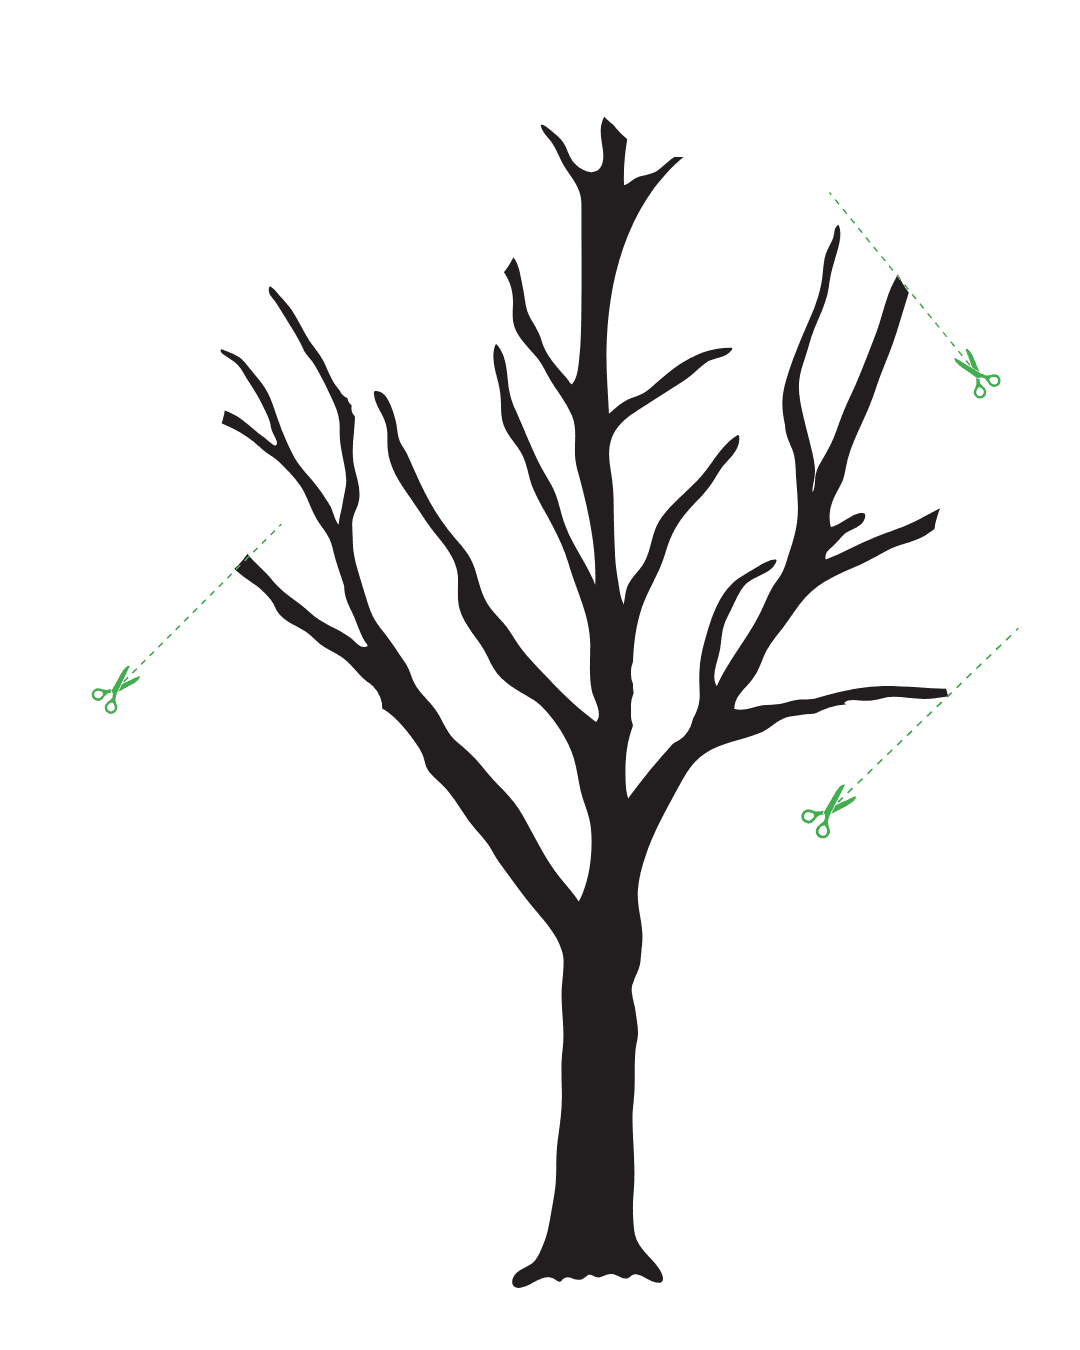
The Art of Summer Pruning: Your Secret to Manageable Trees
Summer pruning is what makes backyard orchard culture possible, but it can seem intimidating at first. The good news? It’s more forgiving than you think, and the trees will guide you.
When to Summer Prune
The ideal timing is late June through early August in most climates—after the spring growth flush has finished but while the tree is still actively growing. You’ll notice new growth slowing down and beginning to “harden off” from green, flexible shoots to brown, woody stems.
In warmer climates, you might have multiple growth flushes, so you can prune after each one. The key is pruning during active growth, not during dormancy.
The Science Behind Summer Pruning
Summer pruning works because you’re removing leaves during peak photosynthesis season. Since leaves are the tree’s solar panels, removing them reduces the tree’s ability to manufacture and store energy for explosive spring growth.
The result? Smaller, more manageable trees that redirect energy into fruit bud formation rather than endless vegetative growth.
What to Remove
Focus on these priorities in order:
- Water sprouts: Vigorous vertical shoots growing from main branches—these rarely produce fruit and steal energy from productive wood
- Suckers: Growth from the base of the tree or below the graft union—these come from the rootstock and won’t produce your desired fruit
- Diseased or broken wood: Remove any time of year for tree health
- Crossing or rubbing branches: Branches that will damage each other as they grow
- Excessive interior growth: Open up the center for air circulation and light penetration

The “Heading Back” Technique
For size control, cut new growth back by about half during summer pruning. Make cuts just above an outward-facing bud to encourage horizontal branching rather than vertical growth. This technique encourages the development of fruit buds rather than more vegetative growth.
I remember being nervous about cutting back what seemed like healthy growth on my young pear trees. But the following spring, those pruned branches were loaded with flower clusters, while the unpruned sections produced mostly leaves.
Year-by-Year Pruning Guide
- Year 1: Focus on structure, remove competing leaders, establish main branches
- Year 2: Continue structural development, begin heading back vigorous growth
- Year 3: Establish final height, focus on encouraging fruiting spurs
- Year 4+: Maintenance pruning to control size and encourage continued fruit production
Fruit Thinning: The Counterintuitive Key to Better Harvests
Fruit thinning might seem wasteful, but it’s essential for several reasons: preventing branch breakage, ensuring good fruit size and quality, and avoiding the exhaustion that leads to biennial bearing (producing heavily one year, then little the next).
When to Thin
The best time is about 4-6 weeks after bloom, when fruits are nickel to quarter-sized. At this stage, the tree has naturally dropped some fruits, and you can see which ones are developing well.
How Much to Thin
General guidelines:
- Apples and pears: Space fruits 6-8 inches apart, one per cluster
- Stone fruits: Space 3-4 inches apart for larger fruits, 2-3 inches for smaller varieties
- Cherries: Usually don’t require thinning
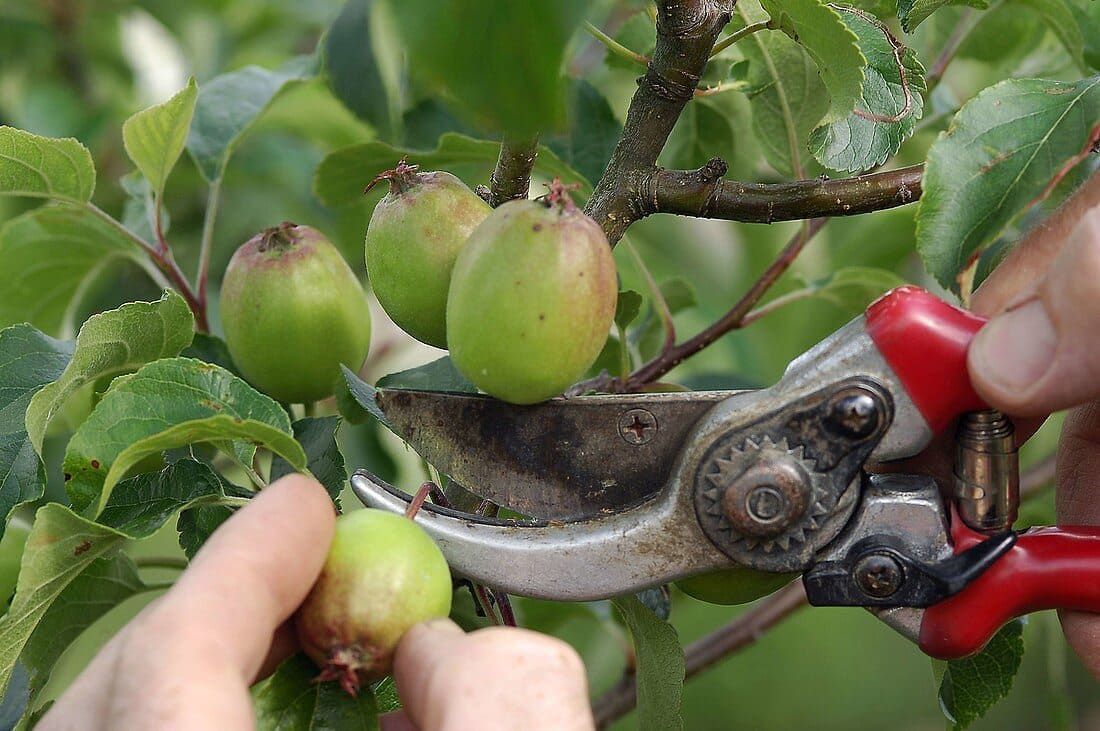
It feels brutal the first time you do it, but proper thinning often results in more total pounds of fruit because the remaining fruits reach full size and quality.
Managing Your Mini Orchard Through the Seasons
Spring: The Season of Awakening and Vigilance
Spring is when your orchard comes alive, and it’s your busiest season. Trees are leafing out, flowering, and setting fruit. This is when you’ll complete any dormant season pruning (before bud break), apply organic fertilizers, and begin monitoring for pest and disease issues.
Watch the weather during bloom time—late frosts can devastate flower buds, especially on early-blooming trees like apricots and peaches. If frost threatens during bloom, you can protect small trees with row covers or even old sheets.
Summer: Growth, Maintenance, and Early Harvests
Summer brings your first harvests and is your main pruning season. Keep trees well-watered during hot spells—stressed trees are more susceptible to pests and diseases and may drop fruit prematurely.
This is also when you’ll start learning which varieties work best in your specific microclimate. Take notes on ripening times, flavor, storage quality, and tree health. These observations will guide future planting decisions.
Fall: Harvest Celebration and Winter Preparation
Fall is the climax of your orchard year, with many varieties reaching peak ripeness. It’s also preparation time for winter—apply compost around trees, plant new additions, and clean up fallen fruit and leaves that might harbor diseases.
This is the perfect time to evaluate your successes and plan improvements for next year. Which varieties exceeded expectations? Which underperformed? What would you plant differently?
Winter: Rest, Reflection, and Planning
Winter is when your trees rest and when you can do structural pruning on dormant trees. It’s also the perfect time to study catalogs, research new varieties, and plan expansions to your orchard.
Use this time to sharpen and maintain your tools, review your notes from the growing season, and dream about next year’s possibilities.
Advanced Techniques for Maximum Production
Integrated Pest Management: Working With Nature
The best pest management starts with healthy trees in a diverse environment. Stressed trees attract pests, while vigorous trees in biodiverse settings often experience fewer problems.
Create habitat for beneficial insects by planting flowers near your orchard. Native plants are particularly valuable—they support local predator populations that help control fruit pests. A simple border of native wildflowers can dramatically reduce pest pressure.
For specific problems, start with the least disruptive solutions:
- Horticultural oil sprays during dormancy for overwintering pests
- Kaolin clay (Surround) to deter insects through physical deterrence
- Beneficial insect releases for targeted pest control
- Pheromone traps to monitor and reduce pest populations
Soil Health: The Foundation of Everything
Healthy soil creates healthy trees that resist pests and diseases naturally. Focus on building organic matter through compost, mulch, and diverse plantings rather than relying on synthetic fertilizers.
Consider planting nitrogen-fixing ground covers like clover between tree rows. This reduces mowing while naturally fertilizing your trees. Some orchardists plant beneficial herbs like comfrey and nettle, which can be harvested for compost or liquid fertilizers.
Water Management: Efficiency and Conservation
Newly planted trees need consistent moisture for the first 1-2 years while they establish. After that, deep, infrequent watering encourages deep root development and drought tolerance.
Drip irrigation is ideal for orchards—it delivers water directly to root zones while keeping foliage dry (reducing disease issues). A simple timer can automate the system, ensuring consistent care even when you’re busy or away.
Troubleshooting Common Challenges
1. “My trees are getting too big despite pruning!”
This usually means you’re not summer pruning aggressively enough, or you’re over-fertilizing with nitrogen. Summer pruning should be your primary size-control method—don’t be afraid to cut back vigorous growth by half or more during the growing season.
2. “I’m getting flowers but no fruit.”
Check these common causes:
- Poor pollination: Plant additional varieties or encourage pollinators with diverse flowers
- Late frost damage: Flowers may look normal but be internally damaged
- Insufficient chill hours: Your variety may not be suited to your climate
- Over-fertilization: Too much nitrogen promotes leaves over flowers
3. “My fruit has worms or pest damage.”
This is often variety-specific. Some fruits (like cherries) are naturally less attractive to many pests, while others (like peaches) face heavy pressure in many areas. Research pest-resistant varieties for your area, and don’t be afraid to replace problem trees with better-adapted ones.
4. “The harvest is overwhelming!”
This is a good problem to have! Plan for preservation: dehydrating, freezing, canning, or sharing with neighbors. Many successful orchardists view surplus fruit as an opportunity to build community relationships and even generate income through farmers market sales.
Container Growing: Orchards Anywhere
Don’t let apartment living or poor soil stop you from growing fruit. Container cultivation opens possibilities for anyone with a sunny balcony, patio, or small yard.
- Choosing Containers
Use containers at least 20-30 gallons for tree fruits, larger for vigorous varieties. Ensure excellent drainage—drill additional holes if necessary. Dark containers can overheat roots in summer, so consider light-colored pots or provide shade to the container while keeping the canopy in full sun.
- Soil and Nutrition
Use high-quality potting mix, not garden soil, which compacts in containers. Container trees need more frequent fertilizing since nutrients wash out with watering. A slow-release organic fertilizer applied twice yearly usually provides adequate nutrition.
- Watering Considerations
Container trees need more frequent watering, especially during hot weather. In summer, daily watering may be necessary. Mulch the soil surface to reduce water loss, and consider drip irrigation for consistent moisture.
- Winter Protection
In cold climates, container trees need protection since their roots are more exposed to freezing. Move containers to protected areas, wrap them in insulation, or bury them in mulch for winter.
Setting Realistic Expectations: The Truth About Homegrown Fruit
Let’s be honest about what backyard orchard culture can and can’t do for you.
The Incredible Benefits:
You’ll have fresher, more flavorful fruit than anything you can buy. You’ll enjoy varieties that never make it to supermarkets because they don’t ship well but taste amazing fresh. You’ll harvest tree-ripe fruit at perfect sweetness. And you’ll have the deep satisfaction of growing your own food while creating habitat for wildlife.
The Reality Check:
You won’t have perfect, unblemished fruit like the grocery store (that’s achieved through intensive spraying and careful sorting). You’ll lose some fruit to weather, pests, and diseases—budget for 60-80% of a perfect harvest in most climates.
Some years will be better than others due to weather, and yes, you’ll occasionally deal with an overabundance that needs quick processing or sharing.
Timeline for Success
Understanding the timeline helps set appropriate expectations:
- Year 1: Focus entirely on establishment—remove any fruit to help trees develop strong roots
- Year 2: Allow light harvest to taste-test varieties while trees continue establishing
- Year 3: Moderate harvest as trees begin hitting their stride
- Years 4-5: Good harvests with trees reaching productive maturity
- Years 6+: Full production from a well-established system
Frequently Asked Questions
- Q: How much space do I really need for a backyard orchard?
A: You can create a productive mini orchard in as little as 200-300 square feet using high-density techniques. Even a 10×10 foot area can accommodate 4-6 dwarf trees. For reference, four trees planted in one hole need about the same space as a large garden shed.
- Q: What’s the best rootstock for backyard growing?
A: Semi-dwarf rootstocks usually offer the best balance of manageable size, good productivity, and tree longevity. True dwarf rootstocks keep trees smaller but may require permanent staking and more intensive care.
- Q: Can I really plant four trees in one hole?
A: Absolutely, but success depends on choosing varieties with similar vigor and compatible rootstocks. Plant them 18-24 inches apart in a large hole and prune regularly to maintain balance. This technique is particularly effective for apples and stone fruits.
- Q: How do I deal with too much fruit at harvest time?
A: Plan ahead for preservation methods: dehydrating, freezing, canning, or making preserves. Build relationships with neighbors who appreciate fresh fruit. Some orchardists even sell surplus at farmers markets or use excess fruit for home brewing.
- Q: What if I rent and can’t plant permanent trees?
A: Container growing is your answer. Use large pots (20+ gallons) and dwarf varieties. Many successful container orchards produce substantial harvests while remaining completely portable.
- Q: How much maintenance does a backyard orchard really require?
A: After establishment, expect 10-20 hours per year for a small orchard: summer pruning (4-6 hours), harvest and cleanup (6-10 hours), and seasonal tasks like fertilizing and pest monitoring (4-8 hours). It’s roughly equivalent to maintaining a flower garden of the same size.
- Q: What fruits are easiest for beginners?
A: Start with naturally disease-resistant fruits like figs, persimmons, or Asian pears. Among traditional fruits, disease-resistant apple varieties and most stone fruits (peaches, plums) are relatively forgiving. Avoid European plums and sweet cherries in areas with high disease pressure.
Your Orchard Journey Starts Now
Creating a backyard orchard using these principles isn’t just about growing fruit—it’s about fundamentally changing your relationship with your outdoor space and your food. There’s something deeply satisfying about stepping outside and harvesting breakfast from trees you planted and nurtured yourself.
The beauty of backyard orchard culture lies in its scalability. You can start with a single dwarf apple tree in a container and gradually expand as you gain experience and confidence. Each tree teaches you something new about your microclimate, your preferences, and the art of fruit growing.
Start small and build on success. Choose 2-3 varieties that excite you and are well-suited to your climate. Pay attention to what works in your specific conditions rather than trying to replicate someone else’s orchard. Every successful fruit grower I know started with more enthusiasm than knowledge and learned through experience.
Remember that some of the most productive and beautiful home orchards I’ve visited started with a single tree planted by someone who thought they “didn’t have enough space for fruit trees.” That person learned, experimented, adapted their techniques to their situation, and gradually created their own fruit paradise—one tree at a time.
Your backyard—no matter how small—has more potential than you realize. With the principles of backyard orchard culture, you’re not just planting trees. You’re cultivating abundance, building food security, creating wildlife habitat, and establishing a legacy that will feed your family for decades to come.
The best time to plant a fruit tree was 20 years ago. The second-best time is right now. What variety will you start with?
Apple🍎 juice